What Is The Anatomy Of A Caliper?
The anatomy of a caliper includes several key components that work to together to produce accurate measurements. The majority of calipers feature a beam with a main scale, inside and outside jaws for measuring dimensions, and a depth probe for depth measurements. A sliding mechanism, thumb roller, and locking screw are also universal parts of calipers. Readouts are different depending on if it is a vernier, dial, or digital caliper, but will still have the same structure overall.
Calipers may look like a simple tool to use at first, but each part of a caliper plays a crucial role in producing accurate, precise, and repeatable measurements. Whether your choice of a caliper is a vernier, dial, digital, or even a special type of caliper, it is crucial to know the anatomy of your caliper so that you can use it more effectively and maintain it properly.
This article will break down the anatomy of a caliper and explain each component’s function.
In This Article:
- The Common Parts of a Caliper
- Differences Between Vernier, Dial, and Digital Calipers
- Anatomy of a Caliper FAQs
This is the sixth article in our series, The Definitive Guide to Calipers.
If you missed the last part of the series: What Are The Different Caliper Sizes?, check it out now!
The Common Parts Of A Caliper
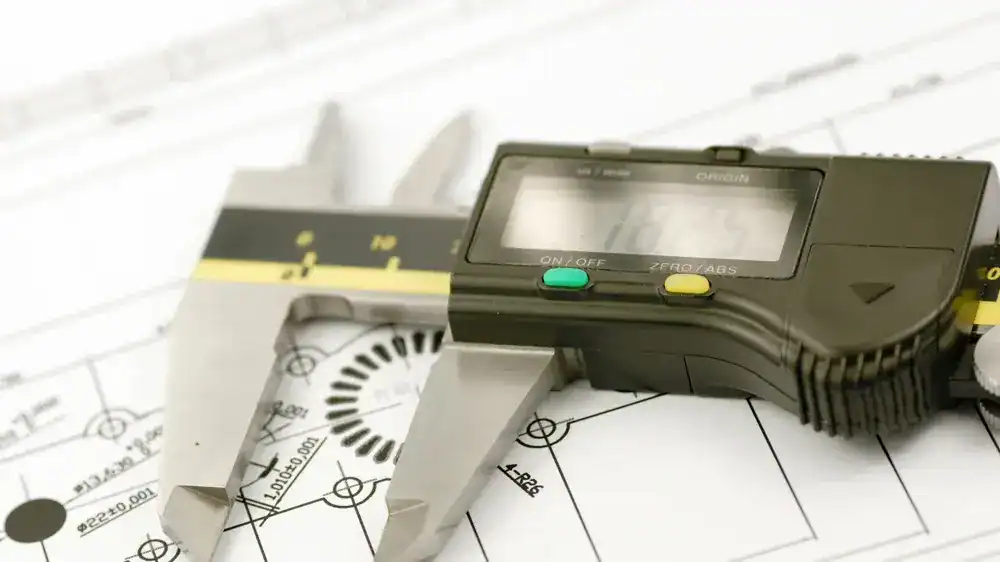
While each type of caliper has its own way of measuring and reporting that measurement, the construction of each is relatively similar. Regardless of exact type, nearly every caliper will have the following features. For the sake of this post, we will compare the main parts of a caliper on a digital caliper. You will find these parts on vernier, dial, and digital calipers.
Beam
The beam is where the main scale sits and where the slider can slide back and forth across the caliper. In all honesty, the beam is the backbone of the caliper.
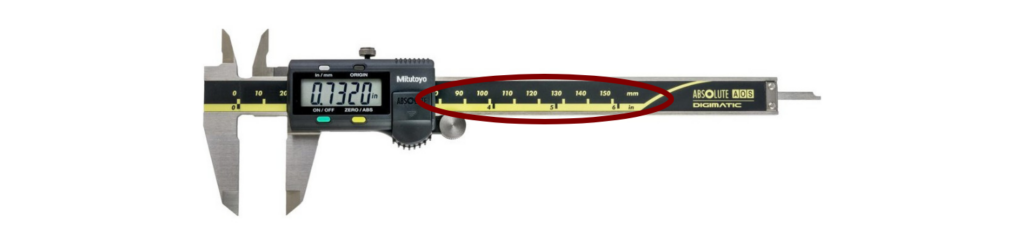
Main Scale
The main scale is the primary measurement scale on the caliper. It is typically graduated in millimeters or inches and is used as the reference scale.
Jaws
The jaws are the moving parts of the caliper that are adjusted to the dimensions of the object being measured. They are typically made of hardened steel.
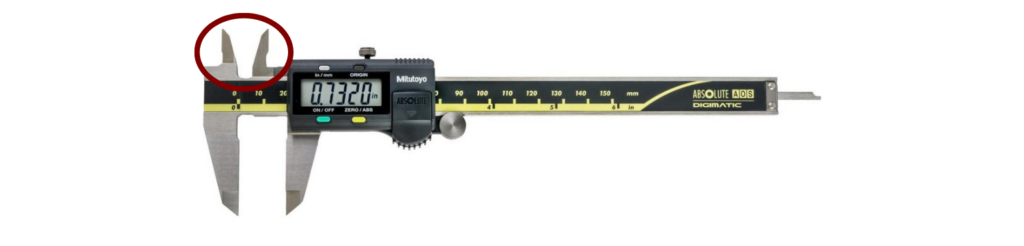
Outside Jaws
The outside jaws of a caliper are typically larger and are the most commonly used jaws of the caliper. They are used to measure the outside diameter, length and width of an object.
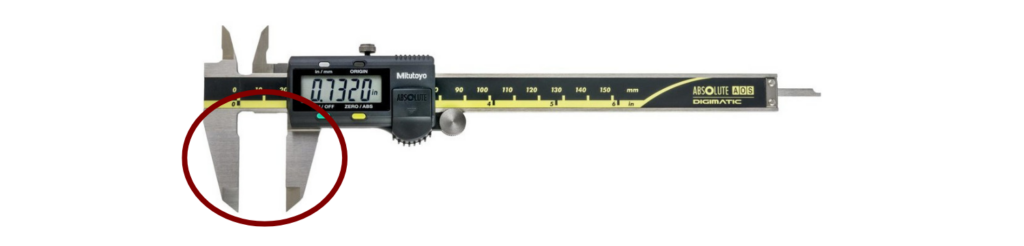
Inside Jaws
The inside jaws of a caliper are typically smaller than the outside jaws. They are used to measure internal dimensions of a part, such as the diameter of a hole or the distance between two features.
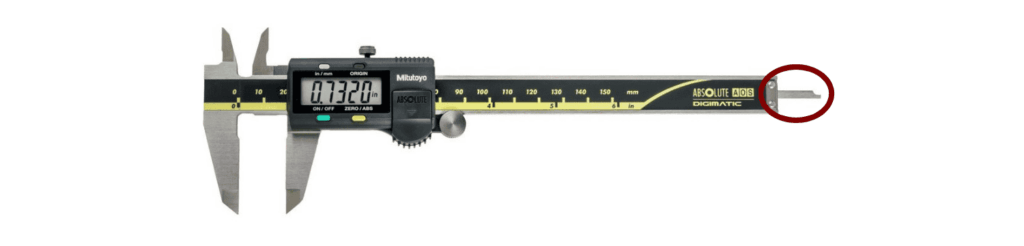
Depth Probe
The majority of modern calipers have a depth probe that can be used to take depth measurements.
Slider
The slider is the part of the caliper that holds the jaws in place and allows them to move along the main scale.
Locking Screw
The locking screw is used to lock the jaws or the slide in place once a measurement has been taken.
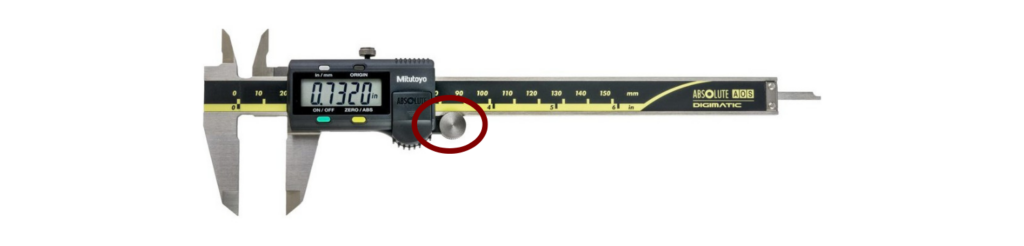
Thumb Roller
The thumb roller is used to adjust the jaws or the slide along the main scale.
Differences Between Vernier, Dial, & Digital Calipers
The differences between each type of caliper are typically found in the method of displaying the measurement that is unique to each type:
Vernier Calipers
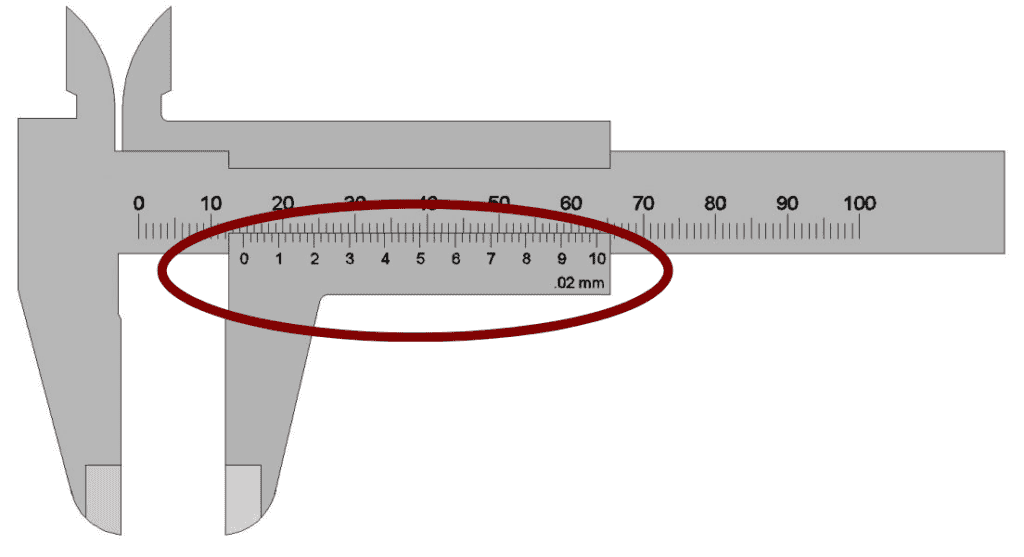
Vernier Scale
The vernier scale is a secondary scale to the main scale that is used to read measurement more accurately than the main scale alone, by dividing the smallest increments of the main scale into much more precise increments. It is typically graduated in tenths or hundredths or thousandths of a millimeter or inch.
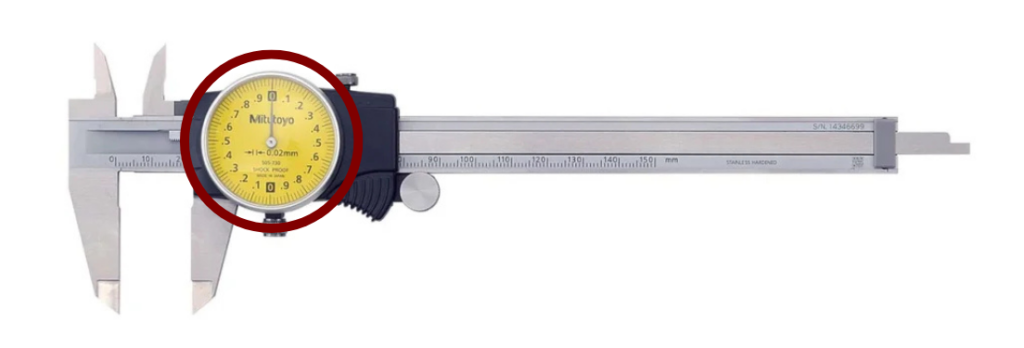
Dial Calipers
Dial Readout
Similar to the vernier scale, the dial on a dial caliper is used to read, more accurately, the final fraction of an inch (or millimeter). It is typically located at the top of the caliper, near the top jaws.
The dial contains a pointer that rotates around the housing and points to the measurement value, much like the hands on a clock. Around the edge are the graduation markings of the final inch (or millimeter). These markings are typically graduated in increments of hundredths or thousandths of whatever until the dial caliper measures in.
One full rotation of the dial typically represents an inch, tenth of an inch, or one millimeter.
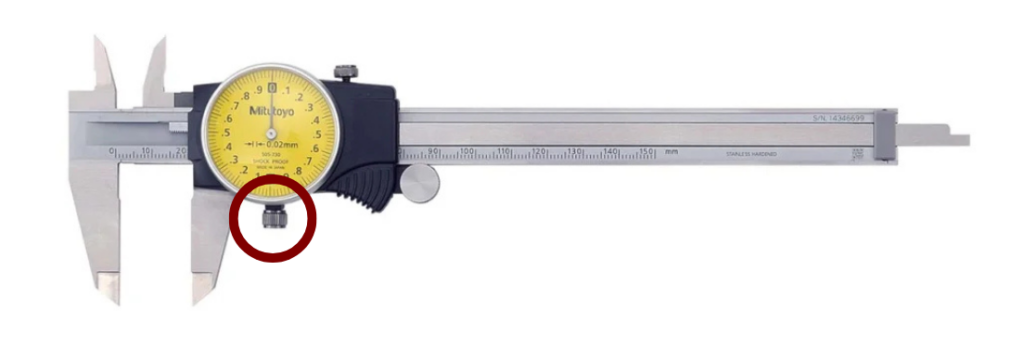
Bezel Lock
The bezel lock is usually present on the dial caliper. This acts like the zero button on the digital caliper and allows the user to set the dial back to zero before taking a measurement. This allows for more precise measurement by zeroing the measurement before taking it.
Digital Calipers
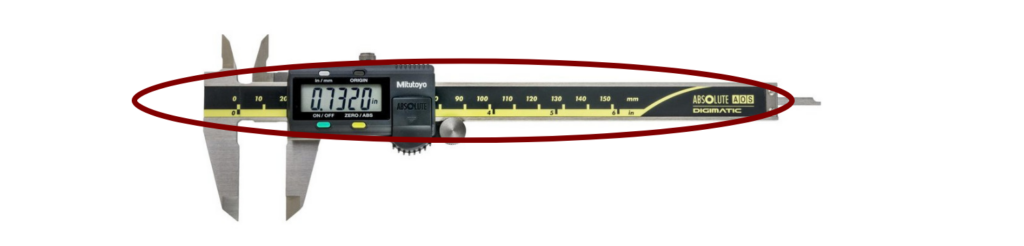
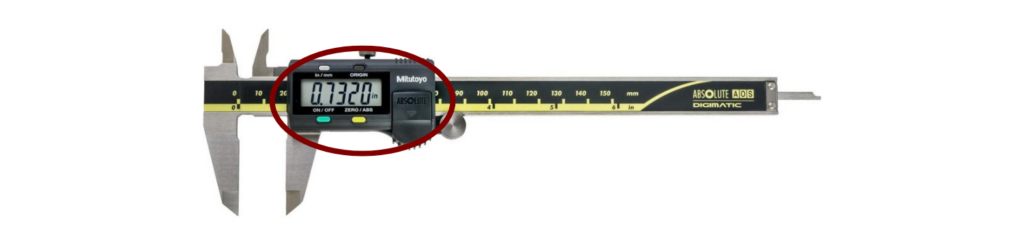
Digital Display
The digital display typically consists of a LCD (Liquid Crystal Display) or LED (Light Emitting Diode) screen that shows the measurement value in millimeters or inches, depending on the caliper’s settings. The digital display is usually divided into increments of 0.01mm or 0.0005 inches.

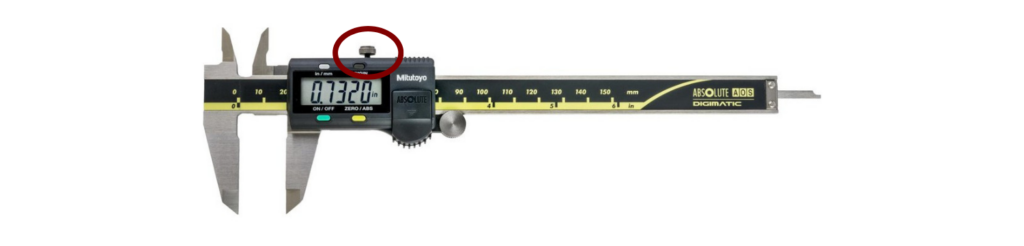
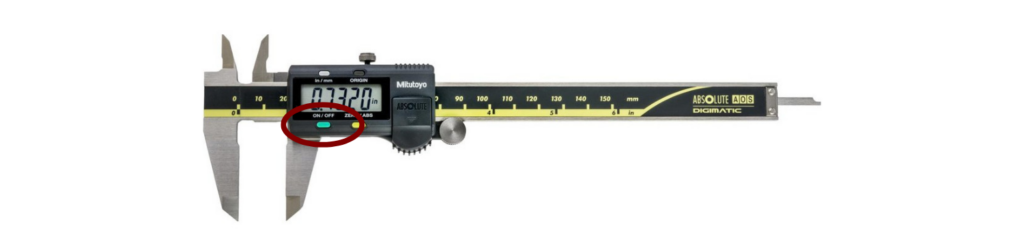
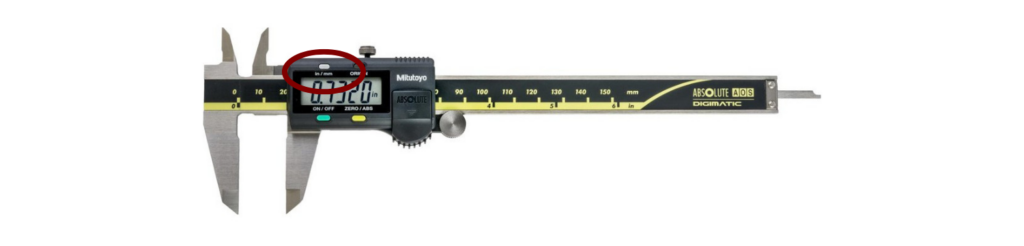
On/Off Button
This button is used to turn on and off the digital caliper. Make sure to turn off your caliper after use to save the battery life.
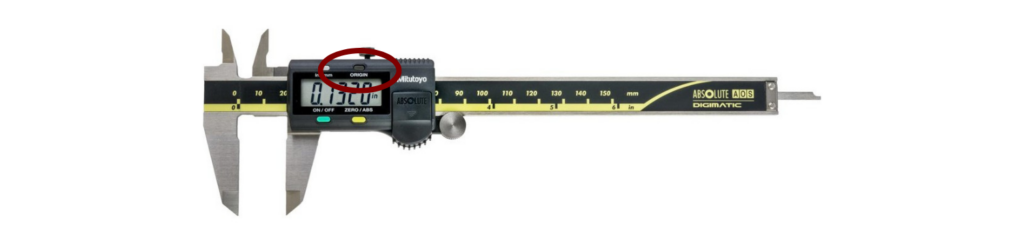
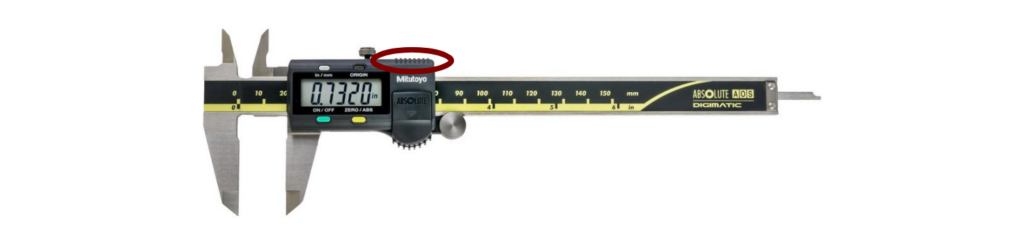
Origin Button
The origin button often gets confused with the zero/abs button. What the origin button does is sets the absolute zero that the tool will reference by default. For example, we will set the origin at 1 inch. If you measure anything below that 1 inch origin it will read as a negative number where anything measuring above that 1 inch origin will start at 0.000 and go up from there. If you turn off the caliper and turn it back on it will reference from that 1 inch origin.
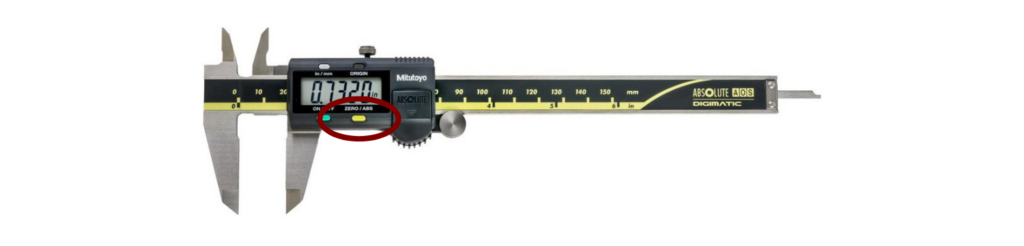
Zero/ABS Button
The zero/abs button is used to provide a temporary, incremental, or relative zero point at any position on the caliper, which would be used for measuring the difference between two parts, rather than the absolute size. While zeroing ensure accurate relative measurements during use, having your caliper calibration periodically is necessary to verify the caliper’s overall accuracy against traceable standards.
Unit Button
The digital display usually has a button or switch to change the unit of measurement between millimeters and inches, depending on the caliper’s model.
Data Output
The port is used to connect the caliper to a computer or other device for data storage or analysis and is typically found on top of the caliper.
Conclusion
By understanding the anatomy of your caliper, you are not not only gaining confidence in using your caliper, but you are also learning how to choose the right type for your measurement needs. Each component of the caliper, from the basic scale and jaws to the advanced digital features, is what makes the caliper a cornerstone tool in measurement.
Anatomy Of A Caliper FAQs
Q1. Do all calipers have a depth probe?
Not always. Some basic caliper models do not include this feature, but most modern calipers will have a depth probe.
Q2. Which type of caliper is easiest for beginners?
The digital caliper is typically the easiest type of caliper to learn. They provide direct readout without requiring interpretation like the vernier and dial calipers require.
Q3. Can calipers measure both inches and millimeters?
Yes. Digital calipers often have a feature that allow you to switch between the units at a touch of a button. However, vernier and dial calipers are usually fixed to one unit.
The Definitive Guide To Calipers
What’s Next: How Accurate Is Your Caliper And Why Does That Matter?
You have learned about the different kinds, the different sizes, and now the anatomy of a caliper.
The next post in this series will focus on the accuracy of the caliper and why it is important to have an accurate caliper. Let’s get started and head to Section 7: Caliper Accuracy.

ISO/IEC 17025 Accredited Caliper Calibration
Fox Valley Metrology offers precise caliper calibration for any make or model. Our ISO/IEC 17025 accreditation guarantees testing to the highest industry standards. We offer fast, reliable in-lab or onsite calibration services to fit your needs and schedule.
- ✓ ISO/IEC 17025 accredited calibration vendor
- ✓ Broadest calibration scope in the industry
- ✓ 3-5 day turnaround time in-lab calibrations
- ✓ Pickup and delivery service options
- ✓ Onsite calibration available