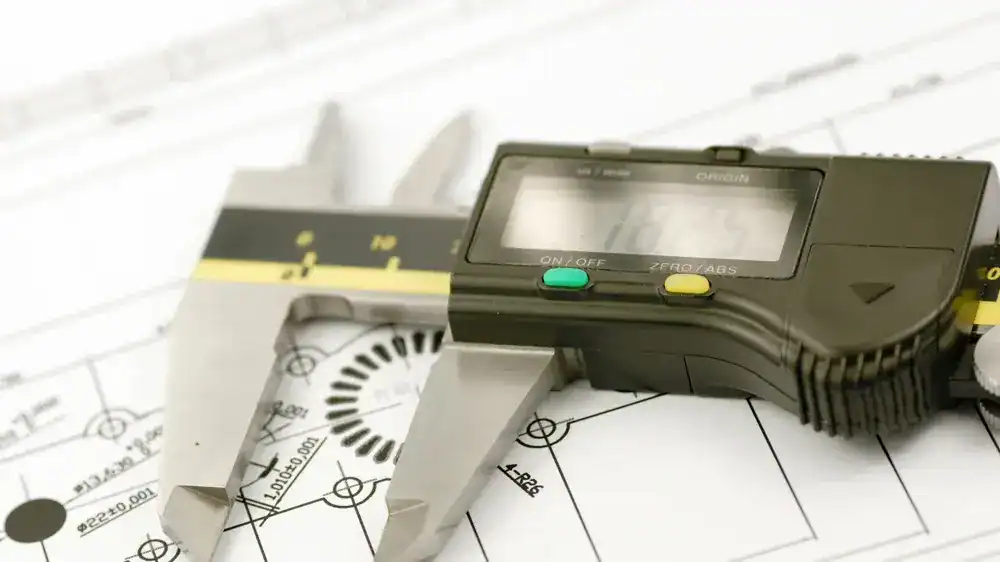
How Do You Use A Caliper?
To use a caliper accurately, first identify the type of measurement needed and clean the caliper and the part being measured. Unlock and zero the caliper, then open the jaws or extend the depth rod as required. Gently position the caliper square to the part, apply light, consistent pressure, and lock the measurement. Read the scale or display carefully, record the result, and secure the caliper after use.
Using a caliper can be relatively straightforward, but the technique that you use while handing a caliper can be the difference between an accurate measurement and a costly mistake. How you use a caliper will slightly vary depending on what type of caliper you are using (vernier, dial, or digital) and the measurement style (outside, inside, and depth), but if you follow these main techniques, you will have precise measurements every time.
In this article, we still go into a step-by-step guide on how to use your caliper to get the most accurate results.
In This Step By Step Guide:
- Identifying the Measurement
- Cleaning the Object
- Unlocking the Caliper
- Zeroing the Caliper
- Opening the Jaws
- Taking the Measurement
- Reading the Measurement
- Recording the Measurement
- Securing Your Caliper
- Common Errors to Avoid While Using a Caliper
- How to Use a Caliper FAQs
This is the tenth article in our series, The Definitive Guide to Calipers.
If you missed the last part of the series: What to Consider When Buying a Caliper, check it out now!
1. Identifying The Measurement
Before you start measuring, you will need to determine what you are measuring. Are you going to measure an internal dimension, such as that of a diameter of a hole? Are you going to be measuring an external dimension such as that of a width of a piece of metal? You could even be measuring a depth dimension like a slot or cavity. Knowing what you are going to measure upfront will allow you to use the correct jaws or depth rod.
2. Cleaning The Object
Look to see if the object you are measuring is dirty. Clean that part to be measured thoroughly, removing dirt and debris. When measuring this precisely, even the tiniest specks can throw off your readings and can cause inaccurate measurements/
3. Unlocking The Caliper
If your caliper has a locking screw on it, make sure to unlock it so the slider can move freely across the caliper.
4. Zeroing The Caliper
The process of zeroing a caliper, also known as “zeroing out” or “zero adjustment”, is the process of adjusting the caliper so that the measurement reading is set to zero. This allows for more precise measurements by eliminating any accumulated measurement error. Zeroing a caliper is a simple process that can be done in a few steps.
4.1. Zeroing a Vernier Caliper
To zero a vernier caliper, first open the jaws of the caliper to their maximum width. Then, adjust the thumbscrew or locking screw until the vernier scale lines up exactly with the main scale, This will set the caliper to zero.
4.2. Zeroing a Dial Caliper
To zero a dial caliper, first open the jaws of the caliper to their maximum width. Then, use the thumbscrew to adjust the jaws or slide until the needle on the dial points to zero by using the bezel lock. This will set the caliper to zero.
4.3. Zeroing a Digital Caliper
To zero a digital caliper, first open the jaws of the caliper to their maximum width or extend the depth probe to its maximum length.
- Locate the zero button or zero adjustment button on the caliper. Is it usually located on the top or side of the caliper.
- Press and hold the zero button until the display reads zero or until the caliper beep. This will set the caliper to zero.
- Repeat the process if the zero button is not working properly or if the calipers does not beep.
5. Opening The Jaws
The next step you want to take is to open the jaws of the caliper. On most calipers, this can be done by turning the thumb wheel or ratchet. Make sure that the jaws are fully open and not touching each other.
6. Taking The Measurement
Now it is time to take your measurement. However, there are different approaches for each type of measurement.
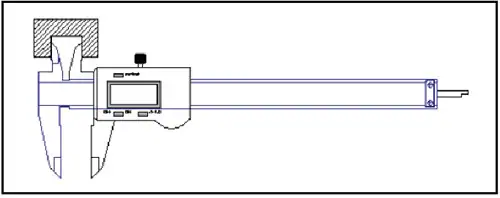
6.1. External Measurements
- First, open the outside jaws of the caliper to be larger than the dimension you are planning on measuring.
- Then, place the outside jaws around the object you want to measure, making sure that the jaws are parallel to the object.
- Gently close the jaws until they are snug around the object, but not tight. Do not apply excessive force where you may damage the jaws or the object you are measuring.
- Lock in the scale one you have your measurement so you do not lose your measurement.
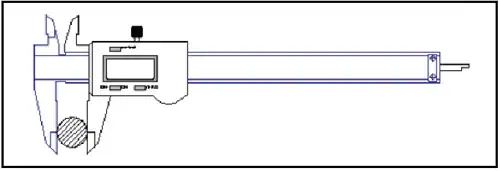
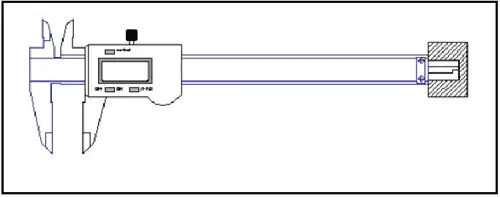
6.2. Internal Measurements
- Keep the inside jaws of the caliper closed and insert the jaws inside the dimension you are planning on measuring, making sure the jaws are parallel to the object.
- Slowly open the jaws until they are firm against the edge of the inside surface. Again, do not apply excessive force or you may damage the caliper or the object being measured.
- Lock in the scale one you have your measurement so you do not lose your measurement.
6.3. Depth Measurements
- Position the caliper so that it is parallel to the dimension you are trying to take.
- Place the end of the main scale, so that it is resting on top of the part. Make sure that it is oriented in such a fashion that the depth rod will be able to extend freely.
- Slowly open the jaws of the caliper, so that the depth rod protrudes from the bottom. Continue doing so until the rod is firmly against the bottom of whatever dimension you are taking the measurement on. Again, do not apply excessive force here to prevent damage.
- Lock in the scale one you have your measurement so you do not lose your measurement.
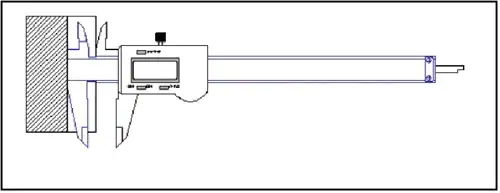
6.4. Step Measurements
- Position the caliper on the step feature and place the the fixed measuring face on the lower surface of the step.
- Extend the sliding face until it rests flat on the upper surface.
- Keep the caliper square to the part so both measuring faces are fully seated against the step surfaces.
- Close the jaws until both faces contact the step firmly, once again do not apply excessive force which can cause damage to your caliper or cause a distorted measurement.
- Lock in the scale one you have your measurement so you do not lose your measurement.
7. Reading The Measurement
Look at the scale on the caliper and read the measurement. Keep in mind the type of caliper you are using as a vernier, dial, and digital caliper all have different ways of reading the measurement you take. If you are using a vernier caliper, pay attention to the main scale and vernier scale. If you are using a dial caliper, pay attention to the main scale and the dial. Digital calipers are far and away the easiest to read and require only taking the reading right from the digital display.
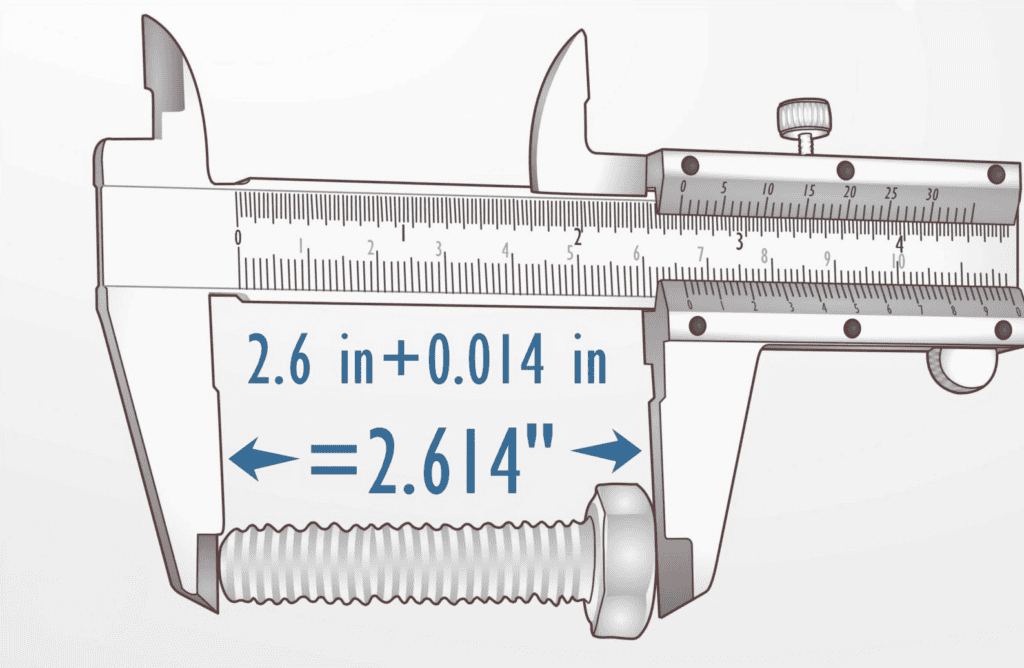
Reading a Vernier Caliper
Vernier calipers are tricky at first to read, but with practice, the reading process on these calipers become second nature.
1.
Identify the division on the main scale that is immediately to the left of the zero mark on the vernier scale. This gives you the whole number part of your measurement.
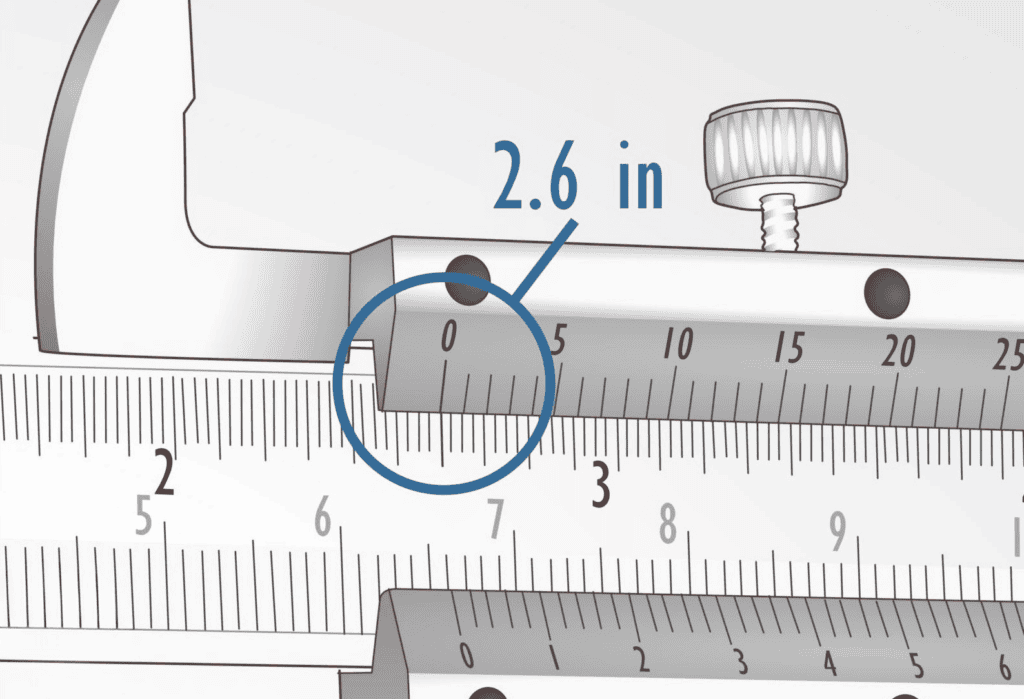
2.
Find the line on the vernier scale that perfectly aligns with a line on the main scale. Now the number of this line on the vernier scale will represent the fraction part of your measurement.
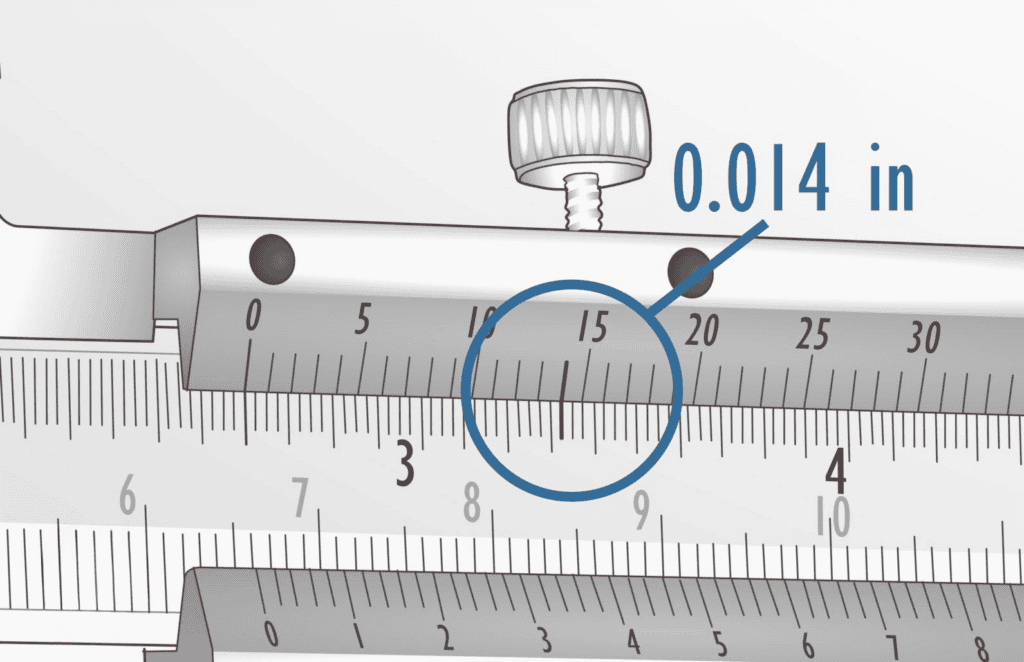
3.
Add the whole number from the main scale to the fractional part of the vernier scale. This gives you the final measurement.
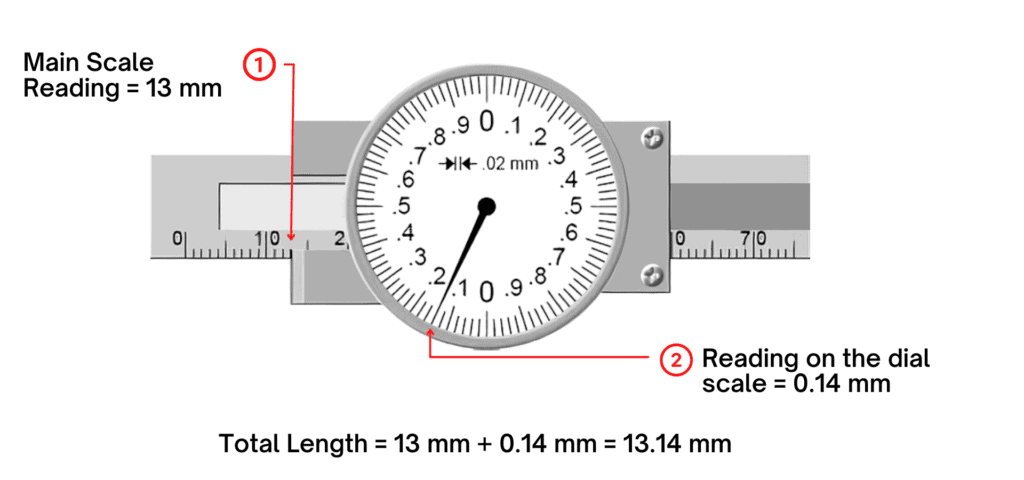
Reading a Dial Caliper
Dial calipers are often easier to read than vernier calipers due to the fact that the dial caliper makes the fractional part clear at glance. However, they still require a close eye to ensure that the needle is aligned properly.
1.
Read the measurement on the main scale to determine the last major graduation the measurement passed.
2.
Look at the dial to find the value of where the needle is pointing.
3.
Your final measurement is the number of the main scale plus the decimal fraction indicated by the position on the dial.
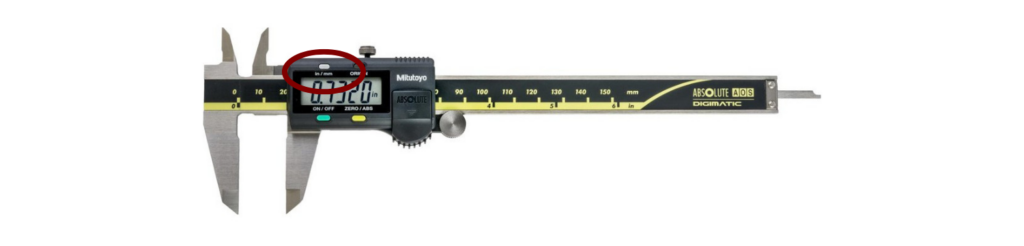
Reading a Digital Caliper
Digital calipers are by far the most user friendly type to read. Their clear displays and conversion features make them ideal for quick and repeatable measurements.
1.
Line up the measurement point with the object you want to measure.
2.
Read the measurement on the digital display.
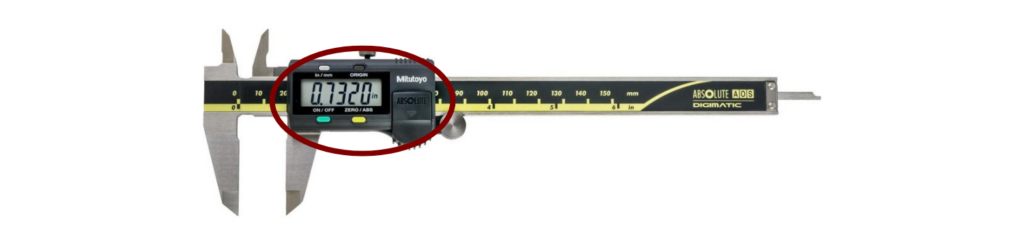
3.
Select the units button if you would like to quickly convert the measurement to a different unit.
8. Recording The Measurement
Record the result of the measurement in whatever system you are using. We mentioned that digital calipers often come with a SPC feature to automatically record your measurements in your system. Always keep in mind that for critical dimensions to measure twice to confirm your readings.
Repeat the process if necessary. If you need to take multiple measurements, repeat the process from step 4.
9. Securing Your Caliper
After using your caliper, close the jaws of the device and lock them in place. Use the thumb wheel or ratchets to close the jaws and use the locking screw to lock the jaws in place.
For digital calipers, make sure to turn off the caliper after use so you don’t drain the battery.
It’s worth noting that some calipers may have different ways of adjusting the jaws or reading measurements, so it’s important to consult the manufacturer’s instructions for specific guidance on using your caliper.
Common Errors To Avoid While Using A Caliper
Incorrect Contact Positioning
The jaws must be held square to the part being measured. Any angle to the jaws in relation to the surface of the part will result in a slightly larger dimension being recorded than is actually true. Make sure to take your time to visually check alignment before finalizing your measurements.
Improper Contact Force
There is a fine line between using contact force on your measurements. Too little force being applied and the measurement will be larger than the actual part. Too much force and the jaws or parts could be damaged. Additionally, the part could deflect as a result and provide you with a smaller dimension than actual. The jaws must be held firmly against the part by applying gentle but firm pressure where you are just making enough contact without forcing the jaws.
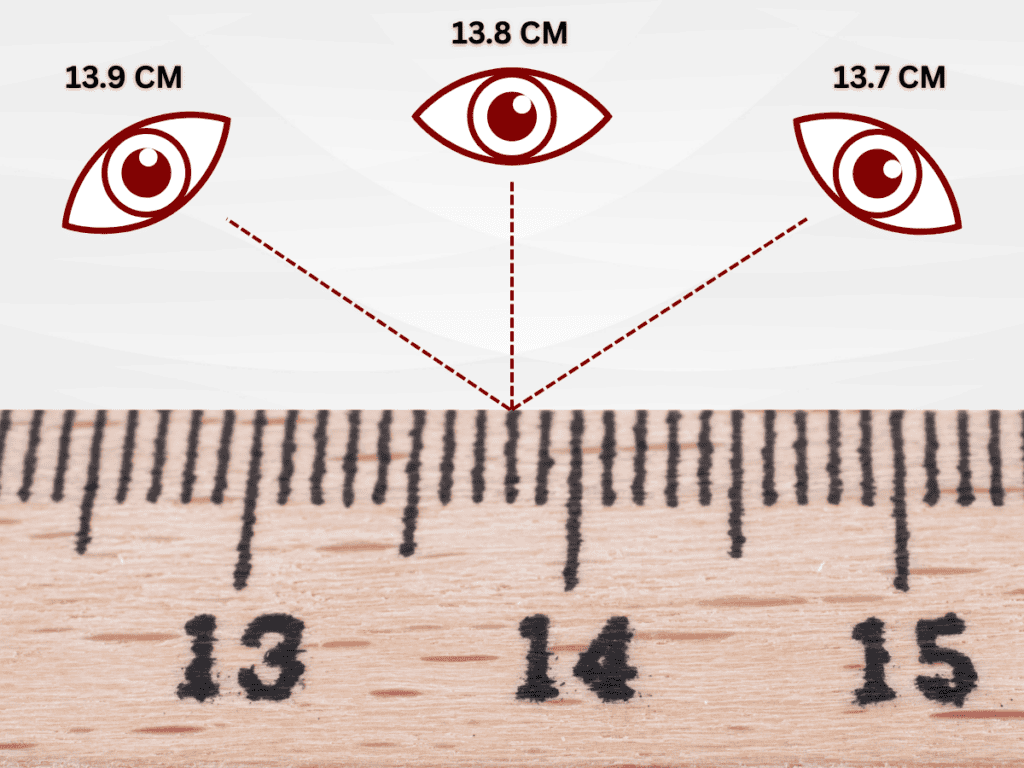
Parallax Error
The parallax error occurs when the user’s eye is not directly aligned with the measurement scale, resulting in inaccurate readings. This mistake most commonly happens while using a vernier or dial caliper. A slight angle in your viewpoint can cause misreadings, so always read the scale head on with your eye aligned to the measurement marks.
Abbe’s Error Principle
The Abbe’s error principle happens when the measurement line is not parallel to dimension, for example, on a sloped surface (like teeth on a gear). This causes the caliper to move and get an inaccurate reading. To best combat this, keep the part as close to the main scale of the caliper as possible.
Internal Dimension Error
The standard design of internal jaws have the two offset from each other. This means they do not measure in a perfectly straight line and the jaws will contact the part offset from each other. While this is okay for spot measurements, you will not be able to use this tool to find the maximum internal diameter of a circle. If you are looking to find the maximum internal diameter of a circle, it would be best to use a bore gage or another dedicated tool that can make internal measurements.
Zero Error
A zero error occurs when the caliper is not properly calibrated and does not read zero when the jaws are closed and will cause your caliper to have inaccurate measurements. Before measuring, always set your caliper to zero and ensure it is reading zero.
Bent or Damaged Jaws
Any misaligned, bent, or damaged jaws can cause inaccurate readings if the jaws are not parallel or not able to make contact with the object being measured. Your calipers need to be handled with care and make sure to inspect them regularly for any damage. If you need to repair the jaws on your caliper, do so. We offer repair services at Fox Valley Metrology if you have an damage on your jaws or calipers. If the jaws on your caliper are dirty, greasy, or have buildup on them, it can create extra spacing that will affect the accuracy of the measurement. The jaws of your caliper should be wiped clean before every measurement for consistent readings.
Using the Wrong Type of Caliper
Using the wrong type of caliper for a task or using it in an environment not suitable for the instrument can lead to measurement errors. Know what caliper you need to choose for the task to get reliable results.
Incorrect Reading of a Scale
This is most common for beginners, especially when using a vernier or dial caliper. Reading the wrong part of the scale or interpreting the measurement can lead to errors. Practicing reading your caliper and knowing how to read it will avoid incorrect measurements.
Conclusion
Using a caliper may seem intimidating at first, but with the right technique and consistency, getting measurements becomes a second nature. From internal measurements, to external measurements and even depth measurements, having a consistent hand will allow you to have precise and reliable readings.
How To Use A Caliper FAQs
Q1. How often should I zero my caliper?
Always zero your caliper before starting each measurement session and always check it after a few readings to see if it has drifted at all.
Q2. Do I need to clean the caliper itself?
Yes, cleaning your caliper before and after use is one of the best practices to extend the life of your caliper.
Q3. How do I know which jaws or feature to use before I start measuring?
Start by identifying whether the feature is external, internal, or a depth measurement. This will determine if you will use the outside or inside jaws or the depth rod.
Q4. How tight should the jaws be when taking a measurement?
When taking a measurement, the jaws should make gentle but firm contact with the part. Excessive force can lead to damaged jaws or damage the part while too little force can result in an oversized reading.
The Definitive Guide To Calipers
What’s Next: What Are The Common Uses Of A Caliper?
You now understand the basics on how to use a caliper! There is still a lot more to learn though about the caliper.
The next post in our series will go into more detail on how you can use your caliper and apply it to your daily tasks. Let’s get started and head to Section 11: Common Uses and Applications of a Caliper.

ISO/IEC 17025 Accredited Caliper Calibration
Fox Valley Metrology offers precise caliper calibration for any make or model. Our ISO/IEC 17025 accreditation guarantees testing to the highest industry standards. We offer fast, reliable in-lab or onsite calibration services to fit your needs and schedule.
- ✓ ISO/IEC 17025 accredited calibration vendor
- ✓ Broadest calibration scope in the industry
- ✓ 3-5 day turnaround time in-lab calibrations
- ✓ Pickup and delivery service options
- ✓ Onsite calibration available