Multimeter Calibration
The Definitive Guide To Using Multimeters
Multimeter Calibration
Regular calibration of your multimeter ensures that the multimeter's readings are reliable and trustworthy. The multimeter calibration process is:
- Gather The Necessary Equipment
- Read The Manufacturers Instructions
- Perform Pre-Calibration Checks
- Zero the Multimeter
- Perform the Multimeter Calibration
- Adjust if Necessary
- Finalize the Calibration
Over time, multimeters can drift from their original calibration due to factors such as temperature variations, mechanical stress, and component aging. By calibrating your multimeter regularly, you can have confidence in the precision of your measurements and make informed decisions based on the data obtained.
Essentially, calibration is the process of comparing its readings with a known reference value or a certified standard. These readings are compared against the multimeter's specifications. If the reading is within the multimeter's allowable variance from the known reference value, the multimeter is in tolerance. If the variance of the reading from the known value is greater than the allowable variance, the multimeter is out of tolerance and adjustment, repair or replacement may be necessary.
the Definitive Guide to Using Multimeters
This is the 16th article in our series, The Definitive Guide to Using Multimeters.
This article delves into all facets of multimeter calibration, from why it is important to do so regularly, how frequently a multimeter should be calibrated, where to have a multimeter calibrated and the process for doing so, should you choose to calibrate your multimeter yourself.
In This Article
If you missed the start of the series: What Is a Multimeter: The Definitive Guide to Multimeters, check it out now! You will be able to work your way back to this article quite quickly.
The Definitive Guide to Multimeters
- What is a Multimeter?
- Why Are Multimeters Important?
- What Do Multimeters Measure?
- What is the History of the Multimeter?
- What are the Common Types of Multimeters?
- What are Common Multimeter Options?
- What are Some Multimeter Specifications?
- What are Common Uses of Multimeters?
- How Do I Choose the Best Multimeter For The Job?
- How Do I Use a Multimeter?
- How Do I Properly Maintain a Multimeter?
- How Do I Calibrate a Multimeter?
- What is the Future of Multimeters?
- Multimeter FAQs
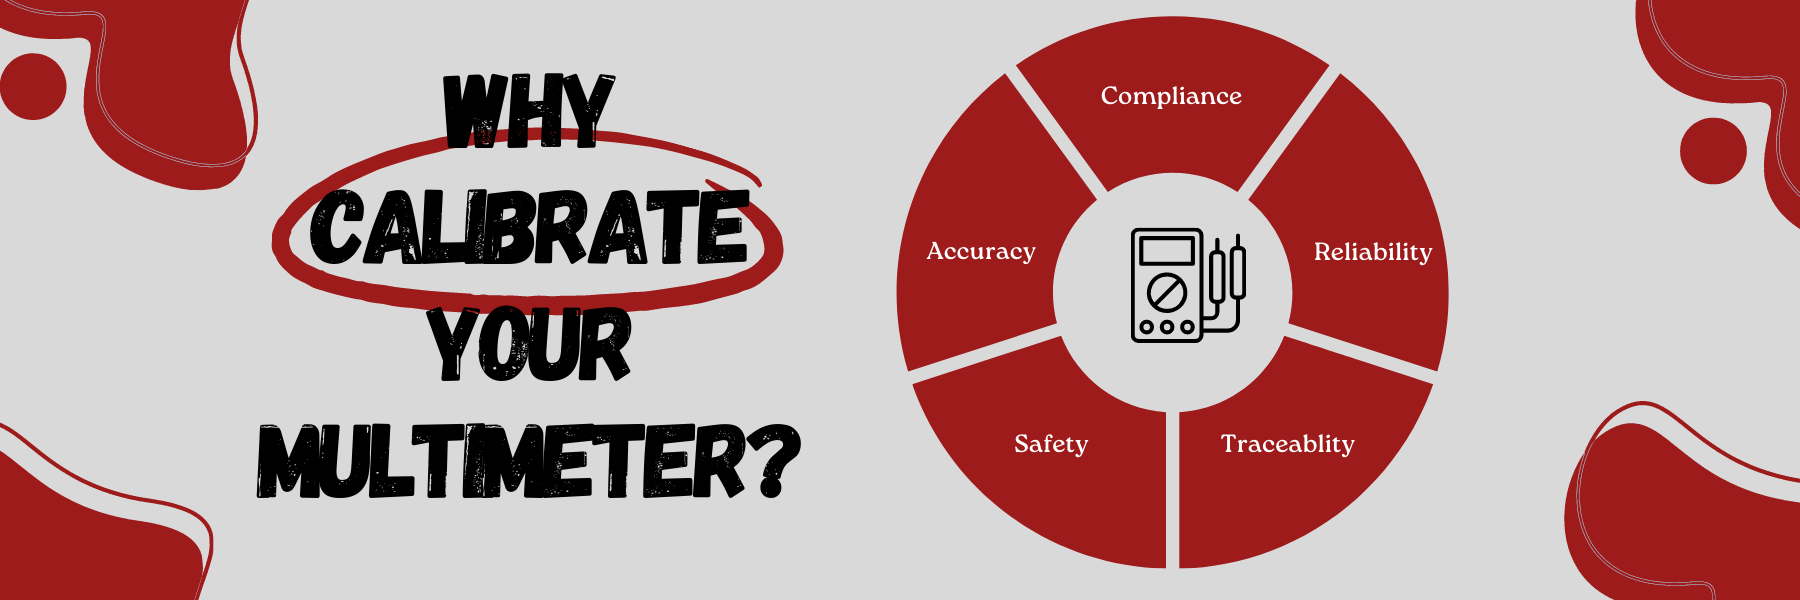
Why Calibrate Your Multimeter?
Multimeter calibration will keep your instrument running for a long time by confirming that the multimeter is still operating in the way it was intended. Calibrating a multimeter is crucial for several reasons:
- Accuracy
- Compliance
- Reliability
- Safety
- Traceability
Accuracy
Multimeters are used to measure voltage, current, resistance, and other electrical parameters. Over time, the internal components of a multimeter can drift or wear out, leading to inaccurate readings. Calibrating ensures that the multimeter provides accurate measurements, which is essential for troubleshooting, electrical work, and maintaining the safety of electrical systems.
Compliance
In many industries, adherence to specific standards and regulations is required, for example, ISO 9001. Calibration ensures that the multimeter meets the necessary standards and is compliant with industry requirements. This is particularly important in fields like electronics manufacturing, electrical testing, and quality control, where precise measurements are essential.
Reliability
A calibrated multimeter provides reliable and consistent results. This is particularly important when performing critical measurements or when comparing readings with known standards. By calibrating regularly, you can have confidence in the accuracy and reliability of your multimeter.
Safety
Electrical work can be hazardous, and inaccurate measurements can lead to dangerous situations. For example, an improperly calibrated multimeter may display incorrect voltage readings, leading to the mishandling of electrical equipment or the underestimation of electrical risks. Calibrating your multimeter ensures that it provides accurate readings, promoting safer working conditions.
Traceability
Calibrating a multimeter involves comparing its measurements against known references or standards. This establishes traceability, allowing for a clear and documented chain of measurement accuracy. Traceability is important for quality assurance, audits, and maintaining consistency across different instruments and measurement systems.
In a proper traceability chain, you can directly link the measurements you are performing all the way back to the national standard for that measurement.
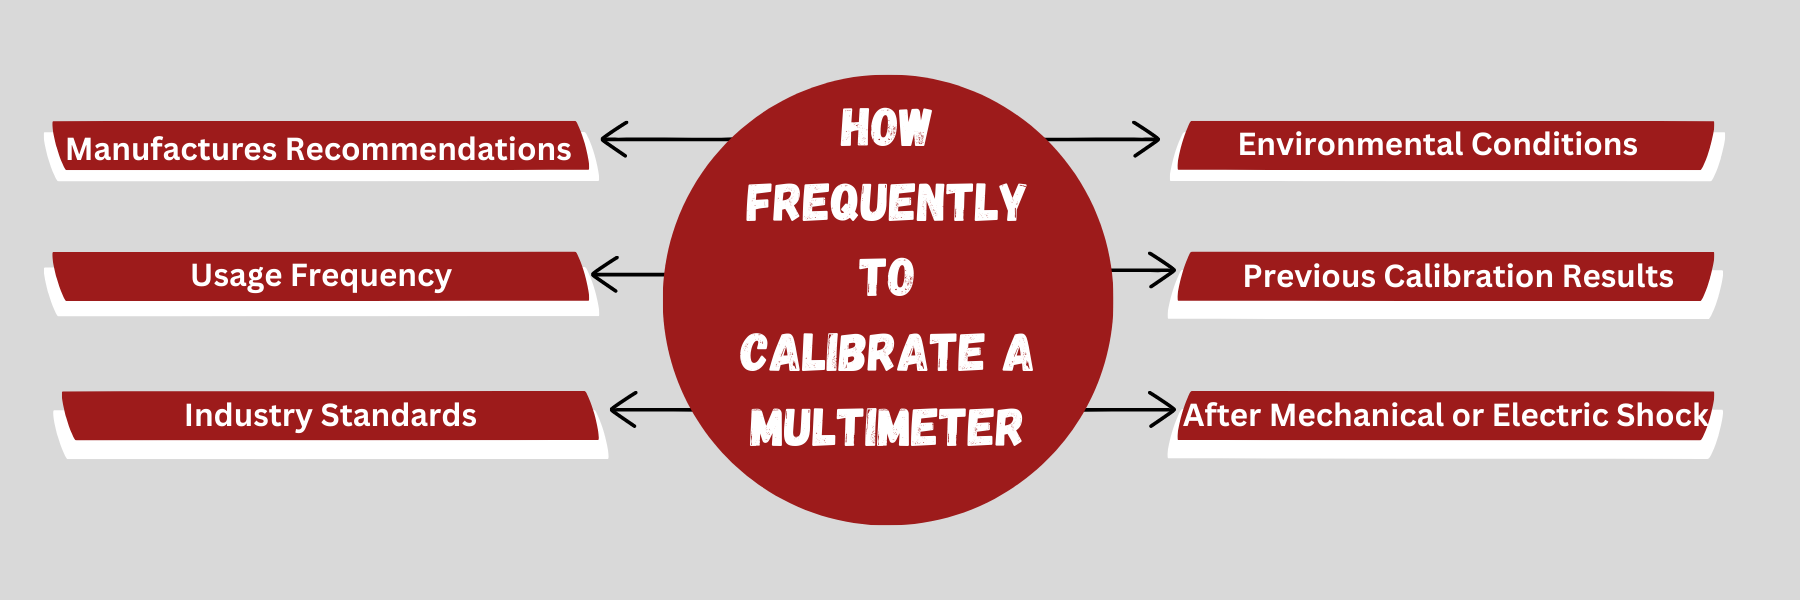
How Frequently to Calibrate a Multimeter
The frequency of multimeter calibration depends on various factors, including:
- Manufacturer's Recommendations
- Usage Frequency
- Industry Standards
- Environmental Conditions
- Previous Calibration Results
- After Mechanical or Electrical Shock
- Annually
Here are some general guidelines:
Manufacturer's Recommendations
The first, and most important, guideline is to consult the user manual or documentation provided by the multimeter manufacturer. They often provide guidelines on calibration intervals specific to their product. Following the manufacturer's recommendations is a good starting point.
For example, the Fluke 87V multimeter manual states that the accuracy specifications of the multimeter are valid for a period of one year after calibration. This means you should calibrate your Fluke 87V multimeter at least once a year.
Usage Frequency
If you use your multimeter very frequently or in critical applications where accuracy is crucial, more frequent calibration may be necessary. Heavy usage can accelerate the wear and drift of internal components, affecting measurement accuracy over time. Simply put, the more you use your multimeter, the more likely it is to fall out of calibration. In such cases, calibrating your multimeter every 6 months may be more appropriate.
Industry Standards
Certain industries have specific calibration requirements and standards that must be followed. For example, industries like aerospace, medical devices, and automotive manufacturing may have stringent calibration intervals mandated by regulations or quality control standards. It's important to research and adhere to any industry-specific requirements.
Environmental Conditions
Harsh or extreme environmental conditions, such as high humidity, temperature variations, or exposure to excessive vibration, can impact the performance of a multimeter. In such cases, more frequent calibration may be necessary to compensate for these environmental factors.
Previous Calibration Results
If you have access to historical calibration data, you can analyze the trend of measurement deviations over time. If there is a consistent pattern of drift or if the multimeter consistently falls out of acceptable tolerances, more frequent calibration may be needed.
After Mechanical Or Electrical Shock
If your multimeter undergoes any severe shock or damage, it is critical to calibrate the multimeter again before use. This could be as simple as being dropped from a ladder or accidentally shocking it while testing a circuit.
Annually
With all of that said, the default calibration cycle for multimeters is typically one year, as that is the most common recommendation by manufacturers. In fact, about 94% of the tens of thousands of multimeter calibrations we perform are on an annual cycle.
Where to Get a Multimeter Calibrated
There are several options for where to send a multimeter to be calibrated. Each of them come with their own pros and cons. The most common choices are:
- Third-Party Calibration Labs
- Manufacturer's Service Centers
- Do-It-Yourself
Third-Party Calibration Labs
There are specialized calibration labs (such as Fox Valley Metrology) that offer services for various types of equipment, including multimeters. These labs are often accredited and follow international calibration standards.
Manufacturer's Service Center
Many multimeter manufacturers have their own service centers where you can send your device for calibration. They are familiar with their product and can ensure proper calibration. While this may sound like the obvious choice, remember they are in the business of selling you new units. Oftentimes their services are quite a bit slower and substantially more expensive than a third-part calibration lab.
Do-It-Yourself
You can always calibrate a multimeter yourself. This will leave you in the most control of the process, but has some substantial downsides. First off, the equipment necessary is expensive. Secondly, the process can be quite time-consuming. Finally, it leaves you on the hook for any liability.
How to Calibrate a Multimeter
Now that we understand the importance of multimeter calibration, let's dive into the step-by-step process of calibrating your multimeter.
The multimeter calibration process is:
- Gather The Necessary Equipment
- Read The Manufacturers Instructions
- Perform Pre-Calibration Checks
- Zero the Multimeter
- Perform the Multimeter Calibration
- Calibrate The DC Voltage Function
- Calibrate The AC Voltage Function
- Calibrate The DC Current Function
- Calibrate The AC Current Function
- Calibrate The Resistance Function
- Adjust if Necessary
- Finalize the Calibration
Step 1: Gather the Necessary Equipment
Before starting the calibration process, ensure you have the following equipment:
- A calibrated and ideally traceable reference standard, in this case an electrical calibrator (link to NIST traceability information)
- Four test leads of equal length
- Safety equipment, such as gloves and goggles
- A suitable workspace with minimal electromagnetic interference
The most important piece of this process is selecting a calibrator appropriate for the job. There are two primary criteria in selecting this calibrator:
- The calibrator must be at least four times more precise than the multimeter you are about to calibrate (see Test Uncertainty Ratios (or TUR))
- The calibrator must cover the functions present in the multimeter (i.e. voltage, current, resistance, etc.)
The most common reference calibrator would be a Fluke 5522A (at the time of this writing).
It bears noting that calibrators are expensive pieces of equipment – both upfront and maintaining each year. They are highly specialized and powerful machines. Make sure to take your time in selecting the proper calibrator for the job.
The good news is our friends over at Fluke already prepared a great tool for helping you select the proper calibrator for the job. Here is a simplified version of that tool:
Multimeter Calibration Standards Options
| Multimeter Specifications | Fluke 5080A | Fluke 5540A | Fluke 5550A | Fluke 5560A | Fluke 5730A |
| 3.5 Digits (typ. ± 0.3 % DC V) | X | X | X | X | X |
| 4.5 Digits (typ. ± 0.025 % DC V) | X | X | X | X | |
| 5.5 Digits (typ. ± 0.015 % DC V) | X | X | X | ||
| 6.5 Digits (typ. ± 0.0030 % DC V) | X | X | |||
| 7.5 Digits (typ. ± 12 ppm DC V) | X | ||||
| 8.5 Digits (typ. ± 3.9 ppm DC V) | X |
Step 2: Read the Manufacturer's Instructions
Refer to the user manual or documentation provided by the multimeter manufacturer. It contains specific instructions for calibration, as different models may have varying calibration procedures. Familiarize yourself with the manufacturer's guidelines to ensure a proper calibration process.
In addition to the process of how exactly to calibrate the multimeter, the manual should also contain a listing of the specific test points you should calibrate the unit at as well as the acceptable deviation from that test point that would still allow the unit to be considered “In Tolerance”.
If the manufacturer, for some reason, does not provide this procedure there are several procedures written by governing bodies on multimeter calibration available for reference. One example is Euramet CG-15.
Step 3: Perform Pre-Calibration Checks
Perform the following checks before initiating the calibration process:
- Inspect the multimeter for any visible signs of damage or wear.
- Ensure the multimeter is clean and free from dirt or debris.
- Verify that the multimeter's batteries are fresh and properly installed.
Step 4: Zero the Multimeter
To calibrate the multimeter, the first step is to zero it. This process involves nullifying any offset or residual readings displayed by the multimeter when no voltage or current is present. Follow these steps to zero the multimeter:
- Set the multimeter to the appropriate measurement function (e.g., voltage, current, resistance).
- Connect the test leads together, ensuring a short circuit.
- Adjust the zero adjustment knob or use the zeroing function specified in the user manual to eliminate any displayed readings.
Step 5: Perform the Multimeter Calibration
After zeroing the multimeter, it's time to perform the calibration. This step requires utilizing the calibrated reference standard, discussed previously.
While the exact process for calibrating a multimeter will vary (be sure to reference the procedure found in step 2), the general process is the same for most multimeters. For each function (e.g. DC Voltage, AC Voltage, DC Current, AC Current, Resistance etc.), follow these general steps for calibration adjustments:
1. Calibrate The DC Voltage Function
Begin the calibration with DC Voltage by selecting the DC voltage function on the rotary dial.
- Each handheld DMM may have different DC voltage capabilities so be sure to verify the operating range of yours, but most range from the low mV up to 1000V
- Connect your test leads from the voltage (standard out) and common on your reference calibrator to the voltage input on your DMM using the test leads mentioned above.
- Starting with the low voltage and using common sense test points, apply a known voltage from your reference calibrator (i.e. 10 mV, 1 V, 10 V) and take your reading from your DMM to determine if it is reading the applied voltage within in its allowable accuracy limits (which are found on the multimeter data sheet).
- Repeat this process until you have verified the accuracy of your meter across its applicable range.
- Ensure that the calibrator is set to Stand By.
2. Calibrate The AC Voltage Function
Once DC Voltage is completed move on to verifying AC Voltage and select the AC voltage function on the rotary dial.
- Each handheld DMM may have different AC voltage capabilities so be sure to verify the operating range of yours, but most range from the low mV up to 600V
- Connect your test leads from the voltage (standard out) and common on your reference calibrator to the voltage input on your DMM using the test leads mentioned above.
- Starting with the low voltage and using common sense test points, apply a known voltage from your reference calibrator (i.e. 10 mV, 1 V, 10 V) at 60 Hz and take your reading from your DMM to determine if it is reading the applied voltage within in its allowable accuracy limits (which are found on the multimeter data sheet).
- Repeat this process until you have verified the accuracy of your meter across its applicable range and your desired additional frequencies (common test frequencies include 50 Hz, 60Hz, 400 Hz, 1 kHz).
- Ensure that the calibrator is set to Stand By.
3. Calibrate The DC Current Function
Once the voltage functions have been verified you can move on to testing DC current and select the DC current function on the rotary dial.
- Each handheld DMM may have different DC current capabilities so be sure to verify the operating range of yours, but most range from the low µA up to 10A
- Connect your test leads from the Aux or 20A (appropriate high terminal depends on the range you are testing) and common on your reference calibrator to the current input on your DMM using the test leads mentioned above. You will note that most DMM’s have both a low current (400 mA and below) input a high current (400 mA to 10 A) input. Be sure to use the correct input for your specific test.
- Starting with the low current and using common sense test points, apply a known current from your reference calibrator (i.e. 100 µA, 1 A, 10 A) and take your reading from your DMM to determine if it is reading the applied current within in its allowable accuracy limits (which are found on the multimeter data sheet).
- Repeat this process until you have verified the accuracy of your meter across its applicable range.
- Ensure that the calibrator is set to Stand By.
4. Calibrate the AC Current Function
Next you can move on to testing AC current and select the AC Current function on the rotary dial.
- Each handheld DMM may have different AC current capabilities so be sure to verify the operating range of yours, but most range from the low mA up to 10A
- Connect your test leads from the Aux or 20A (appropriate high terminal depends on the range you are testing) and common on your reference calibrator to the current input on your DMM using the test leads mentioned above. You will note that most DMM’s have both a low current (400 mA and below) input a high current (400 mA to 10 A) input. Be sure to use the correct input for your specific test.
- Starting with the low current and using common sense test points, apply a known current from your reference calibrator (i.e. 1 mA, 1 A, 10 A) at 60 Hz and take your reading from your DMM to determine if it is reading the applied current within in its allowable accuracy limits (which are found on the multimeter data sheet).
- Repeat this process until you have verified the accuracy of your meter across its applicable range and your desired additional frequencies (common test frequencies include 50 Hz, 60Hz, 400 Hz, 1 kHz).
- Ensure that the calibrator is set to Stand By.
5. Calibrate the Resistance Function
Lastly, (at least for verifying the accuracy of the most common DMM functions) you can move on to resistance and select the resistance function on the rotary dial.
- Each handheld DMM may have different resistance capabilities so be sure to verify the operating range of yours, but most range from the low ohms up to 50 MOhm.
- Connect your test leads from the Sense out and common on your reference calibrator to the standard input on your DMM using the test leads mentioned above. Additionally, connect the standard Resistance output on the calibrator to the DMM input (should be 4 leads hooked up to two sets of terminals on the calibrator, both connected to the resistance input on the DMM with the leads coming from the sense terminals making contact with the DMM first).
- Set your calibrator to 4 wire resistance output (this will utilize the sense leads to remove the potential lead error).
- Starting with the low resistance test points using common sense test points, apply a known resistance from your reference calibrator (i.e. 1 Ohm, 10 Ohm, 100 Ohm, etc) and take your reading from your DMM to determine if it is reading the applied resistance within in its allowable accuracy limits (which are found on the multimeter data sheet).
- Repeat this process until you have verified the accuracy of your meter across its applicable range.
- Ensure that the calibrator is set to Stand By.
The above multimeter calibration process is for general multimeters and only covers the most common functions. If your multimeter has additional functions, such as frequency or capacitance, you will need to complete the calibration process for those functions as well.
Step 6: Adjust if Necessary
In a perfect world, each test point on your multimeters would be perfectly in tolerance. Of course, we don’t live in a perfect world. It is not uncommon that your multimeter would need adjustment to bring the specific multimeter back into tolerance. From our experience, you can expect this about 5% of the time.
If you go back to that user manual found earlier, there should almost certainly be a process for adjusting your multimeter. Some multimeters have built-in calibration adjustment mechanisms, while others may require manual adjustments using screwdrivers or trimmers. Follow the manufacturer's instructions for finalizing the calibration and securing any adjustment mechanisms.
Once adjustment is complete, it is extremely important to re-calibrate the multimeter to ensure that your adjustment was correct. Simply refollow the process you took in Step 5.
Calibration vs. Adjustment
Calibration and adjustment are frequently confused for each other. It is important to note that the calibration process does not inherently involve adjustment.
Calibration is simply comparing the instrument in question against a known standard. If the instrument is found out of tolerance it should be adjusted back into tolerance, then re-calibrated.
For more information on this subject check out our post on Calibration vs. Adjustment.
If adjustment of the multimeter is required, you should also note the before and after results of the calibration on the certificate.
Step 7: Finalize the Calibration
Once you are satisfied with the calibration results, you will need to document the calibration process. If you have a quality manual, it may dictate exactly what you need in your calibration certificates. Most commonly you will need to include the following:
- Date
- Unique identification of the multimeter
- Environmental conditions at the time of the multimeter calibration
- Calibration standards used
- Test points tested
- Readings of the multimeter at those test points
- Readings of the multimeter at the test points after any adjustments
- Measurement uncertainty of each test point (if known)
This information should be saved in a digital file and have a calibration certificate created. Below is a sample certificate you can use as a guideline.
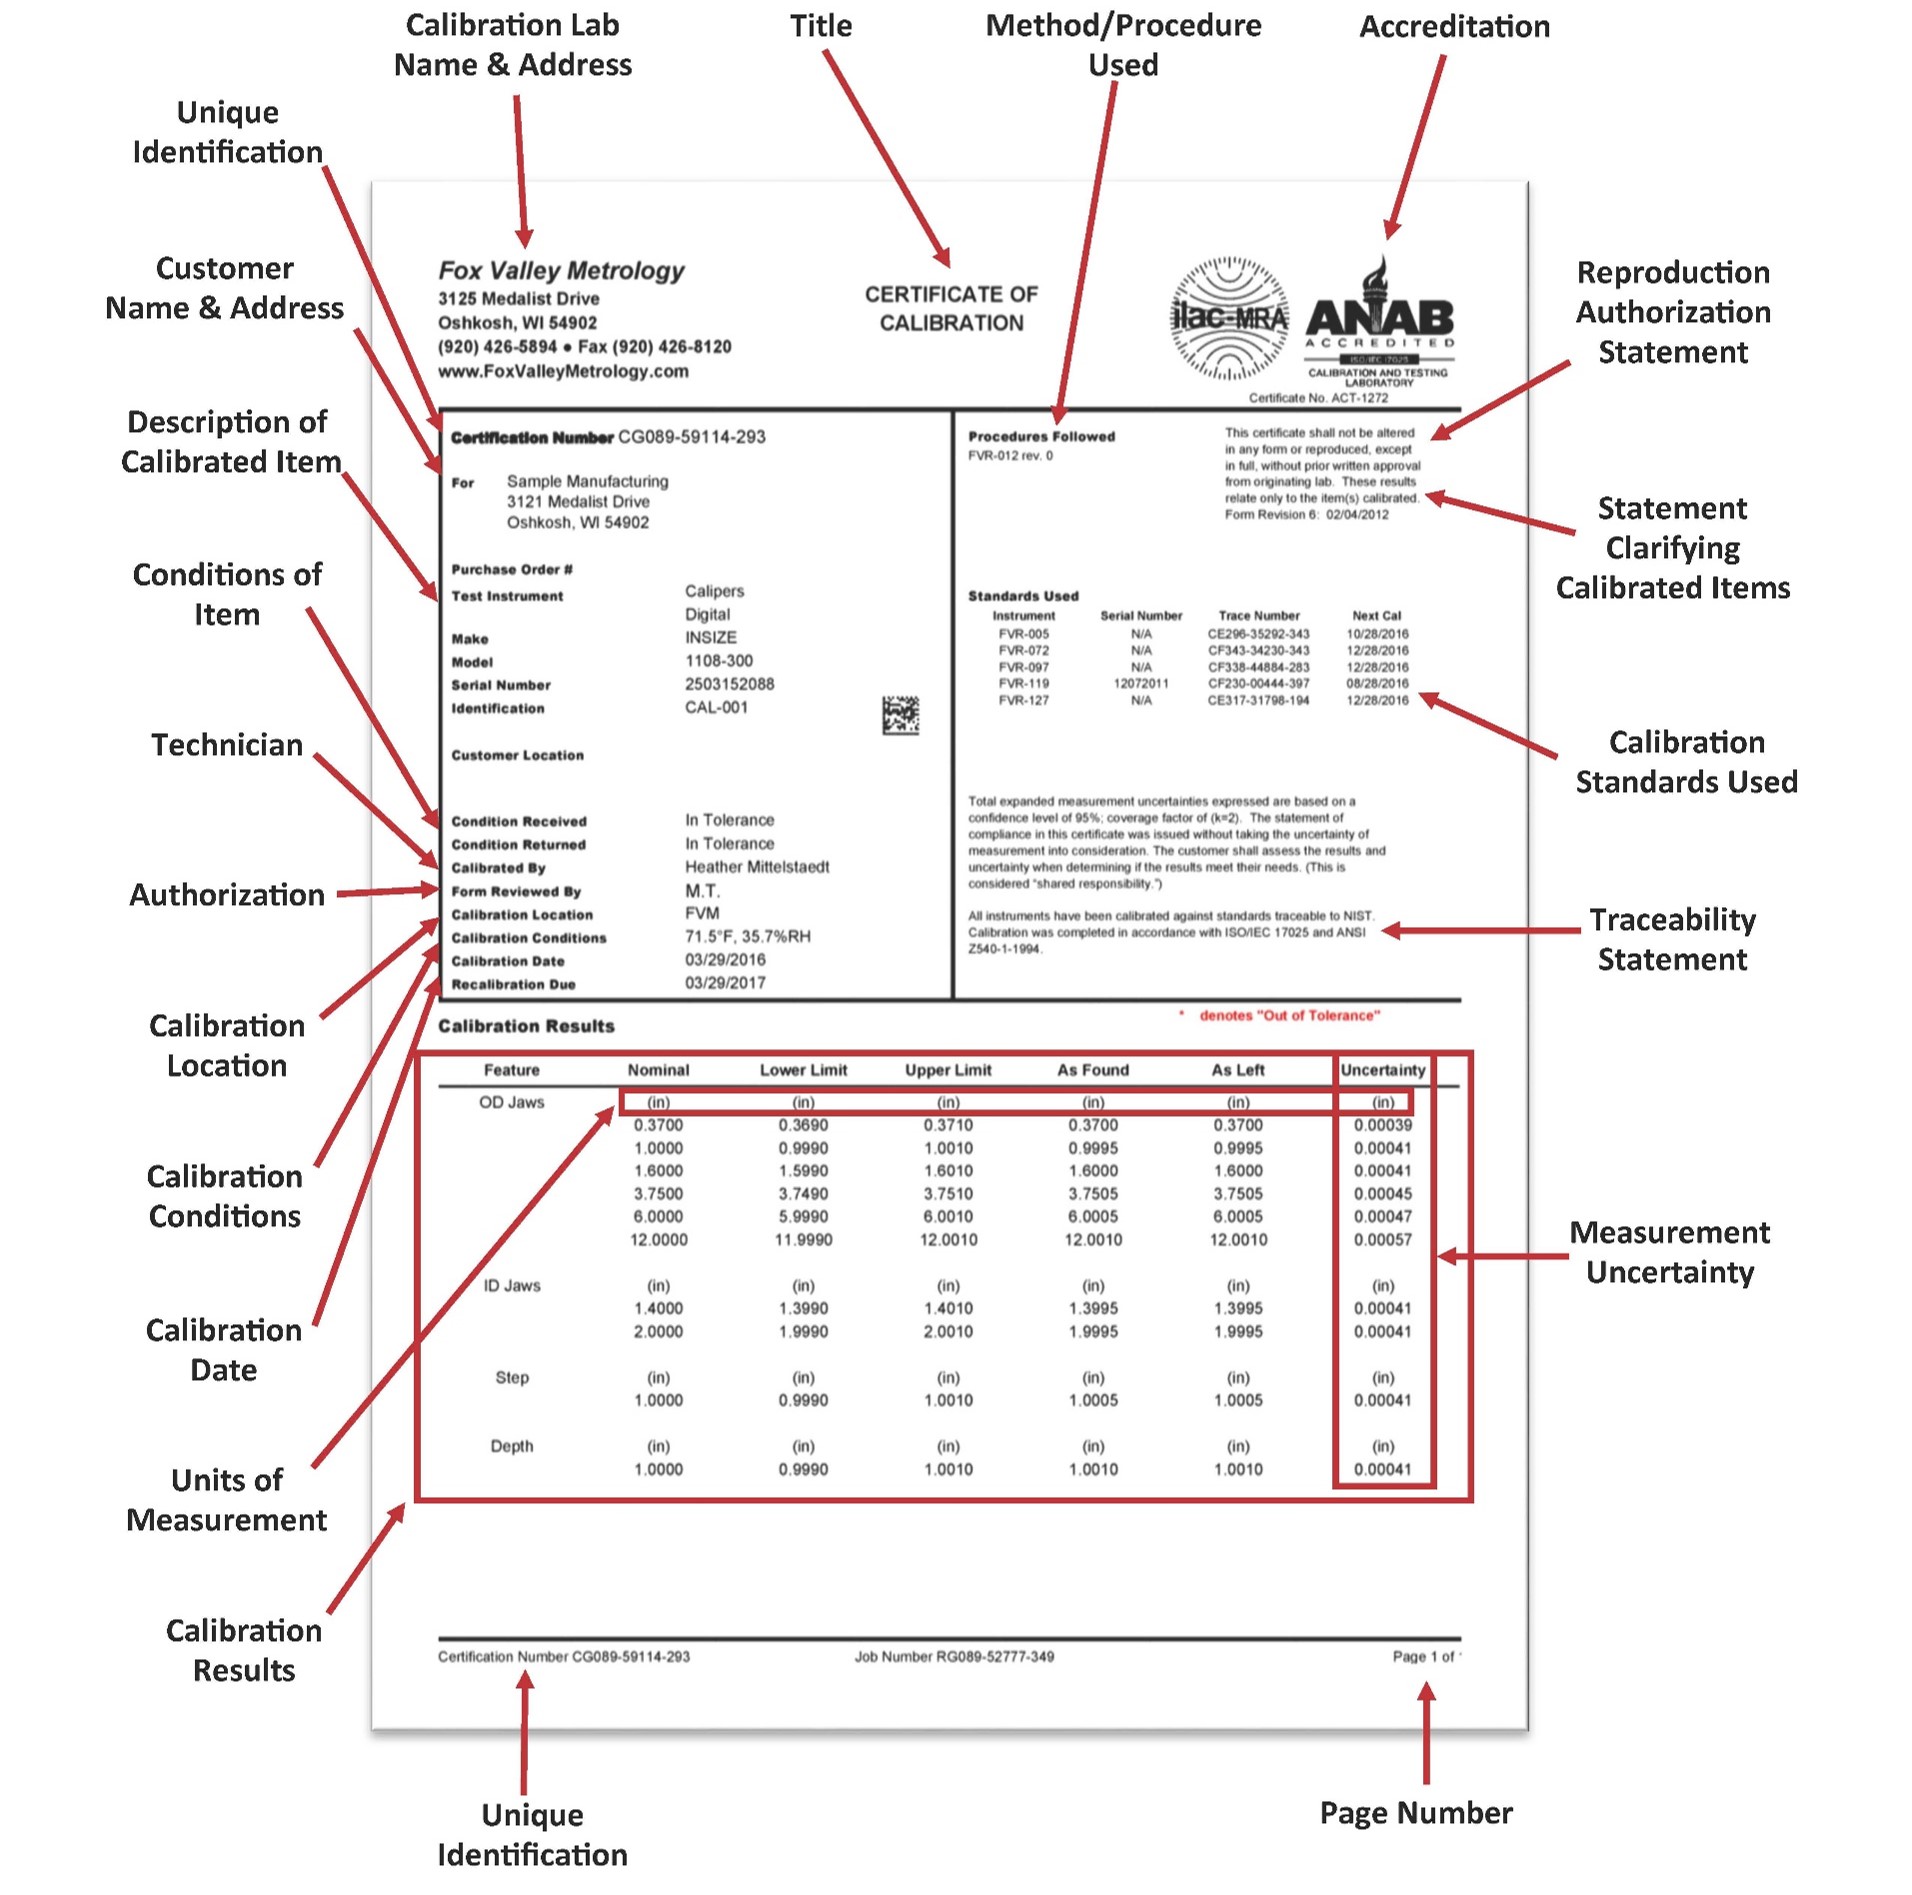
Sample Calibration Certificate
Additionally, you will need to consider applying a calibration label to the multimeter. Most quality standards dictate that you apply this sticker to each calibrated instrument to provide quick verification by the user that the multimeter is in tolerance and has been calibrated within its proper intervals. Additionally, the label provides quick identification of the multimeter itself.
Most commonly, the calibration label will include the equipment ID, the date it was calibrated and the date it is due again for calibration.
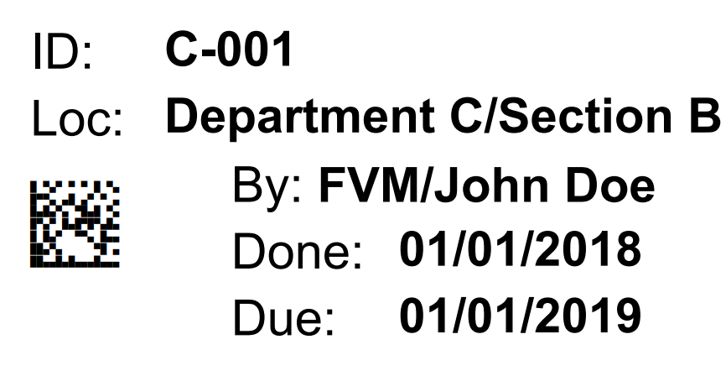
Sample Calibration Label
Of course, if all of this seems too complicated or not worth your time, there are many third-party options available. Check out our multimeter calibration services if you are interested in learning more about this option.
What's Next: The Definitive Guide to Multimeters
At this point, we have covered nearly everything there is to now about multimeters... for now...
In the next section, we will dive into the possible future of multimeters and what we could see in technological advancements for the tool. Lets get started and head to Section 17: The Future of Multimeters.
ISO/IEC 17025 Accredited Multimeter Calibration
Fox Valley Metrology proudly offers accredited precision measuring instrument calibration services of Multimeters. We calibrate all types of Multimeters at our offices throughout the country, meaning we are sure to have local Multimeter calibration services near you.
- ✓ ISO 17025 accredited calibration vendor
- ✓ Broadest calibration scope in the industry
- ✓ 3-5 day turnaround time for laboratory calibrations
- ✓ Pickup and delivery service options available
- ✓ Onsite calibrating service options