How to Use a Multimeter
The Definitive Guide To Using Multimeters
How to Use a Multimeter
To use a multimeter, start by selecting the appropriate measurement mode (e.g., voltage, current, resistance) and range. Connect the probes to the circuit/component being measured, ensuring proper polarity. Read the displayed value on the multimeter's screen, and if necessary, switch to a different range for more accurate results.
So, you've got a multimeter and now you're wondering how to use it, right? Well, you're in luck!
Using a multimeter effectively is an indispensable skill for anyone working with electrical and electronic systems. Whether troubleshooting a malfunctioning device or verifying circuit parameters, the accuracy and efficiency of your measurements hinge on your ability to operate this tool correctly.
This handy device can seem a bit perplexing at first glance, but once you get the hang of it, you'll be testing, measuring, and diagnosing electrical issues like a pro. The good news is, the process of using a multimeter is quite simple.
In this post, we'll delve into the nuances of multimeter operation, offering step-by-step guidance to ensure you get the most out of every reading. Let's enhance your proficiency with this crucial instrument!
the Definitive Guide to Using Multimeters
This is the 14th article in our series, The Definitive Guide to Using Multimeters.
This article delves into how to properly use a multimeter, best practices for safety and some common errors while using a multimeter and how to avoid them.
In This Article
If you missed the start of the series: What Is a Multimeter: The Definitive Guide to Multimeters, check it out now! You will be able to work your way back to this article quite quickly.
The Definitive Guide to Multimeters
- What is a Multimeter?
- Why Are Multimeters Important?
- What Do Multimeters Measure?
- What is the History of the Multimeter?
- What are the Common Types of Multimeters?
- What are Common Multimeter Options?
- What are Some Multimeter Specifications?
- What are Common Uses of Multimeters?
- How Do I Choose the Best Multimeter For The Job?
- How Do I Use a Multimeter?
- How Do I Properly Maintain a Multimeter?
- How Do I Calibrate a Multimeter?
- What is the Future of Multimeters?
- Multimeter FAQs
The Process of Using a Multimeter
Using a multimeter involves a series of steps to accurately measure electrical parameters in circuits and components:
- Understand The Multimeter
- Select Appropriate Measurement Mode
- Select Appropriate Range
- Connect the Test Leads to the Multimeter
- Connect the Test Leads to the Circuit/Component
- Perform the Measurement
- Read and Record the Measurement Results
- Disconnect and Power Down
Let's break down each of these steps in more detail.
Step 1: Understand The Multimeter
If you have not used this particular multimeter before, start by familiarizing yourself with the different components of the multimeter, including the display, dials, ports, and test leads.
You will also want to check out the user manual for the multimeter. A lot of times, this can be found with a simple Google search.
Step 2: Select Appropriate Measurement Mode

First, ensure the multimeter is in good working condition and set the dial to the appropriate measurement mode for your intended test, such as voltage, current, resistance, or continuity. Ensure the polarity is set correctly, if applicable.
Step 3: Select Appropriate Range
If necessary, select the appropriate range on the multimeter based on the expected value of the measurement. It's generally better to start with a higher range and gradually decrease it for increased accuracy.
Step 4: Connect the Test Leads to the Multimeter
Next you will want to attach the red test lead to the multimeter's red (or positive port) and the black test lead to the common (or ground port). Make sure the test leads are securely connected.
Step 5: Connect the Test Leads to The Circuit/Component
Depending on the type of measurement you're performing, connect the test leads to the circuit or component you are inspecting accordingly. Avoid touching the metal tips of the probes when they are plugged into live circuits to prevent electric shocks. Additionally, make sure not to touch the tips together.
Step 6: Perform the Measurement
Each type of measurement requires its own unique process of completing the measurement:
Step 6.1: How To Measure Voltage With a Multimeter
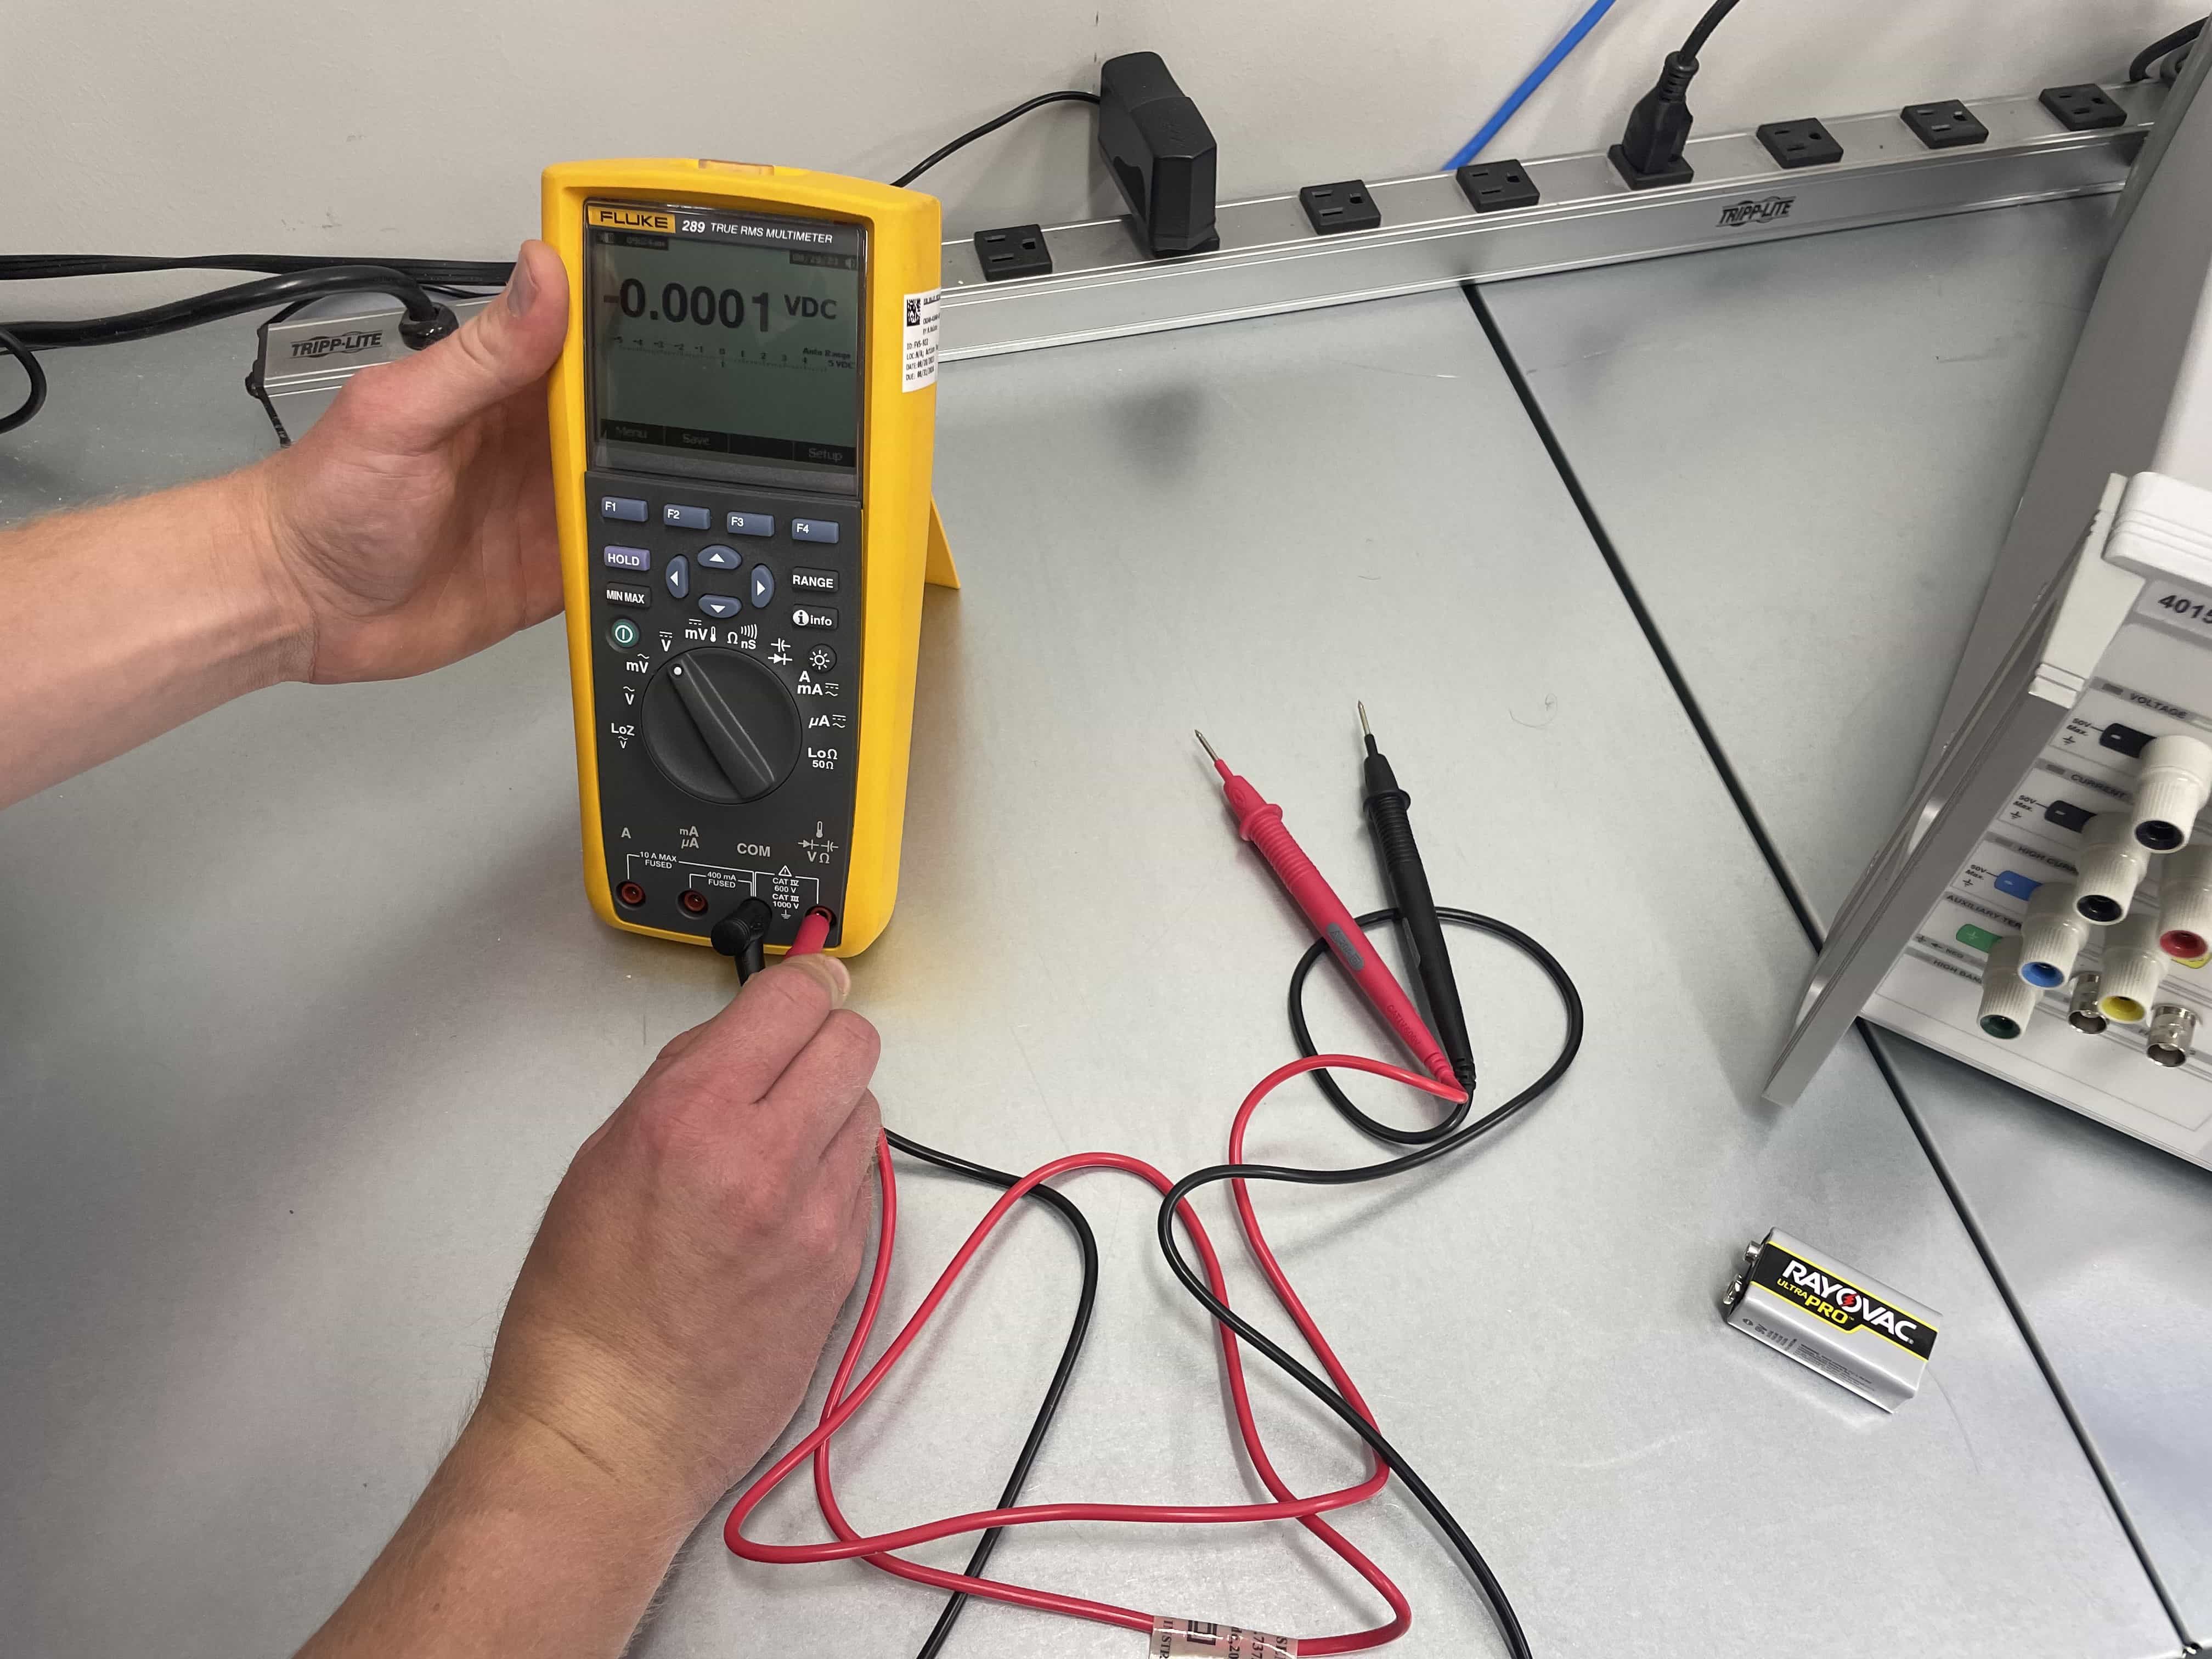
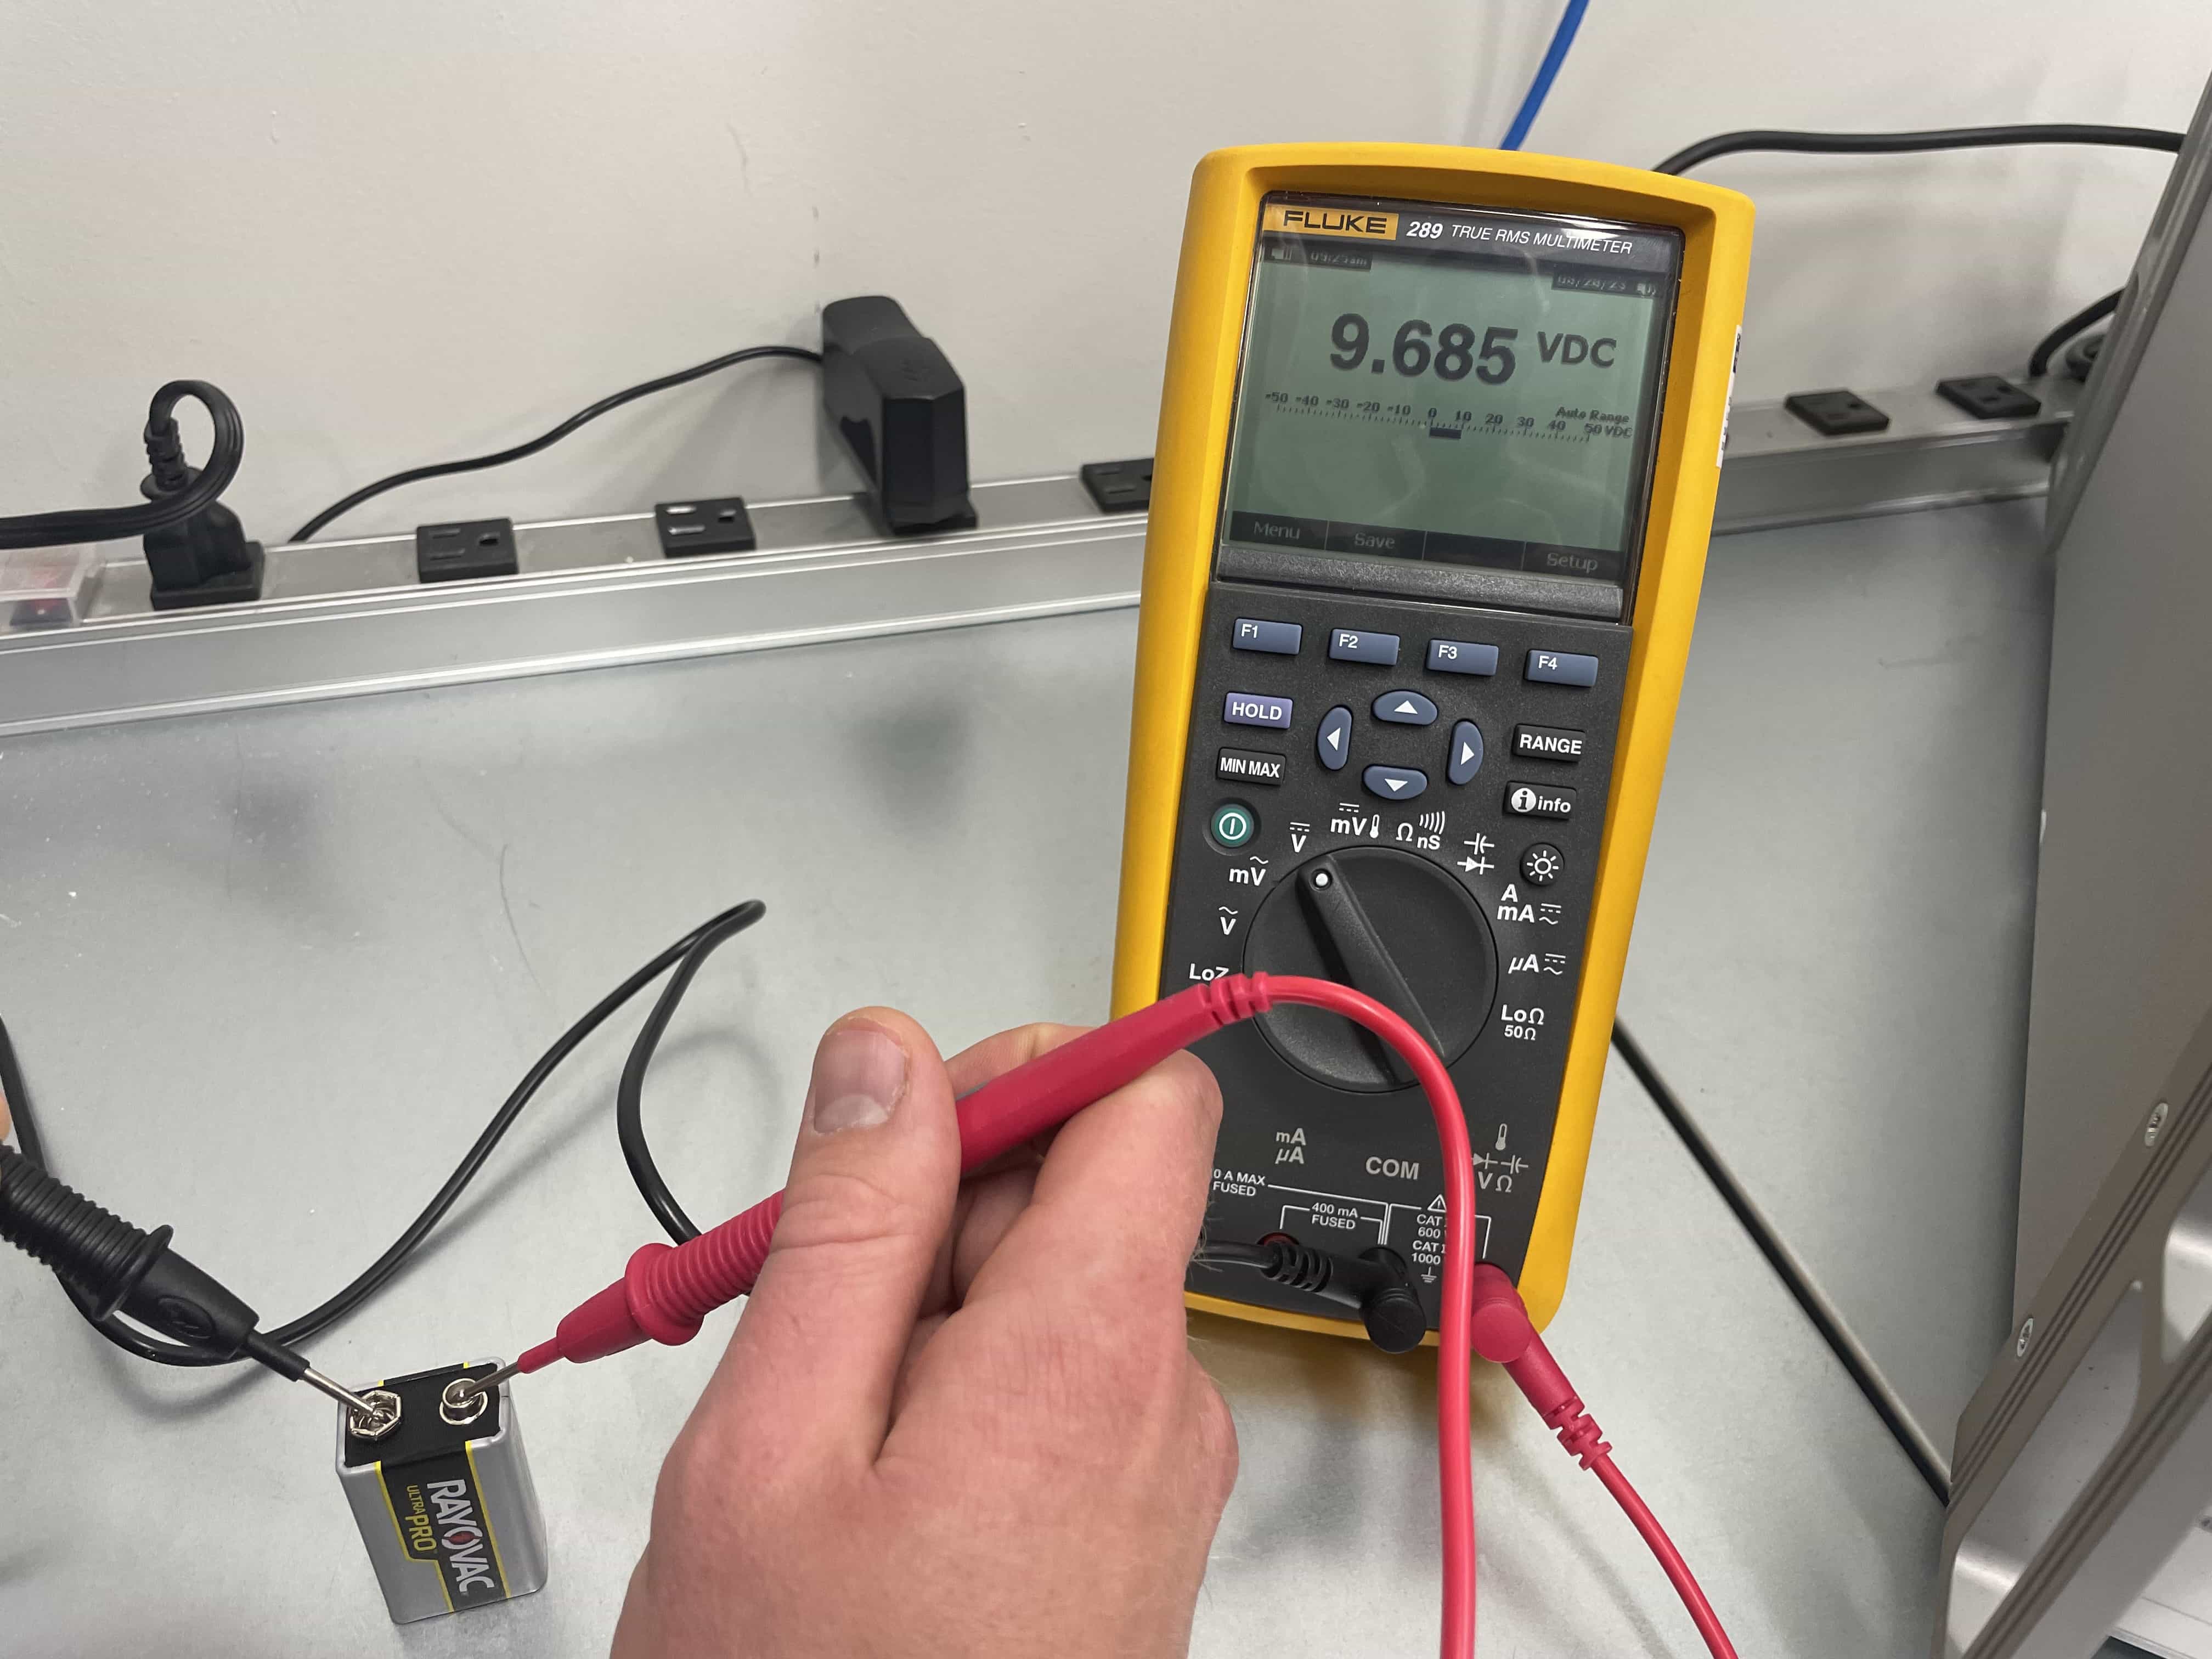
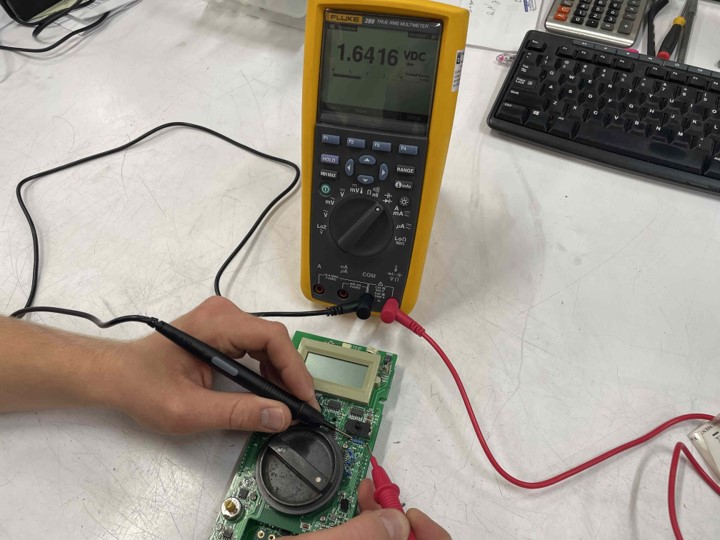
For voltage testing with a multimeter you simply need to place the test leads across the component or circuit you want to measure. You will want to squeeze the probes with a bit of pressure against the circuit, to ensure connection.
For example, if you were to use the multimeter to test the voltage of a battery, you simply need to touch the black probe to the '-' end of the battery (its ground) and the red probe to the "+" end (its power).
The battery example is an example of testing DC voltage. The process for measuring AC voltage with a multimeter is the same as measuring DC voltage, except that you need to have the multimeter set to the AC voltage setting.
Step 6.2: How To Measure Current With a Multimeter
To measure current with a multimeter, you will first want to break the circuit and connect the multimeter in series with the component. Then simply press the test leads to the component and hold firm to maintain proper polarity.
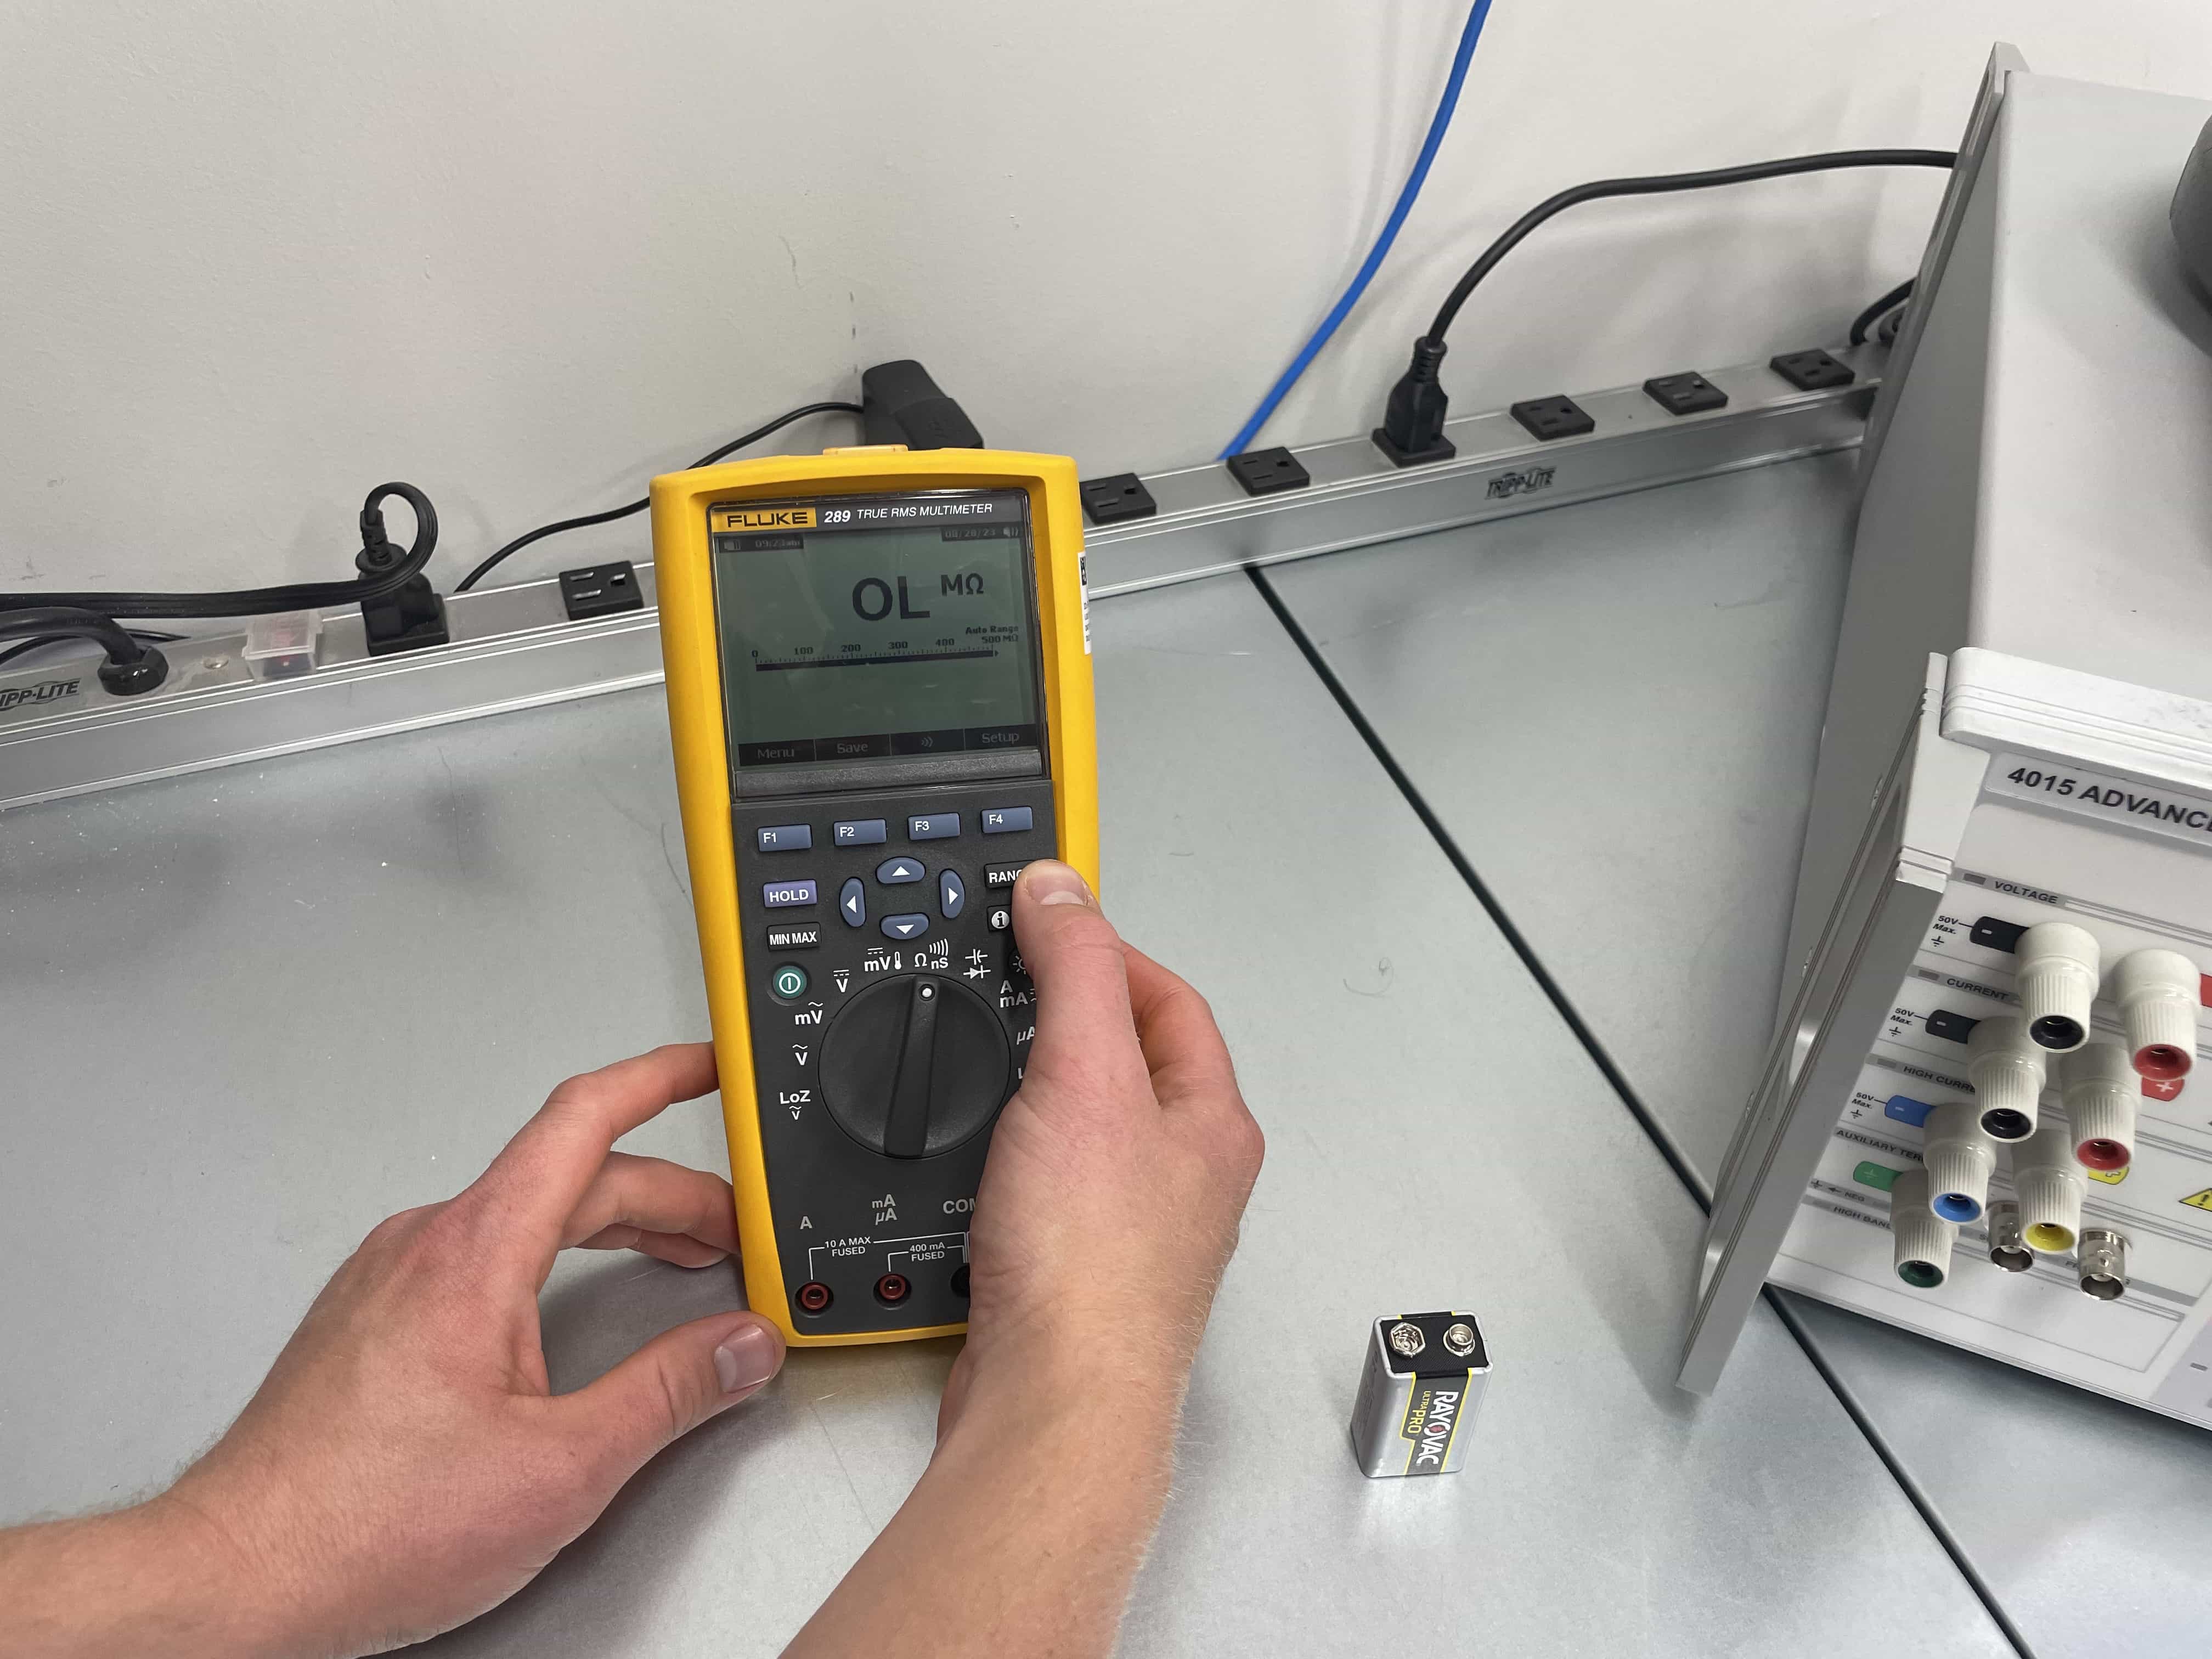
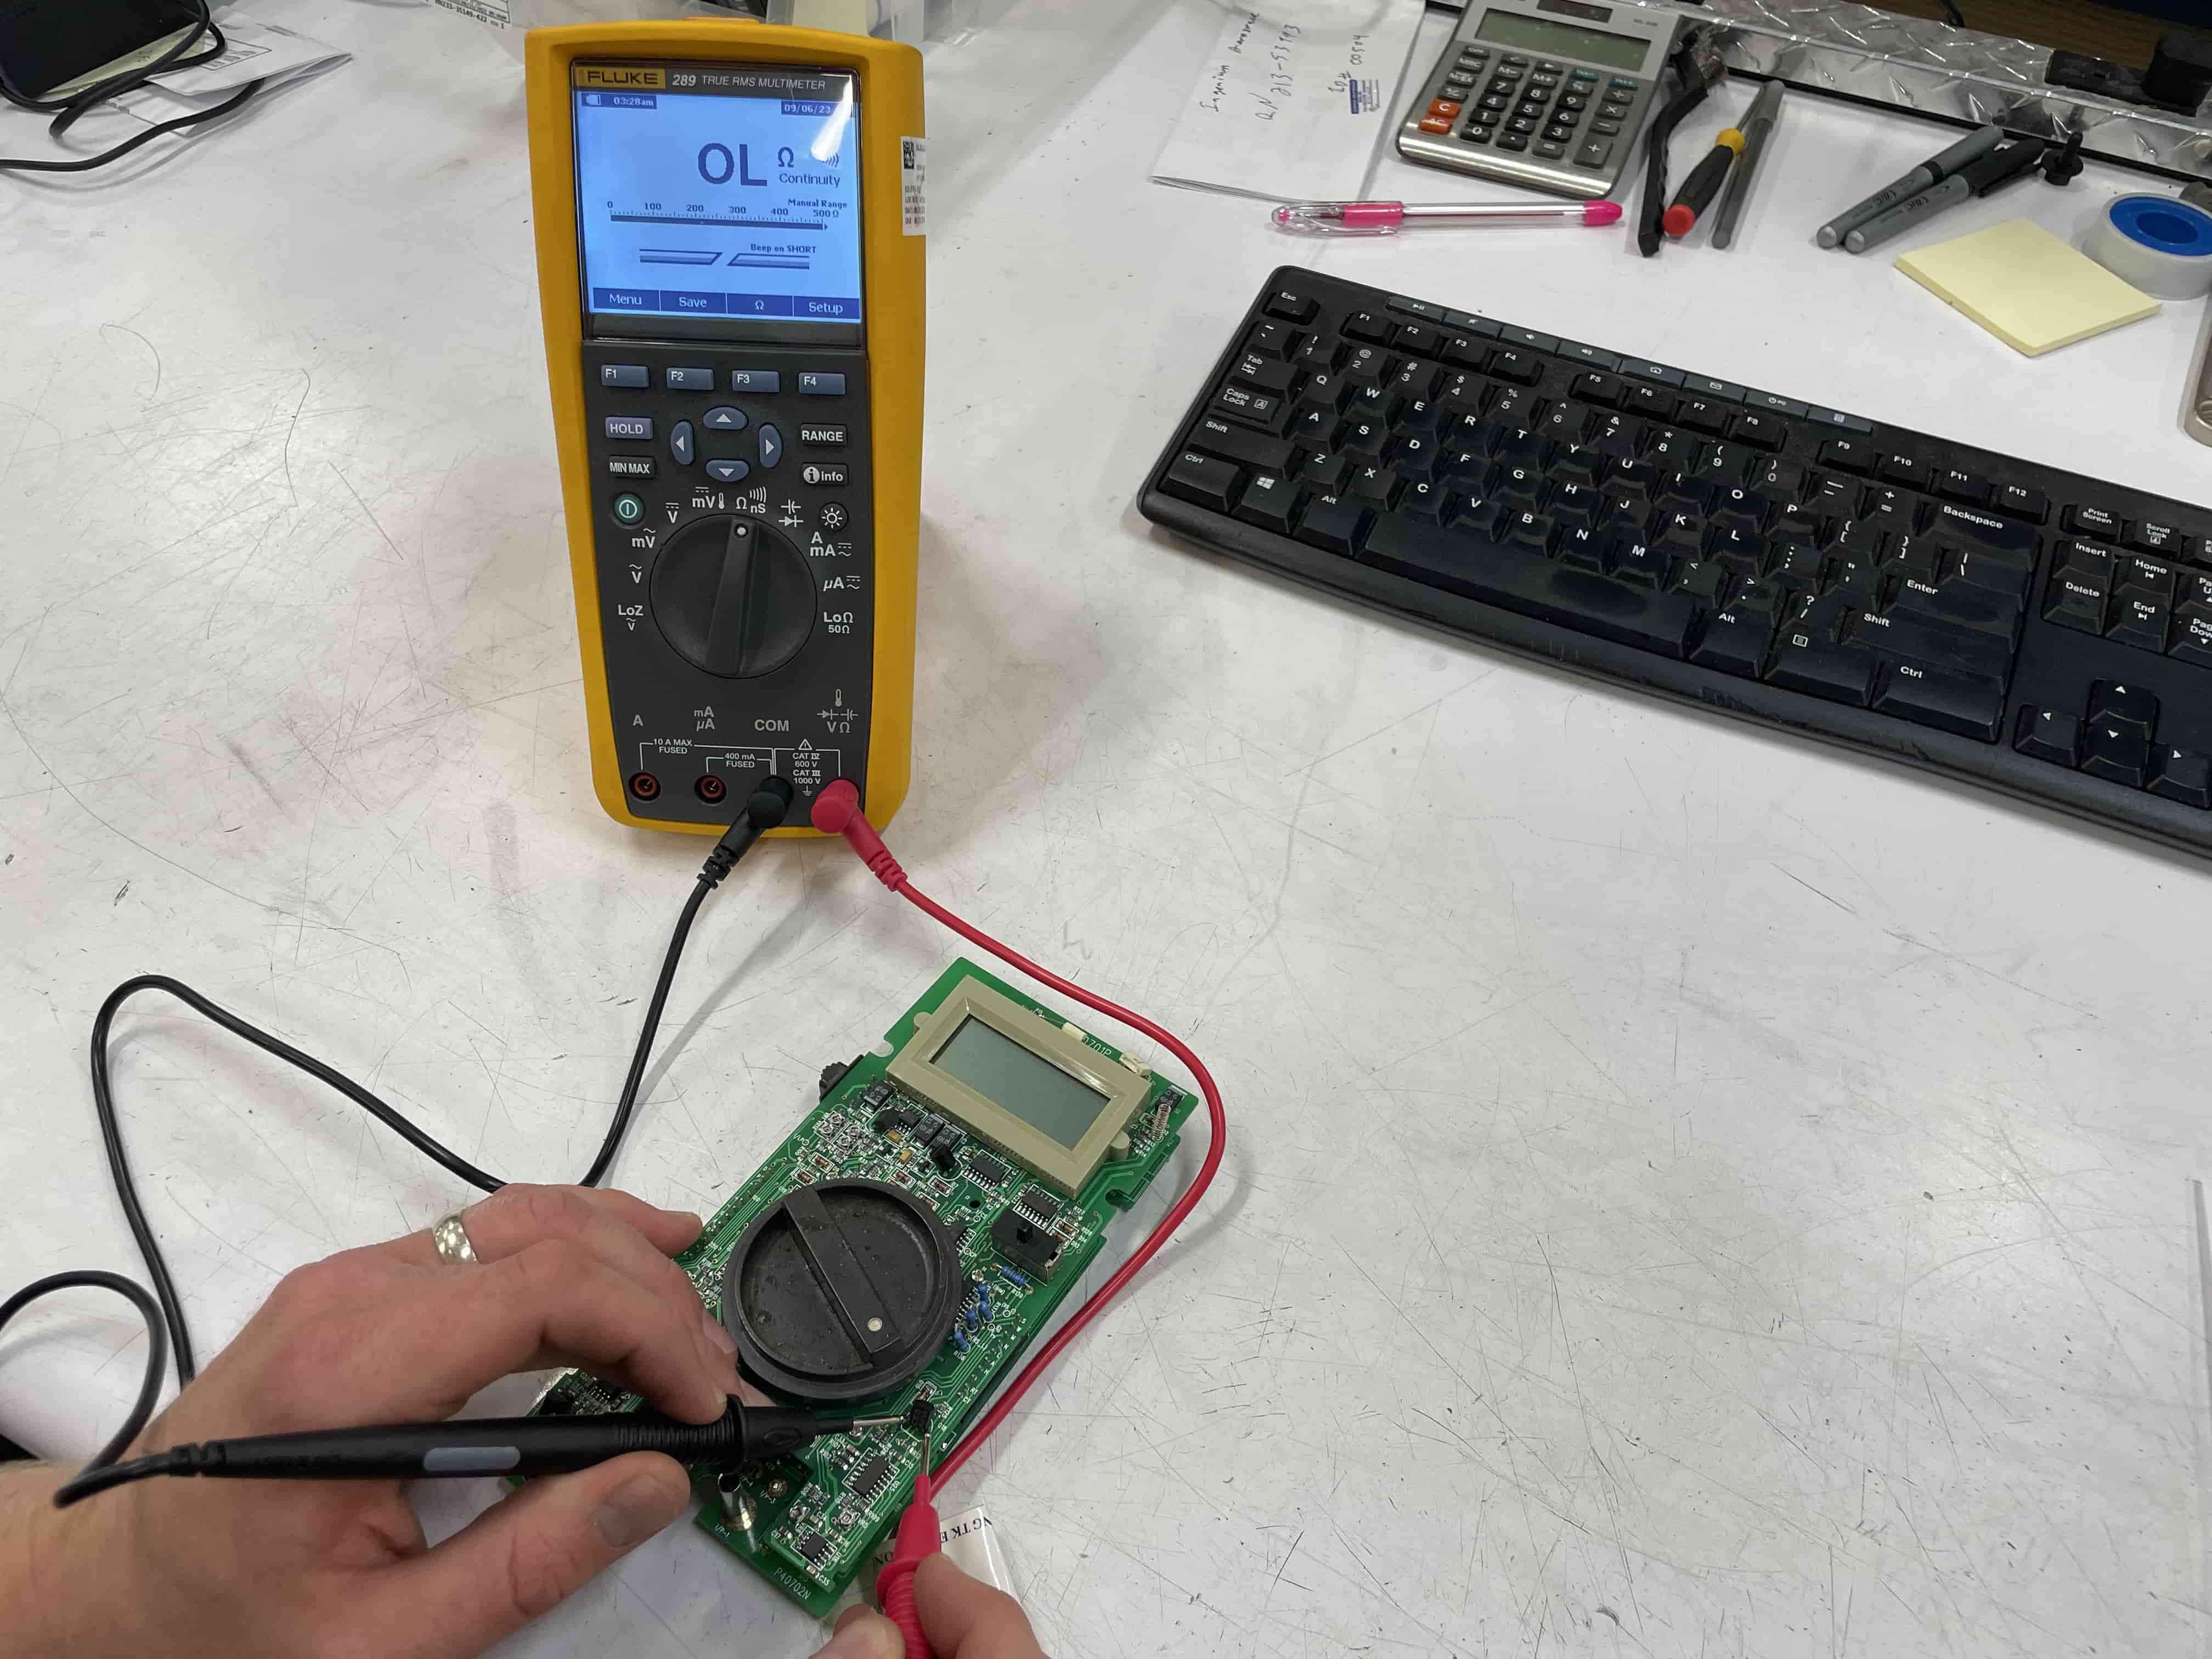
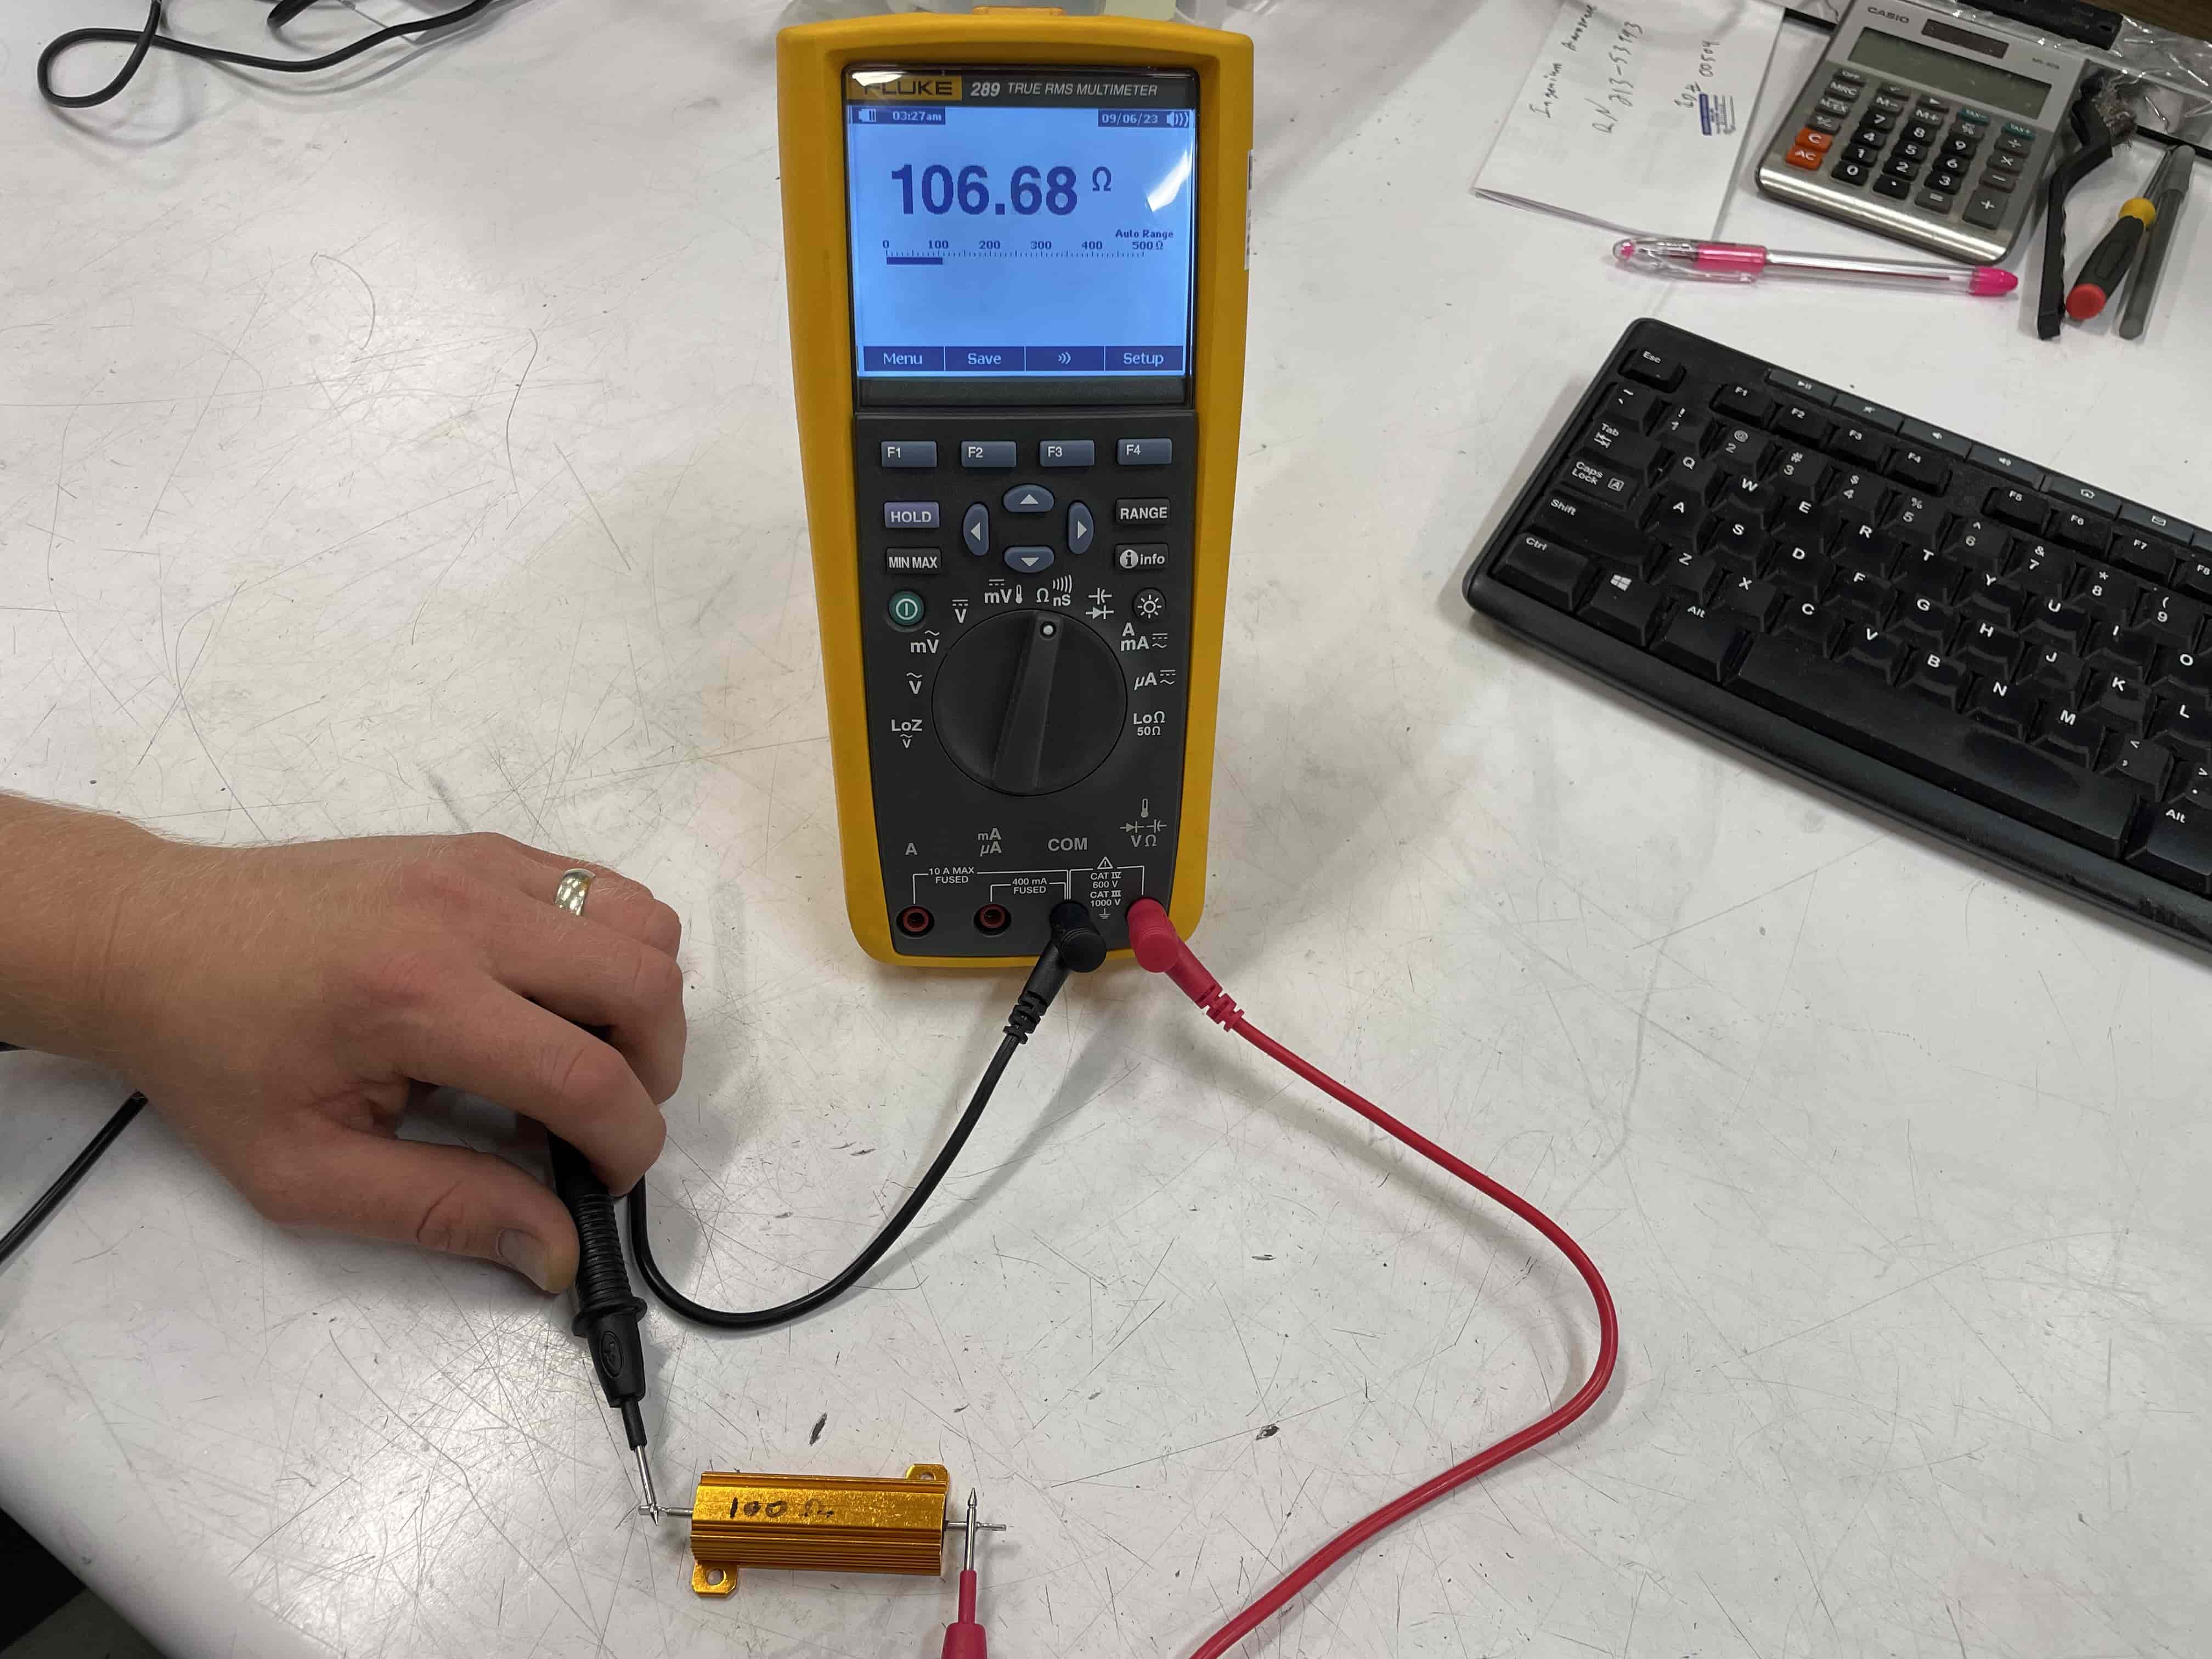
Step 6.3: How To Measure Resistance With a Multimeter
To measure resistance with a multimeter, you will first want to touch the tips of the probes together to ensure that there's no residual resistance in the probe leads. The multimeter should read very close to zero ohms (Ω). This step calibrates the leads' resistance so it can be subtracted from the actual measurement.
Next, touch the red probe to one end of the resistor or component and the black probe to the other end - just the same as you did for voltage measurements.
If the resistor is functioning properly, the resistance value on the meter’s display should be the same as the resistor’s rating. If not, the resistor is defective and needs to be replaced.
Step 6.4: How To Test For Continuity With a Multimeter
To check continuity with a multimeter, simply place the test leads across the component, just like you would for voltage and resistance.
When testing for continuity, if a complete path is detected, most newer multimeters will audibly beep. If your multimeter does not contain a function to audibly beep, the display should indicate a low resistance value, indicating continuity. If this does not happen, it indicates an open circuit (no connection).
Note: Similar to testing for resistance, you will want to touch the tips of the probes together to ensure that there's continuity between them before starting the test.
Step 6.5: How To Check a Capacitor With a Multimeter
To measure capacitance with a multimeter, you will want to first remove the capacitor from the circuit. Be sure to do this safely, as capacitors can remain energized even after power is removed from the circuit. In order to do this safely, you can discharge the capacitor by connecting a resistor to it.
Once it is properly discharged, you can test the capacitance by placing the leads across the capacitor terminals. Touch the red probe to the positive terminal of the capacitor and the black probe to the negative terminal.
Step 6.6: How To Measure Frequency With a Multimeter
To test frequency of an electrical component or circuit with a multimeter, you will need to touch the red probe to the point where the signal is accessible (e.g., the signal generator's output) and touch the black probe to the reference ground or common point.
There are two primary settings in which multimeters can measure frequency. Be sure to select the one most pertinent to your testing.
- Frequency Counter Mode: This is used to measure the frequency of an AC signal at a specific moment in time.
- MIN MAX Recording Mode: While connected to a circuit for a period of time, the multimeter will record the minimum and maximum frequency it measures during that time period.
Step 6.7: How To Measure Temperature With a Multimeter
If your multimeter contains the ability to measure temperature, you simply need to plug in the thermocouple adapter and measure the temperature of whatever you are inspecting.
Step 7: Read and Record the Measurement Results
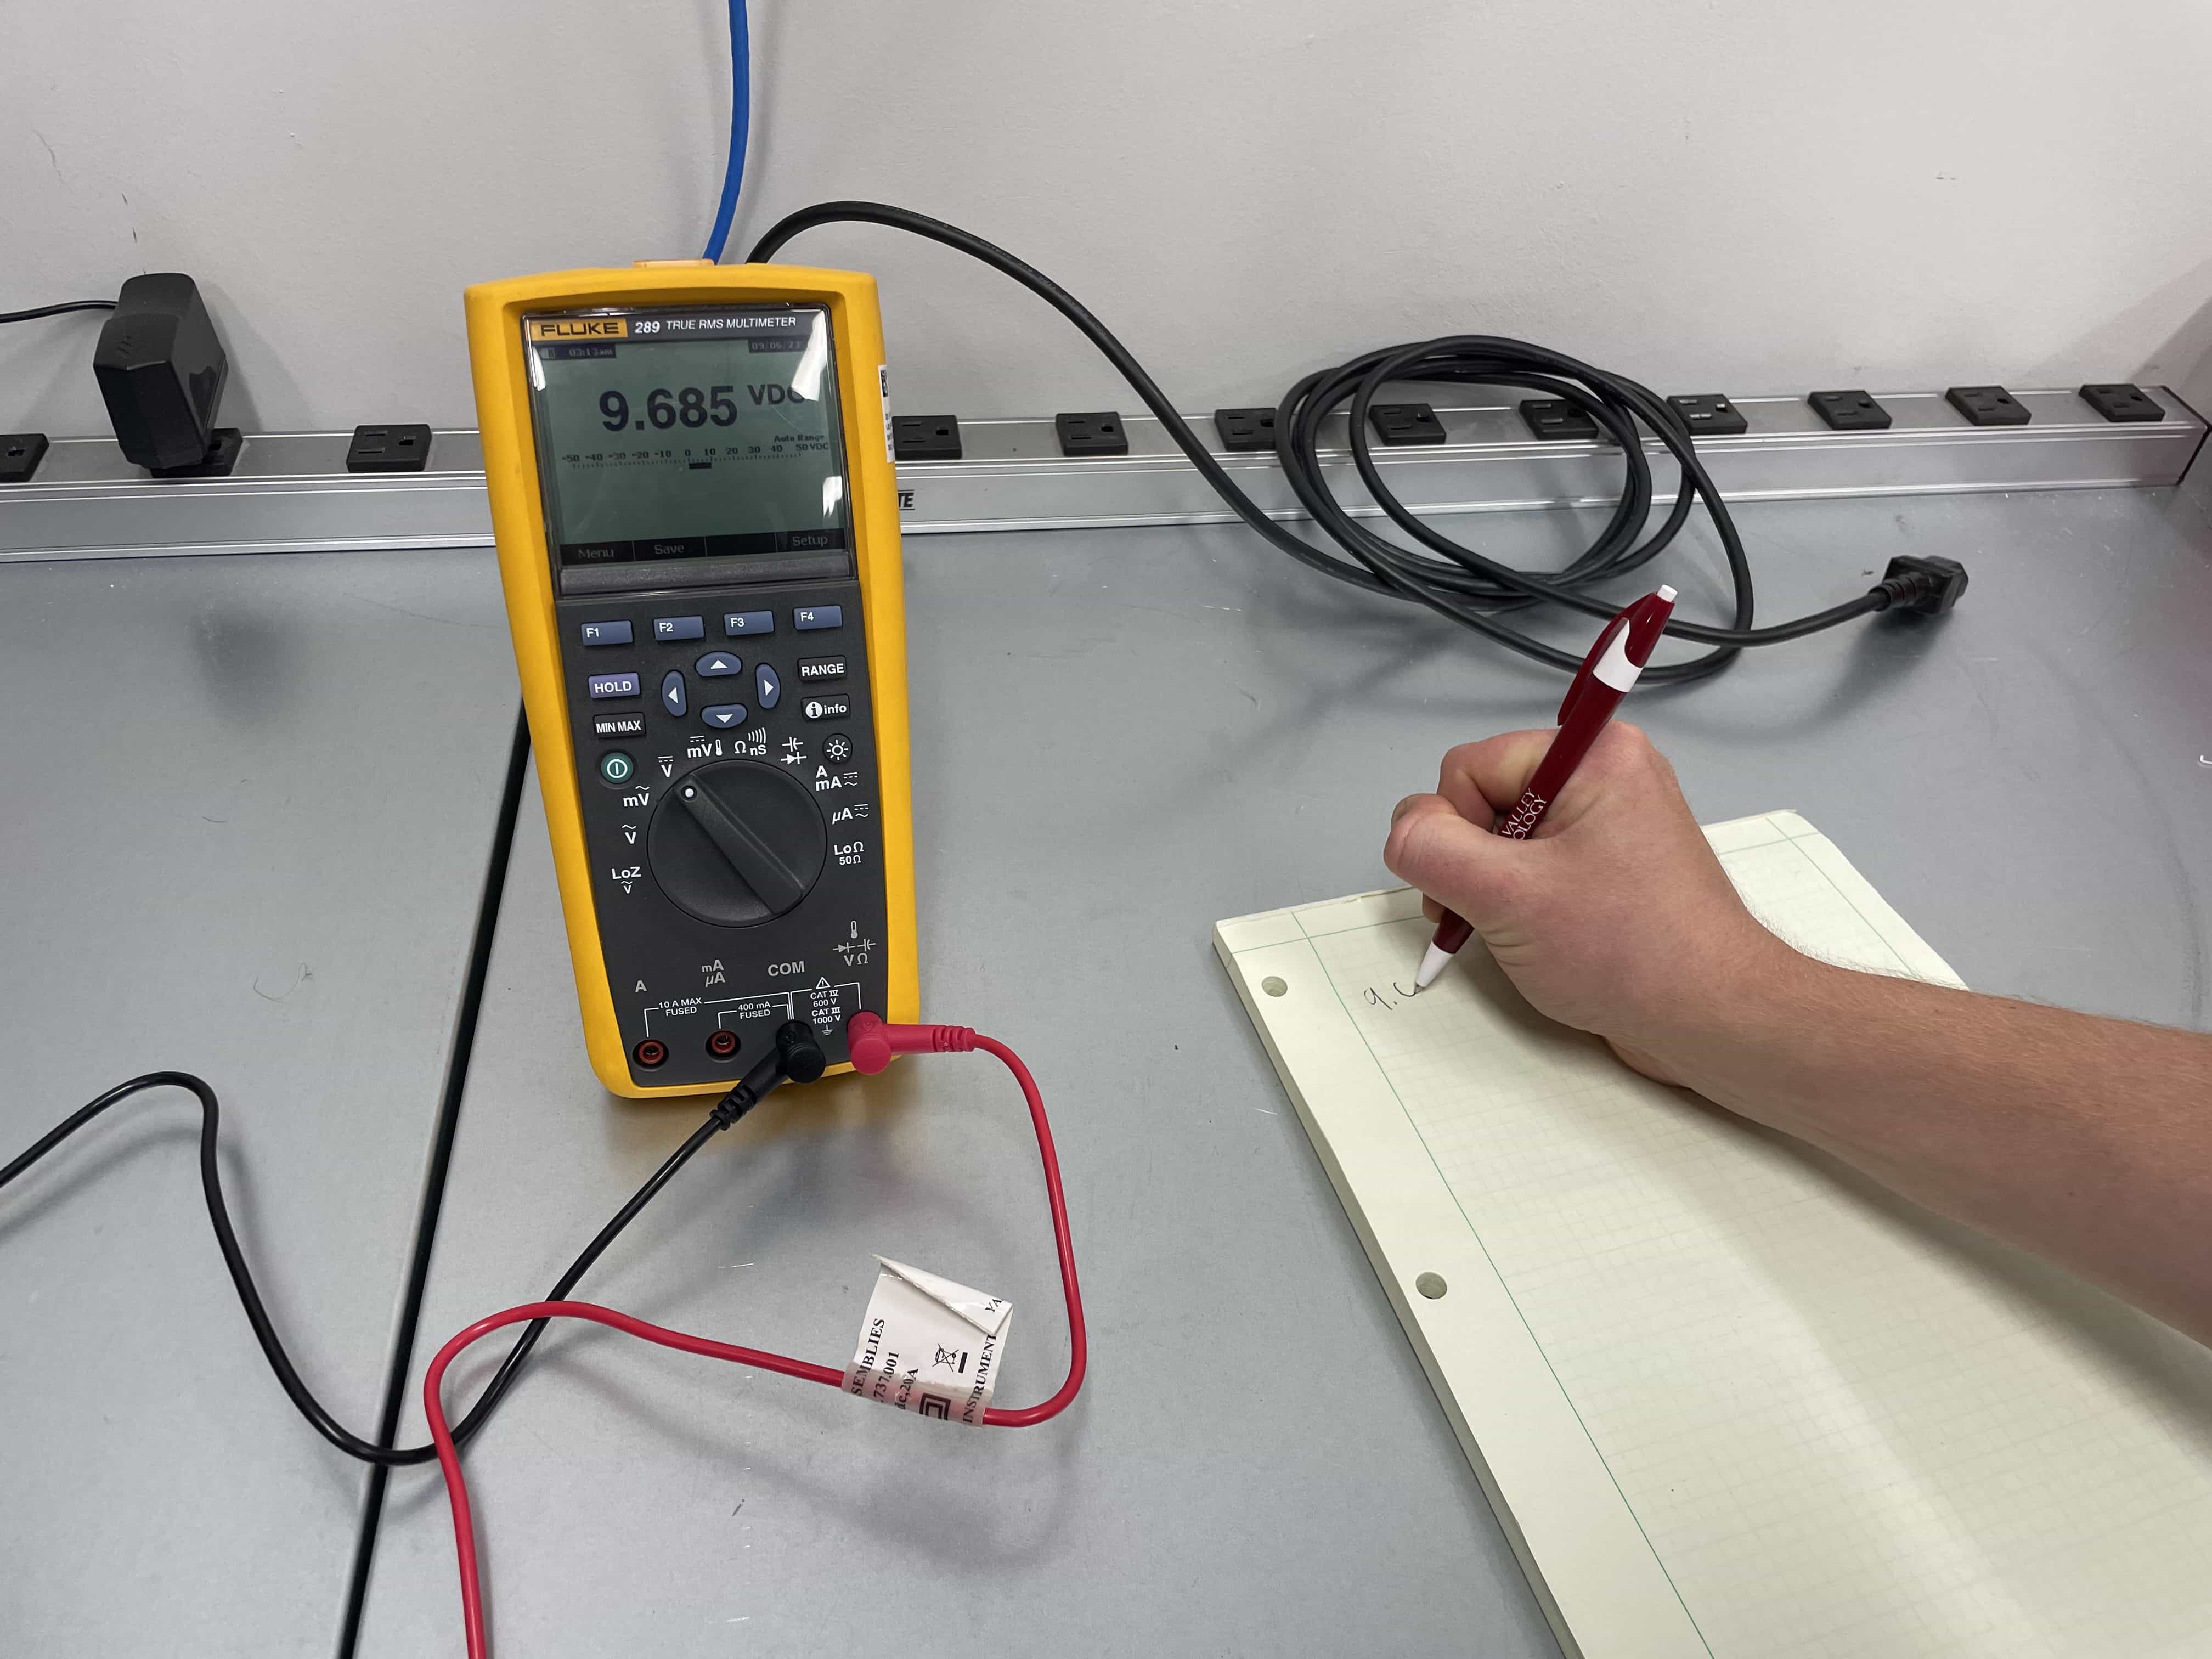
Once the test leads are properly connected, read the measurement displayed on the multimeter. Pay attention to the unit of measurement and the decimal point placement to interpret the value correctly. For analog multimeters, be sure to pay attention to the scale you are reading from.
Next, you will simply need to record the measurement. This can be as simple as a pen and paper or by utilizing a multimeter with data output to a computer or other device.
Repeat this process for any additional tests you need to complete on the circuit or component you are testing.
Step 8: Disconnect and Power Down
After taking the measurements you need, disconnect the test leads, return the multimeter to its default settings, and turn it off to conserve battery life.
If you had to disassemble the circuit you were testing, be sure to reassemble that circuit and reestablish power to it at this time.
It is important to note, that while these steps provide a general overview, it's crucial to consult the specific instructions provided by the manufacturer for your multimeter model.
Troubleshooting With a Multimeter
In addition to the standard tests listed above, the multimeter is also an invaluable tool for troubleshooting electrical circuits and identifying faults. Here are some common troubleshooting scenarios where a multimeter can help:
- Testing an Outlet With a Multimeter
- Checking Power Supply Voltage of a Laptop
- Testing a Fuse For A Car's Headlights
- Testing a Car Battery With a Multimeter
- Identifying a Short Circuit
- Verifying Component Values
- Testing Diodes
- Checking Grounding
Troubleshooting Scenario 1: Testing an Outlet With a Multimeter
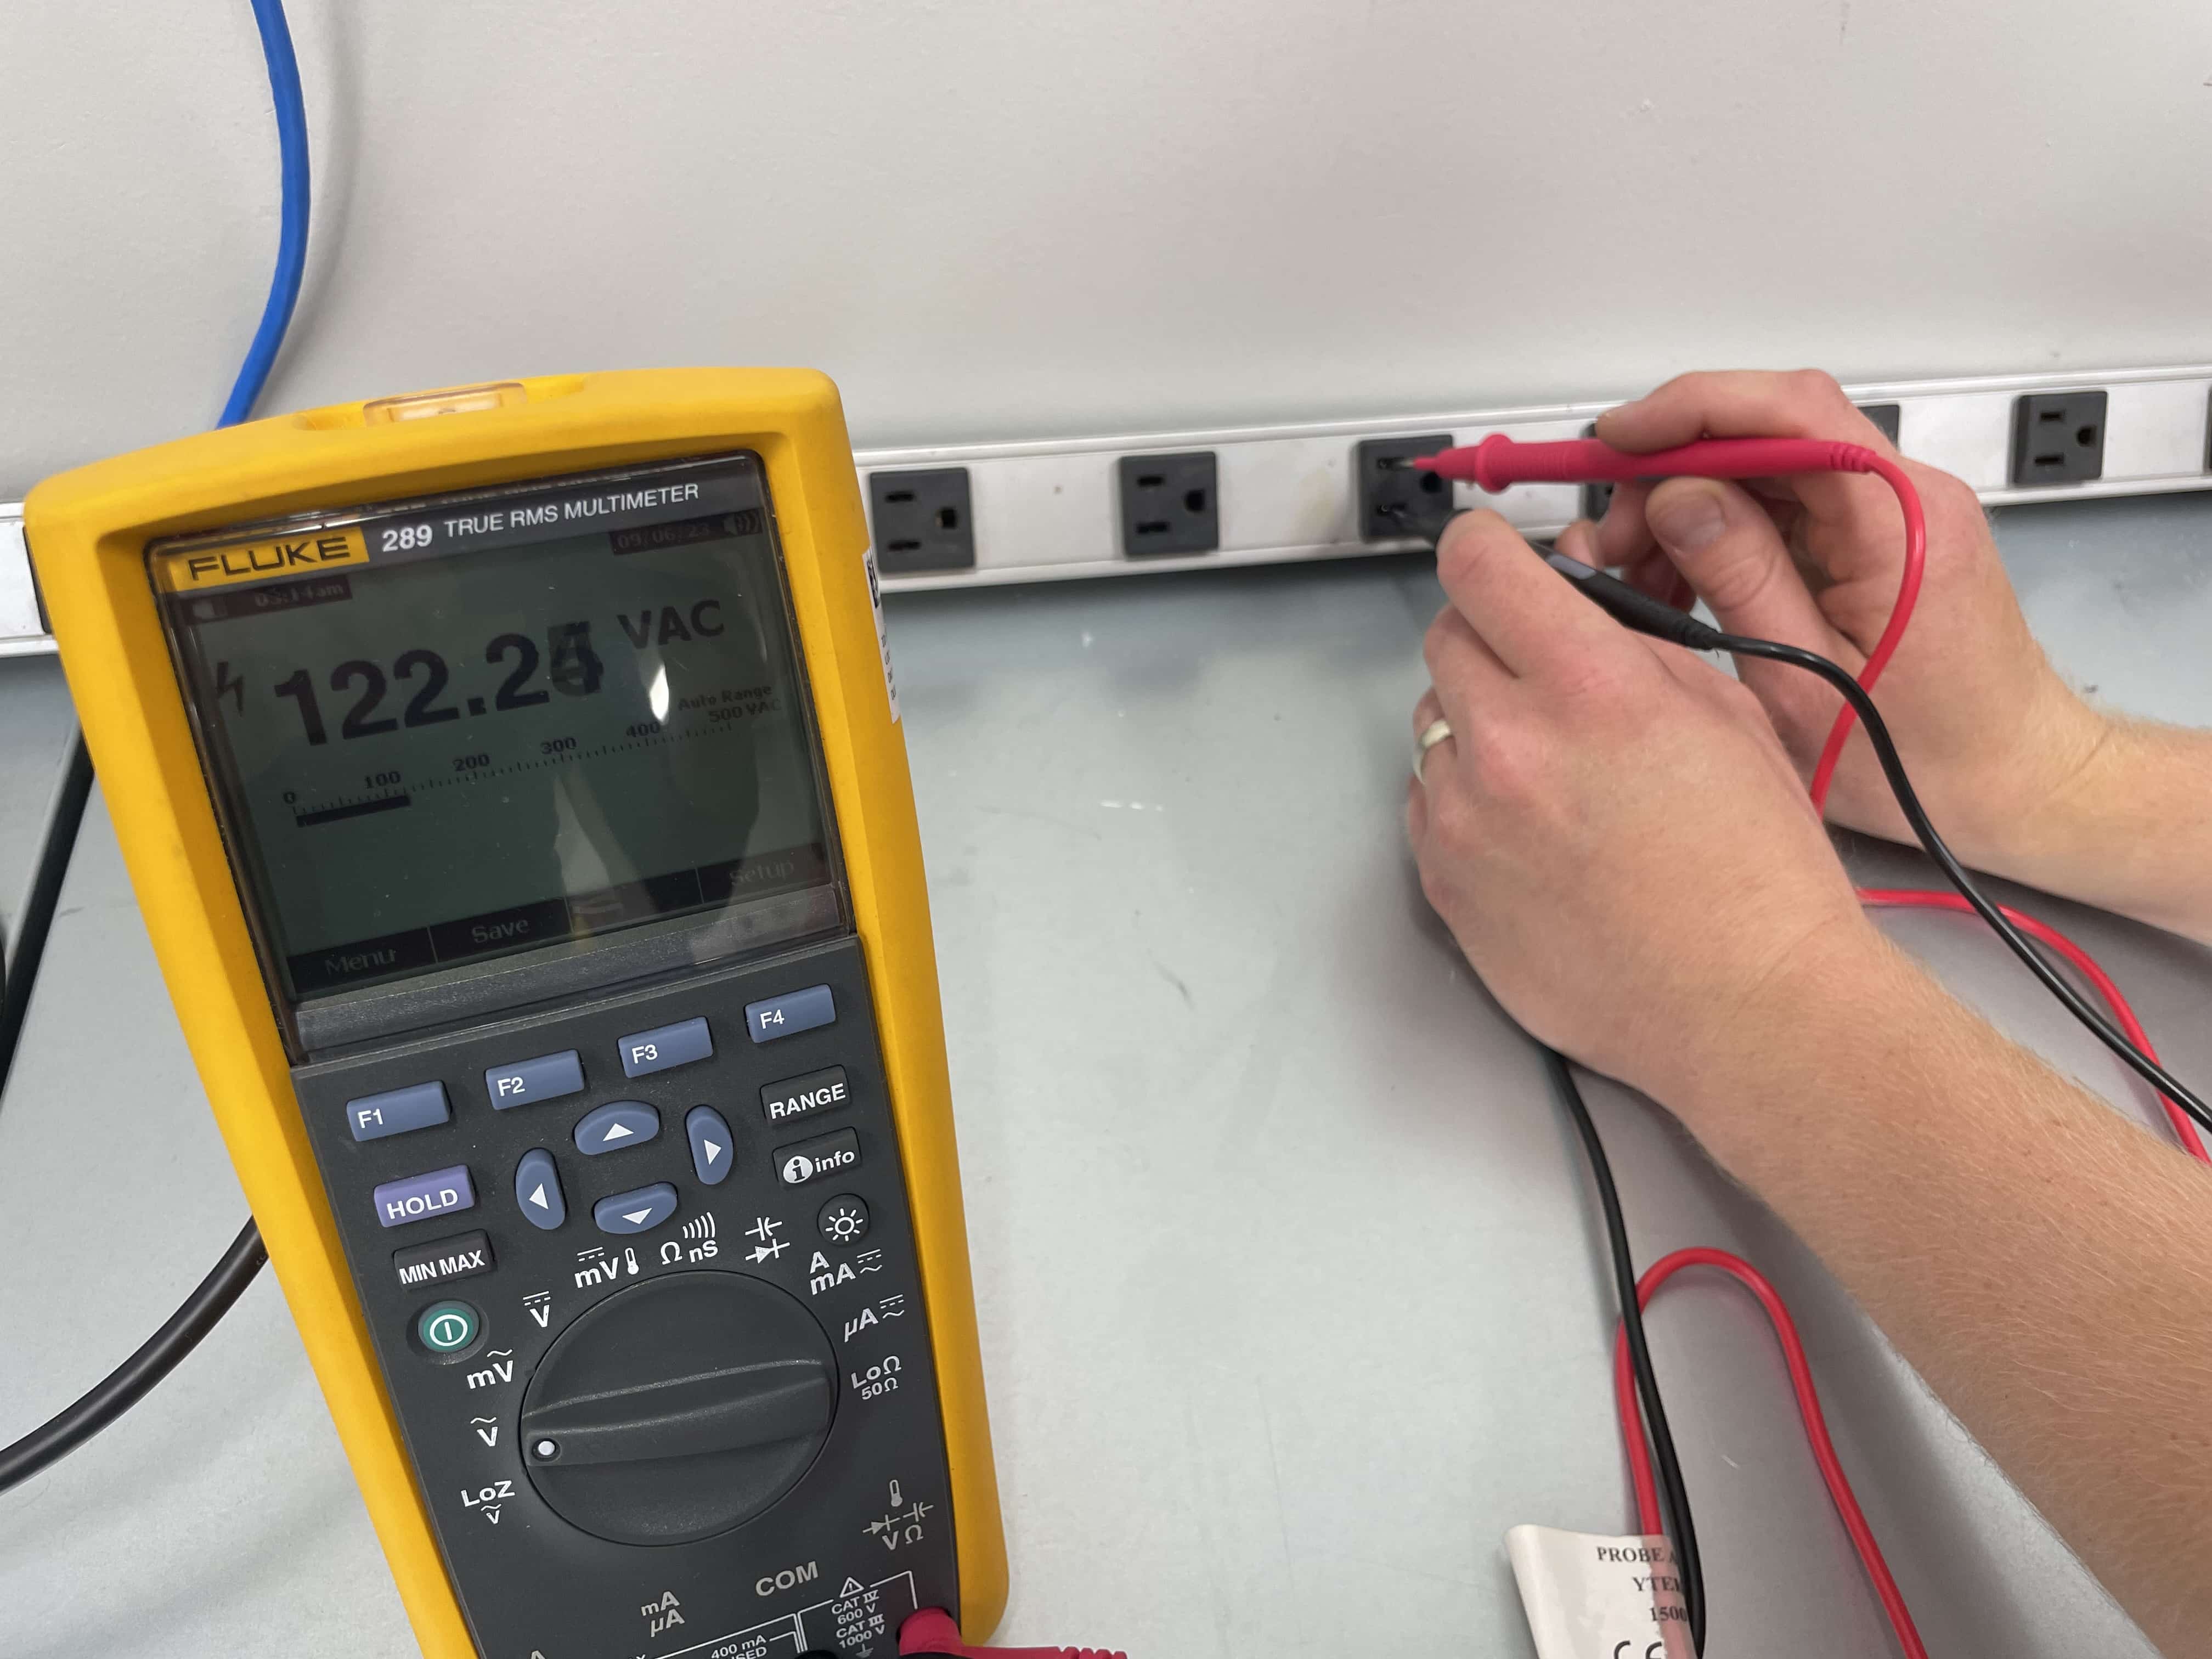
Let's pretend you have a laptop that is not turning on. One of the first things you should check is whether the outlet you have it plugged into is actually supplying power. To test an outlet with a multimeter, insert the black probe into the smaller slot and the red probe into the larger slot of the outlet; a standard US outlet should read around 110-120 volts AC. If the reading deviates significantly, doesn't provide a value or shows reverse polarity, you have an issue with your outlet.
Troubleshooting Scenario 2: Checking Power Supply Voltage of a Laptop
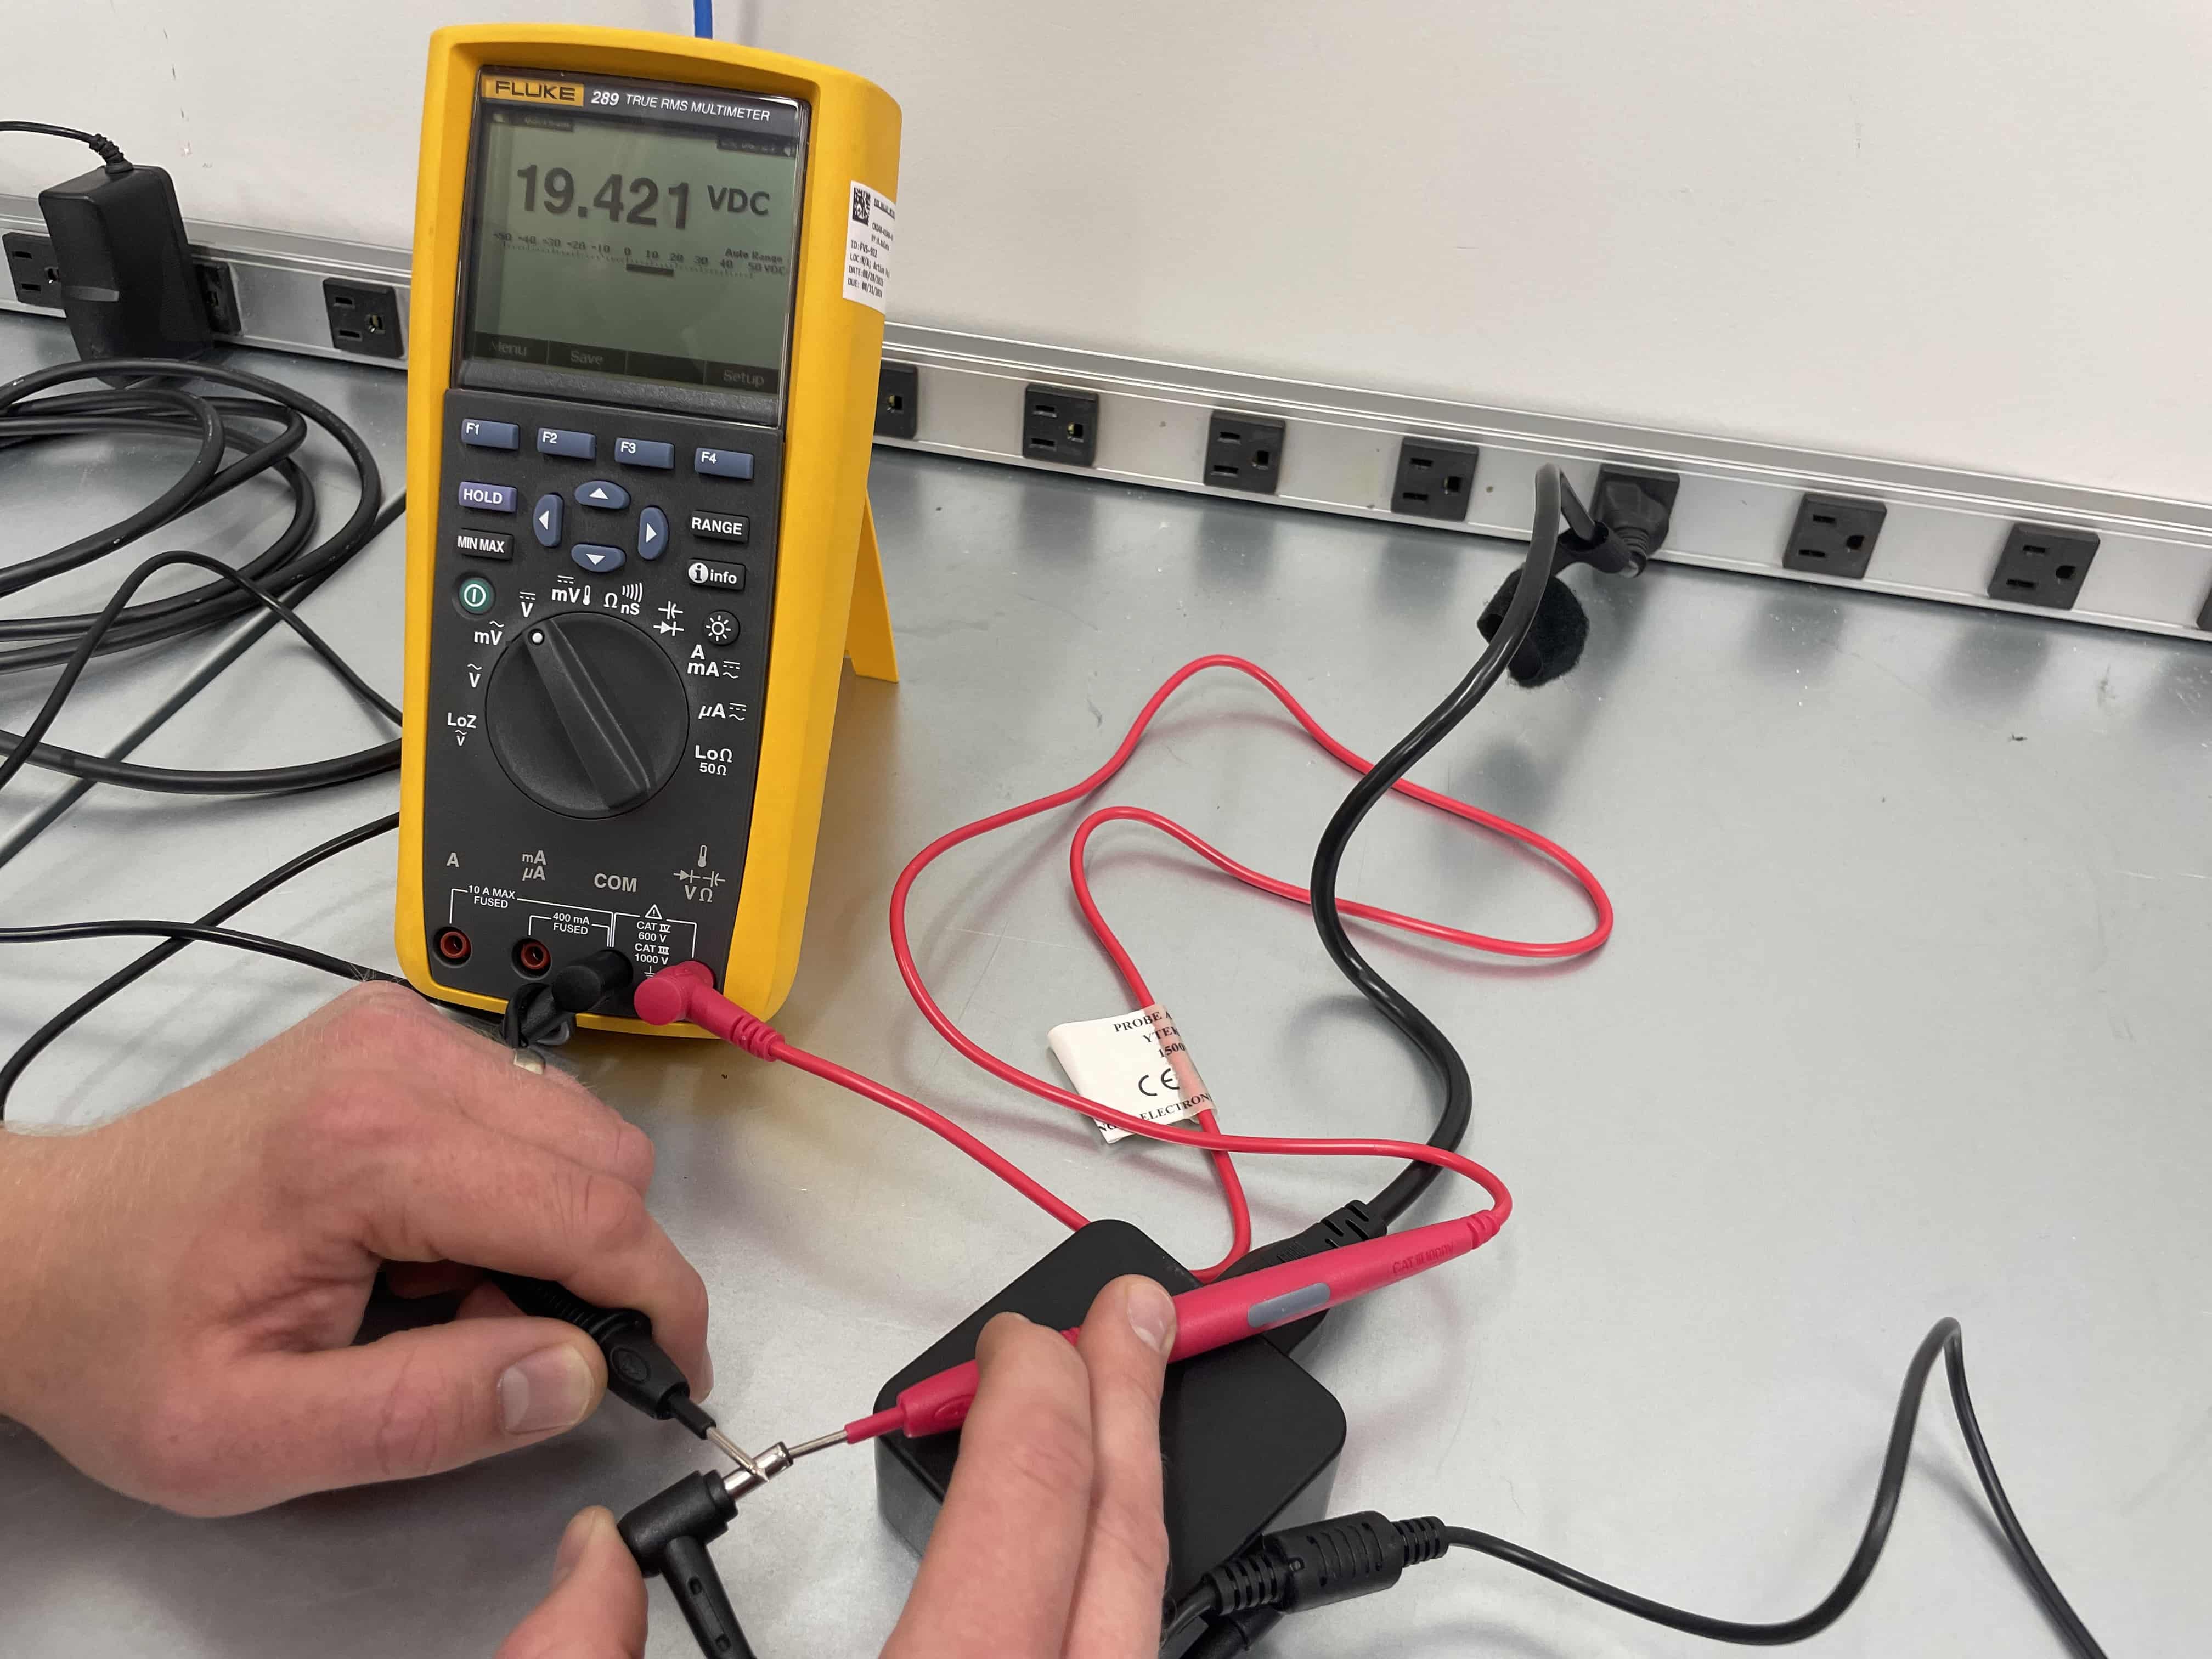
Let's assume that your laptop still will not turn on. Now that we know the outlet is working properly, you suspect a faulty power adapter for the computer. Set your multimeter to DC voltage mode. Connect the red probe to the tip of the adapter plug and the black probe to its outer ring. Turn on the adapter and read the displayed voltage. If it's significantly lower than the rated voltage, the adapter might be the issue.
Troubleshooting Scenario 3: Testing a Fuse For A Car's Headlights
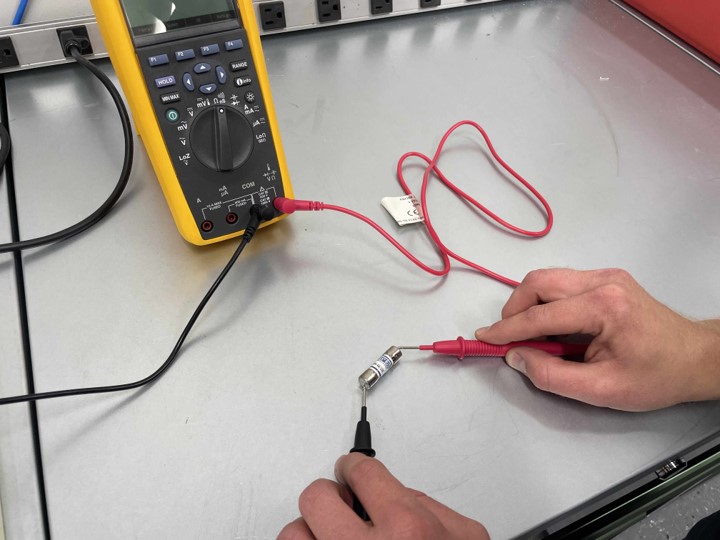
Your car's headlights are not working. There is a decent chance it is the headlight fuse that working poorly. To check the headlight fuse, set the multimeter to continuity mode. Remove the headlight fuse and touch the probes to its terminals. If the multimeter beeps, the fuse is fine. If it doesn't beep, the fuse might be blown and needs replacement.
Troubleshooting Scenario 4: Testing a Car Battery With a Multimeter
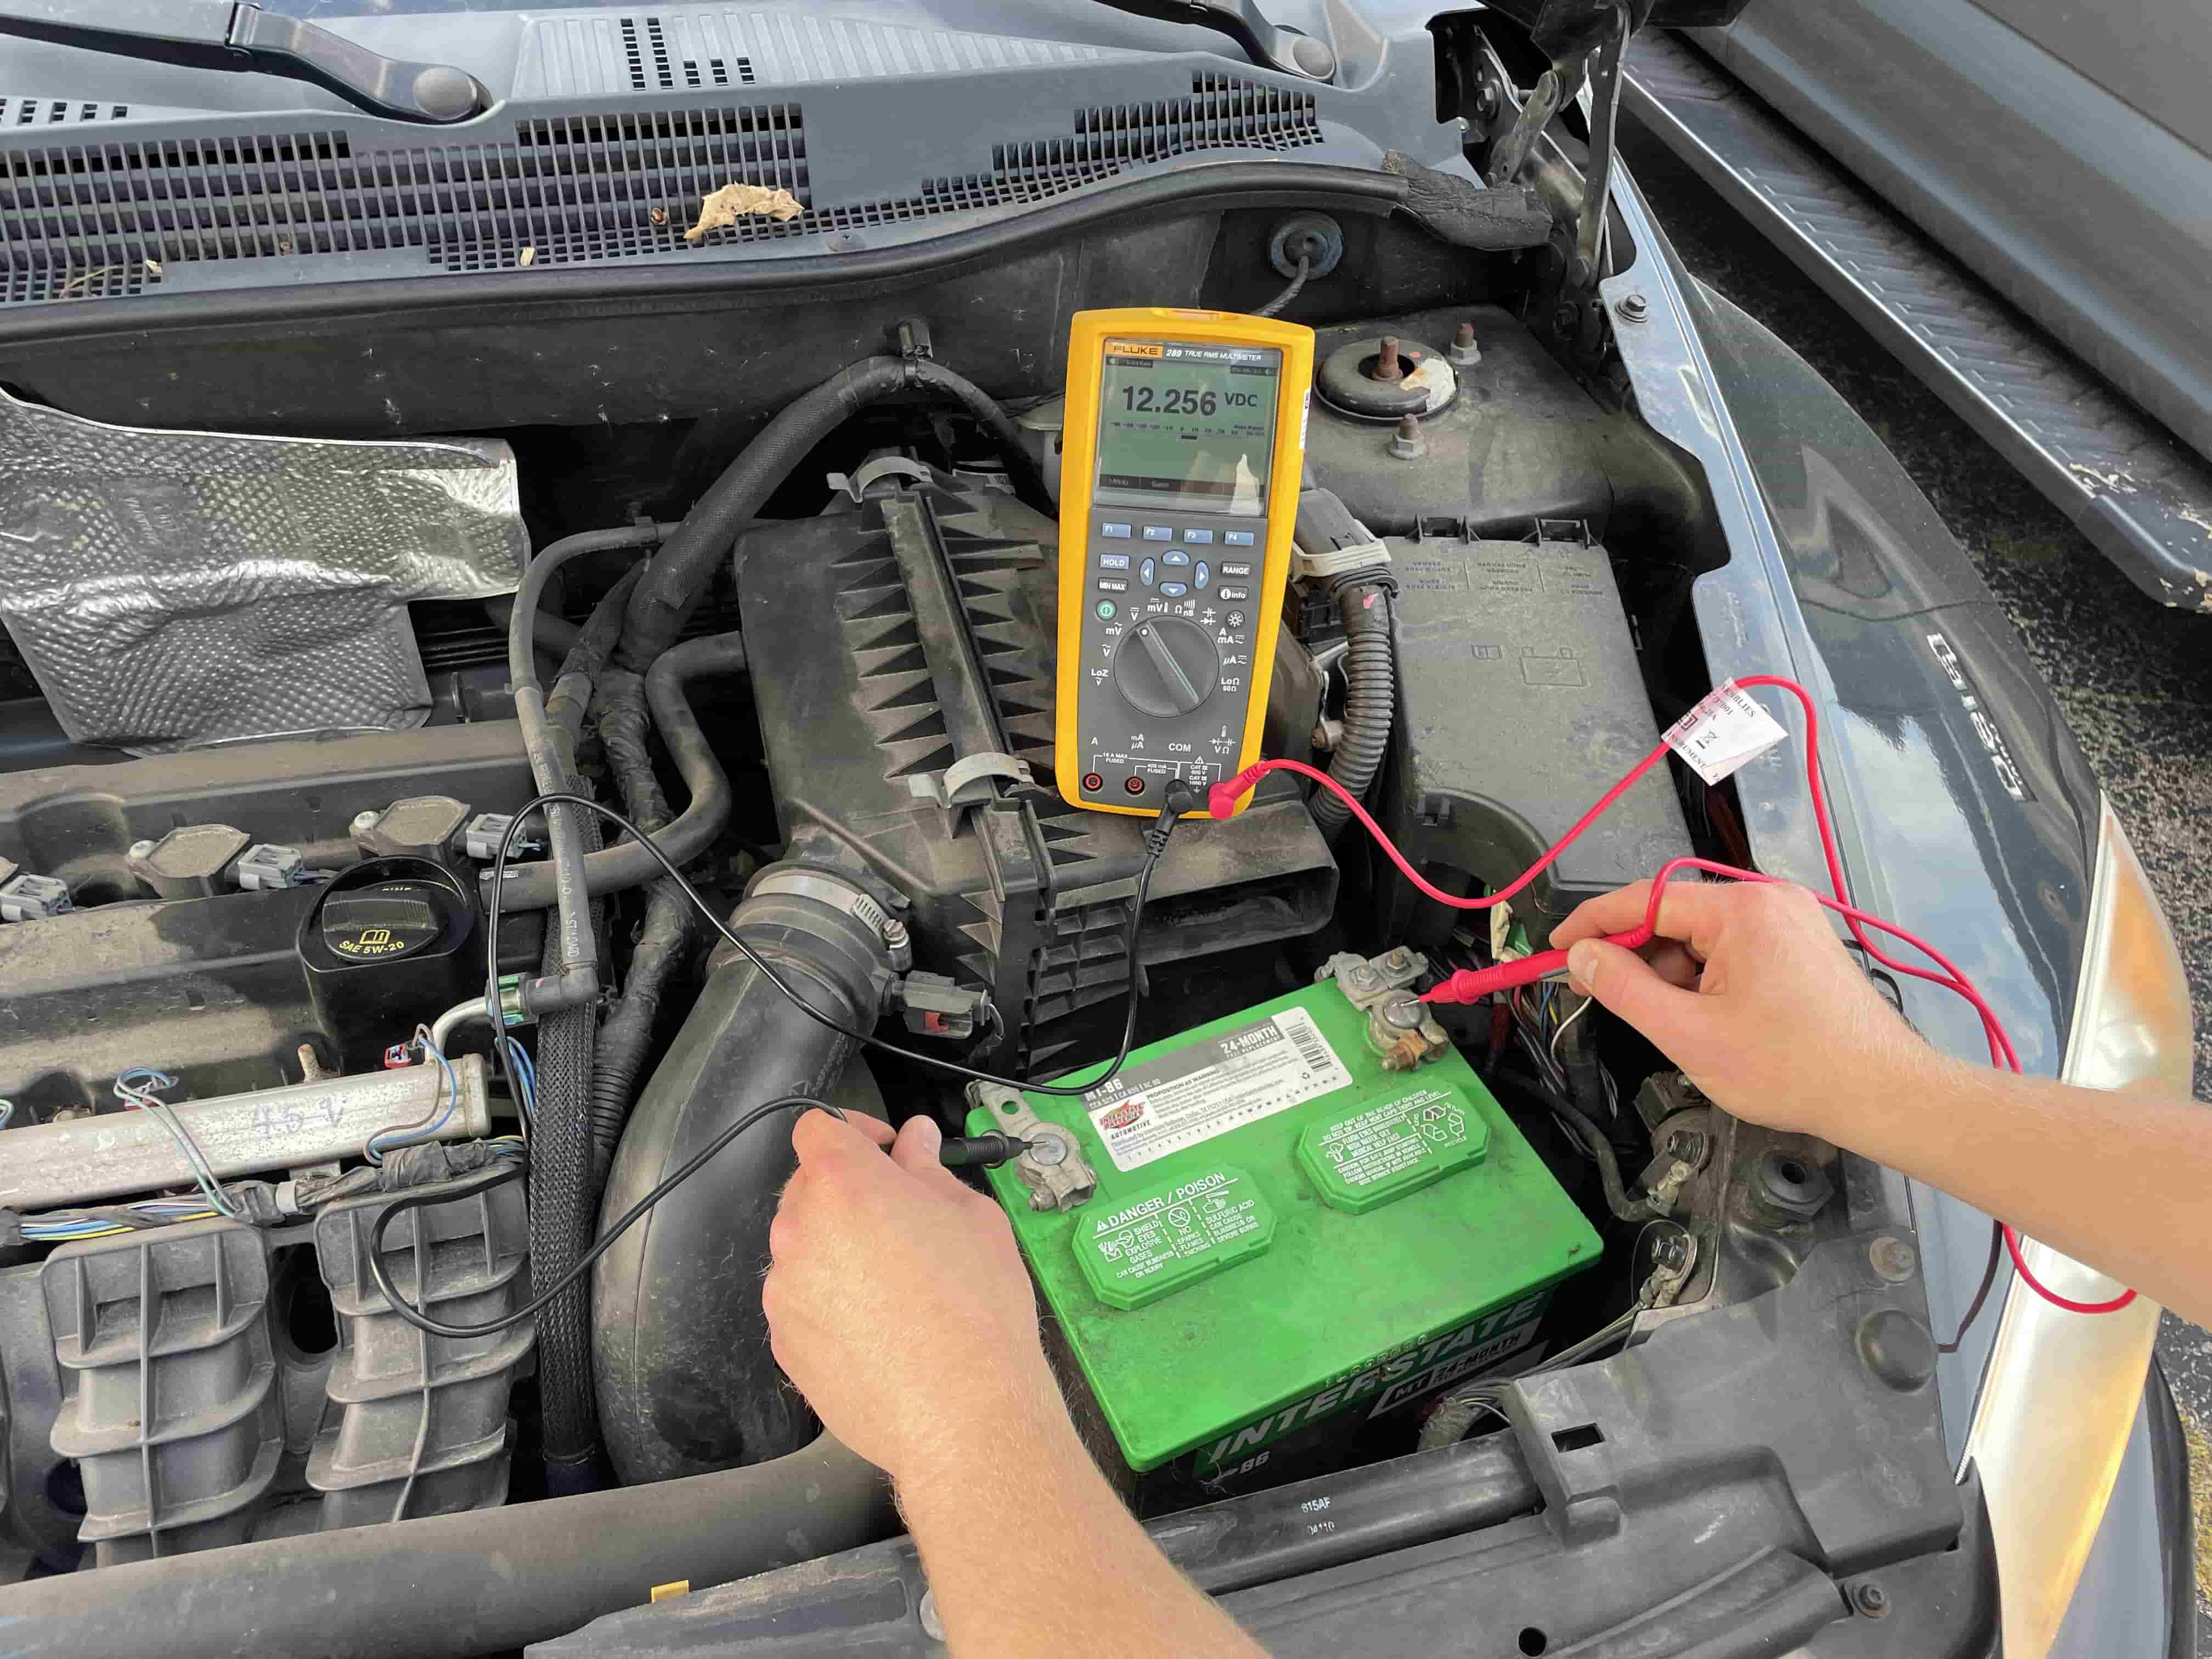
Your car won't start. In fact, the engine won't even turn over. We have all been there. The most likely culprit is your battery is dead. To test this, take out your multimeter and connect the red probe to the battery's positive terminal and the black probe to the negative terminal; a fully charged car battery should read around 12.6 volts DC. If the reading is below 12 volts, the battery may be discharged or faulty.
Troubleshooting Scenario 5: Identifying a Short Circuit
You're troubleshooting a circuit board with erratic behavior. Set the multimeter to continuity mode and disconnect suspected components or wires. Touch one probe to one end of the disconnected section and the other probe to the opposite end. If the multimeter beeps, there's a short circuit causing the issues.
Troubleshooting Scenario 6: Verifying Component Values
You're repairing an audio amplifier and suspect a faulty resistor. Set the multimeter to resistance mode. Measure the resistance of the suspected resistor and compare it to the expected value. If it's far off, the resistor might need replacement.
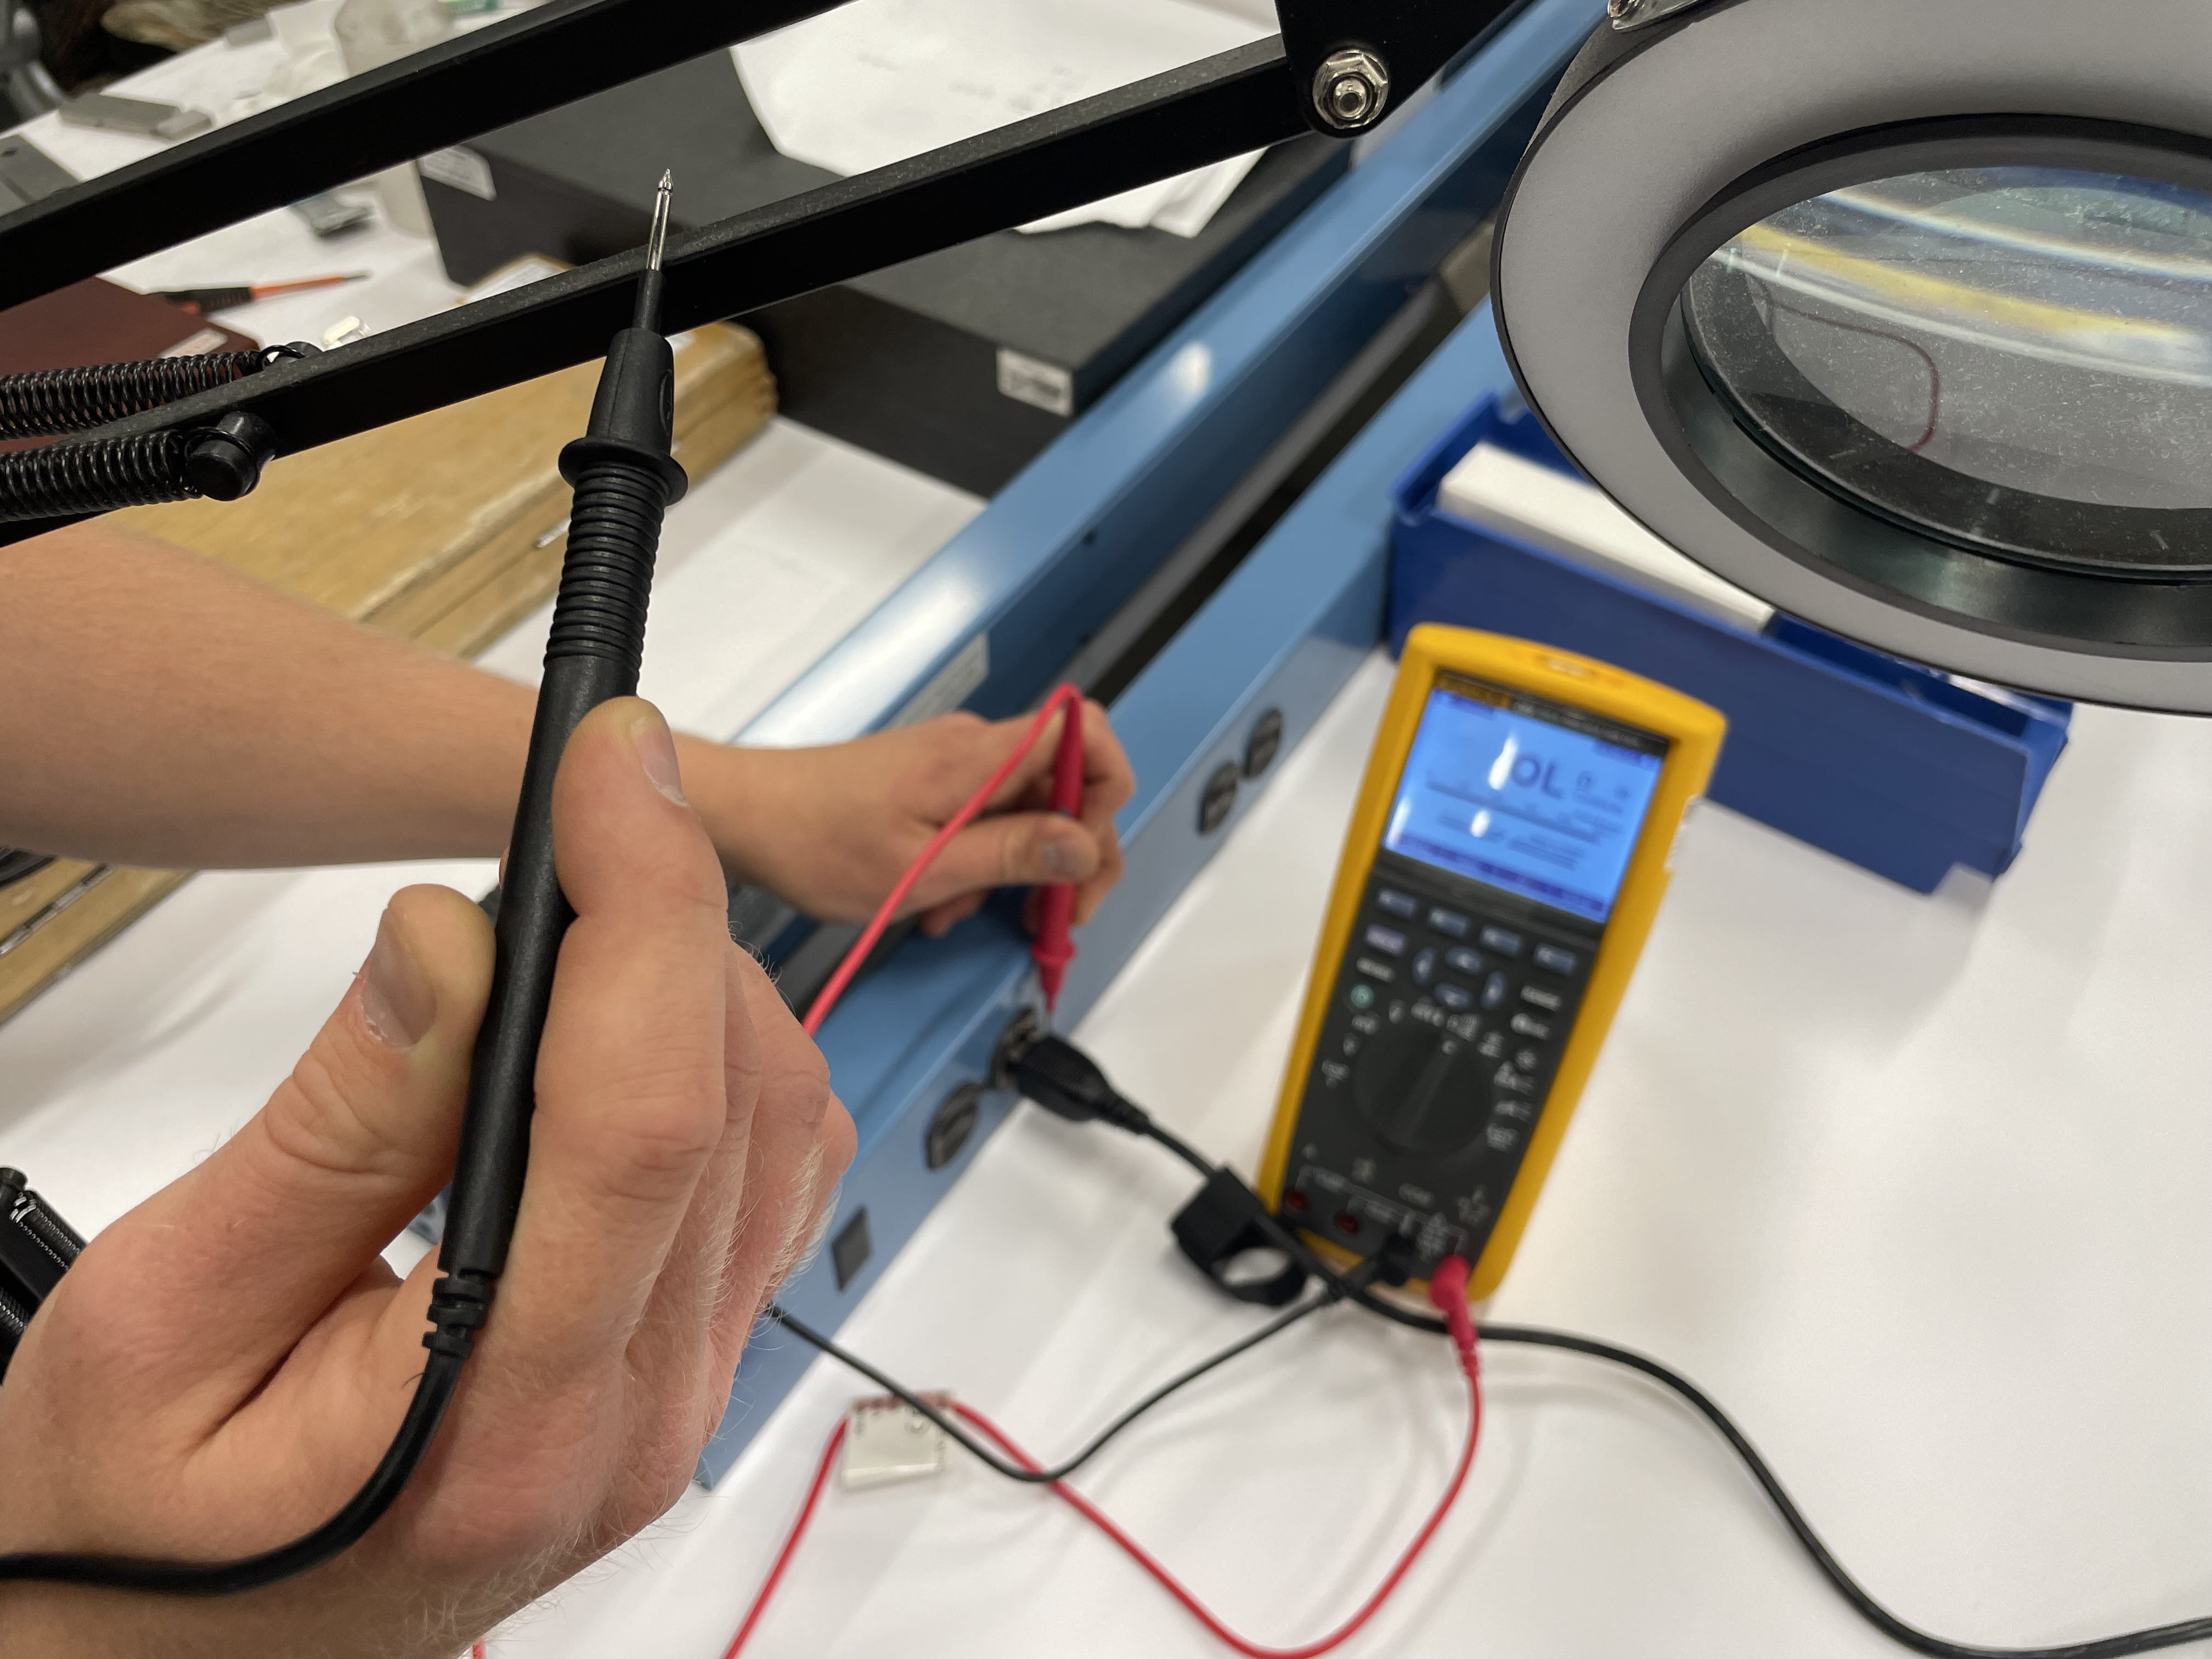
Troubleshooting Scenario 7: Testing Diodes
You're repairing a solar panel system and suspect the diode is faulty. Set the multimeter to diode testing mode. Connect the probes to the diode terminals, observing polarity. The multimeter should show a forward voltage drop. Reverse the probes; the multimeter should show an open circuit.
Unfortunately, we do not have a solar panel at our disposal for testing. The above image shows the process, just on a more standard circuit board. The process will be exactly the same.
Troubleshooting Scenario 8: Checking Grounding
You're troubleshooting a flickering light fixture. Set the multimeter to continuity mode. Connect one probe to the fixture's metal frame (ground) and touch the other probe to various points in the circuit. If the multimeter beeps or shows continuity, the points are properly grounded.
Obviously, each of these are quite specific examples, but the basic principle can be applied to other measurements that are nearly the same. For example, the instructions on how to use a multimeter to test a car battery can be applied to nearly any type of battery around your home.
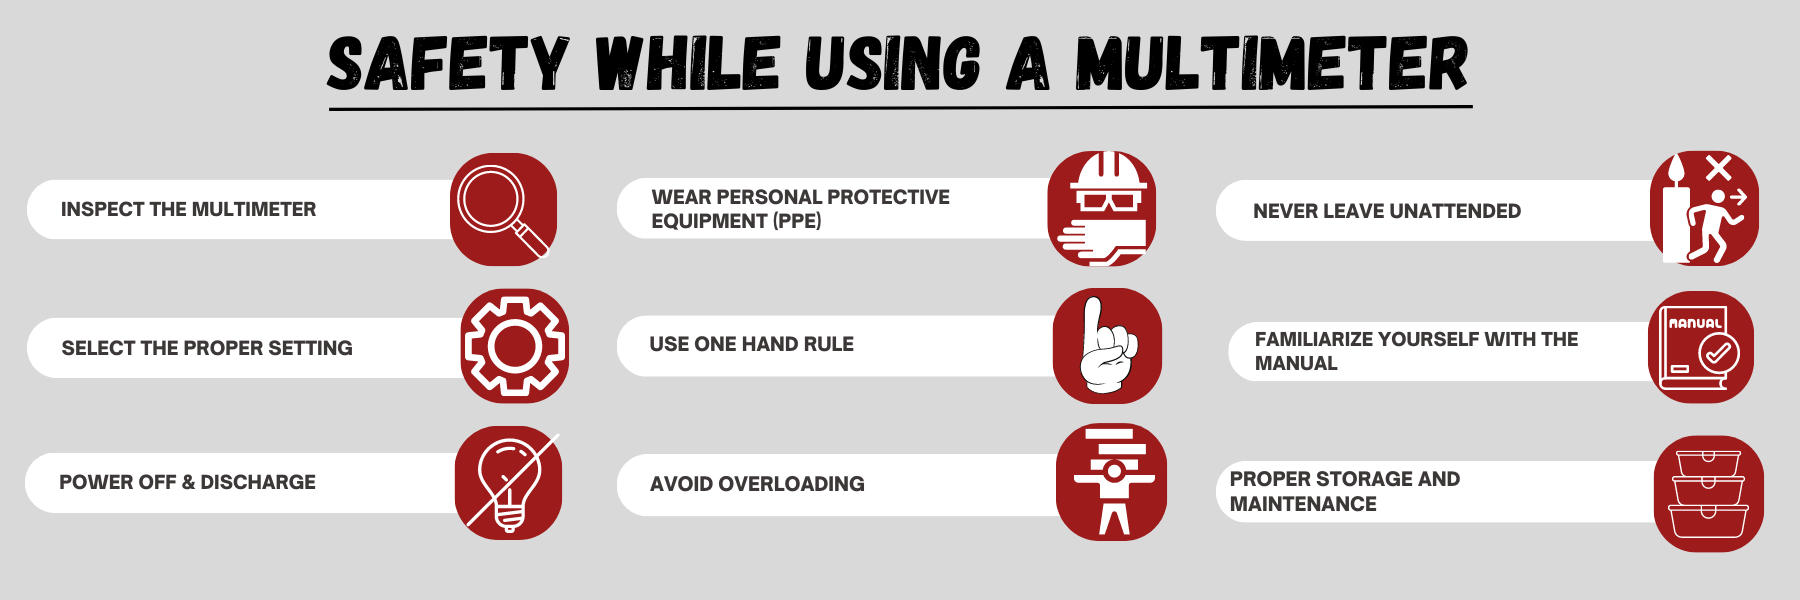
Multimeter Safety
Take these precautions and following proper operating procedures will help ensure the safe and effective use of a multimeter:
- Wear Personal Protective Equipment (PPE)
- Remove Metallic Jewelry
- Familiarize Yourself with the Manual
- Power Off and Discharge the Circuit
- Inspect the Multimeter
- Select the Proper Setting
- Use the One Hand Rule
- Avoid Overloading
- Never Leave The Multimeter Unattended
- Utilize Proper Storage and Maintenance
When it comes to using a multimeter, safety should always be a top priority. Multimeters are powerful and versatile tools, but mishandling or improper usage can lead to serious risks – both to you and the meter. After all, this is electricity. There is a reason it was used as a method of corporal punishment.
Let's look into each of those precautions in more detail.
Multimeter Safety Rule 1: Wear Personal Protective Equipment (PPE)
Wearing the appropriate personal protective equipment (PPE) is a fundamental aspect of working with a multimeter. Here are a few essential PPE items to consider:
- Safety Glasses: Protect your eyes from potential hazards, such as sparks, debris, or chemicals.
- Insulated Gloves: Insulating gloves provide an extra layer of protection against electrical shocks.
- Lab Coat or Protective Clothing: Wear clothing that covers your body and prevents loose clothing from coming into contact with live circuits.
Multimeter Safety Rule 2: Remove Metallic Jewelry
Before using a multimeter, remove any metallic jewelry, such as rings, bracelets, or watches. These objects can accidentally come into contact with live circuits and create a potentially dangerous situation. By removing jewelry, you eliminate the risk of electrical shorts or shocks caused by their contact.
Multimeter Safety Rule 3: Familiarize Yourself with the Manual
Each multimeter model may have unique features and operating instructions. To ensure safe and accurate measurements, take the time to read the user manual provided with your multimeter. Familiarize yourself with the specific functions, safety precautions, and limitations of your device.
Multimeter Safety Rule 4: Inspect the Multimeter
When using a multimeter, it is essential to inspect the device for any visible damage or defects. Check the cables, probes, and the display screen for any signs of wear and tear. When looking at the probes make sure the insulation is intact and the probe tips are clean and sharp If you notice frayed wires, loose connections, or cracked casings, hold off on using the multimeter until it is repaired or replaced.
Multimeter Safety Rule 5: Select the Proper Setting
Before taking any measurements, ensure that you select the appropriate setting on your multimeter. Different electrical parameters require different settings. Make sure you understand the range and limits of the values you expect to measure. Using an incorrect setting can lead to inaccurate readings or even damage to the multimeter or the circuit you are working on.
Multimeter Safety Rule 6: Power Off and Discharge the Circuit
Whenever you are about to use a multimeter, start by turning off the power to the circuit you are testing until you are ready to begin testing. This prevents accidental shocks and protects both you and the equipment. Additionally, if you are measuring voltage, it is crucial to discharge any capacitors in the circuit to avoid electric shock.
Multimeter Safety Rule 7: Use the One Hand Rule
When using a multimeter, try to adhere to the "one hand rule." This means using only one hand to make measurements while keeping the other hand away from the circuit and other conducting objects. By doing so, you minimize the risk of creating a path for electric current through your body. This will not always be possible, especially when the contact points are far apart, but following this rule wherever possible will be very important.
Multimeter Safety Rule 8: Avoid Overloading
Each multimeter has its limits in terms of current, voltage, and resistance that it can safely measure. Exceeding these limits can damage the multimeter or compromise your safety. Before making any measurements, ensure that you are within the specified range of your multimeter.
Multimeter Safety Rule 9: Never Leave The Multimeter Unattended
It is crucial to remain attentive and never leave your multimeter unattended when it is connected to a circuit. Unattended multimeters can be accidentally knocked over, resulting in short circuits, damage to the multimeter, or even electrical fires. Always disconnect the multimeter and store it safely when not in use.
Multimeter Safety Rule 10: Utilize Proper Storage and Maintenance
To prolong the lifespan of your multimeter and maintain its safety, proper storage and maintenance are essential. Store your multimeter in a clean, dry, and dust-free environment. Regularly clean the probes, remove any dust or debris, and inspect the device for any signs of wear and tear.
Common Errors To Avoid While Using a Multimeter
Even the most seasoned professionals still make mistakes sometimes. When using a multimeter, try to avoid these very easy to make mistakes below:
- Not Selecting the Correct Measurement Range
- Not Zeroing the Multimeter
- Improper Connection and Contact
- Ignoring Safety Precautions
- Measuring Voltage in a Live Circuit
- Forgetting to Account for Internal Resistance
- Rushing and Misinterpreting Readings
Common Multimeter Error 1: Not Selecting the Correct Measurement Range
One of the most frequent errors when using a multimeter is not selecting the appropriate measurement range. Multimeters have various ranges for voltage, current, and resistance, and using the wrong range can lead to inaccurate readings or even damage the multimeter. To avoid this mistake, start with the highest range and gradually decrease it until you obtain a precise measurement. Always ensure that the selected range can handle the expected values to obtain reliable results.
Common Multimeter Error 2: Not Zeroing the Multimeter
Another common error is neglecting to zero the multimeter before taking measurements. Zeroing the multimeter helps eliminate any offset or residual readings, ensuring accurate measurements. To zero the multimeter, set it to the appropriate range and touch the test leads together. Adjust the zero adjustment knob or press the zero button if available. By zeroing the multimeter, you establish a baseline reference for accurate measurements.
Common Multimeter Error 3: Improper Connection and Contact
Accurate measurements with a multimeter require proper connections and good contact between the test leads and the circuit or component being measured. Failing to establish a secure connection can lead to fluctuations in readings or intermittent measurements. Always ensure that the test leads are securely plugged into the appropriate jacks and that the probes make solid contact with the test points. A loose or poor connection can introduce errors and affect the measurement accuracy.
Common Multimeter Error 4: Ignoring Safety Precautions
Using a multimeter involves working with electrical circuits, which can be hazardous if proper safety precautions are not followed. Neglecting safety measures is a common error that can result in electric shock or damage to the multimeter. Always remember to disconnect the circuit from the power source before making any measurements. Use insulated test leads and keep your fingers behind the protective barriers on the probes. Familiarize yourself with the specific safety guidelines provided in the multimeter's user manual.
Common Multimeter Error 5: Measuring Voltage in a Live Circuit
Attempting to measure voltage in a live circuit is a significant error that can pose serious risks. It is crucial to remember that multimeters are not designed to measure voltage in live circuits directly. Always turn off the power and discharge any capacitors before connecting the multimeter. By measuring voltage in a live circuit, you risk damaging the multimeter and, more importantly, endangering yourself.
Common Multimeter Error 6: Forgetting to Account for Internal Resistance
Multimeters have internal resistance that affects the measurements, especially when measuring current. Forgetting to account for this internal resistance can lead to incorrect current readings. Most multimeters have a low internal resistance in the voltage and resistance measurement modes, but when measuring current, it's essential to select the appropriate current range and consider the multimeter's internal resistance. Consult the multimeter's user manual to determine the internal resistance and compensate for it when necessary.
Common Multimeter Error 7: Rushing and Misinterpreting Readings
Accuracy and precision require patience and attention to detail. Rushing through measurements or misinterpreting readings can lead to errors. Take your time and ensure that the multimeter stabilizes before recording a measurement. Some measurements may require a longer settling time, especially when measuring resistance or capacitance. Carefully observe the multimeter's display and note down readings accurately to avoid any misinterpretation.
What's Next: The Definitive Guide to Multimeters
With a full understanding of how to use multimeters to their fullest extent, the next logical conversation is how to best take care of multimeters when they are not in use.
In the next section, we will dive into how to give your multimeter the care it deserves, from proper storage tips to proper handling. Lets get started and head to Section 15: Maintenance and Care of Multimeters.
ISO/IEC 17025 Accredited Multimeter Calibration
Fox Valley Metrology proudly offers accredited precision measuring instrument calibration services of Multimeters. We calibrate all types of Multimeters at our offices throughout the country, meaning we are sure to have local Multimeter calibration services near you.
- ✓ ISO 17025 accredited calibration vendor
- ✓ Broadest calibration scope in the industry
- ✓ 3-5 day turnaround time for laboratory calibrations
- ✓ Pickup and delivery service options available
- ✓ Onsite calibrating service options